10/30/2019

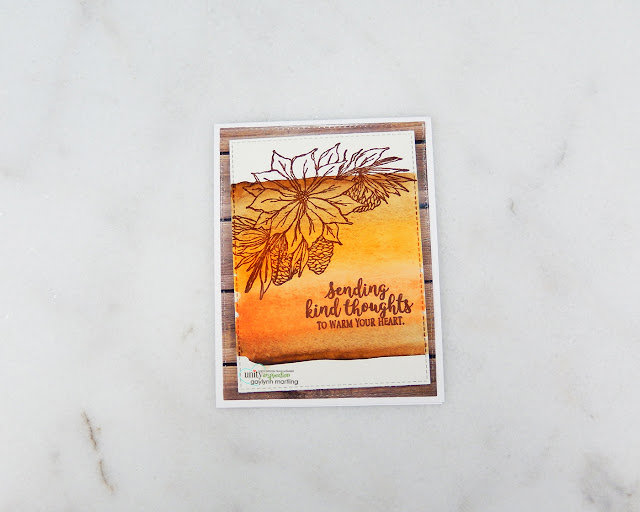
Ombre watercolor floral stamped card and video.

For Technique Time at Unity, I am sharing an ombre watercolor card with floral stamping.  It is great for Fall or most any time of the year.


Sentiment:
Sending kind thoughts to warm your heart.


This is an ombre watercolor card that includes stamping onto part of the watercolor and partially off of the watercolor.  This makes a pretty offset to add interest.

Here are helpful tips for creating this ombre watercolor floral card.  To begin, I pre-cut all of the layers, including the watercolor panel.  Then, watercolor was added, one color at a time.  I alternated colors from light to dark in watercolor lines.  Next, the dried watercolor panel was stamped partially on the watercolor section and partially off of it.  Finally, to finish, everything was layered onto the card base.


I made a quick video tutorial showing the process for this project.
{{Please subscribe to my video channel and like this video.  Many thanks.}}
YouTube:  Gaylynn NeatThingsBtq


Here is a closer look.


I am including this in the
Simon Says Stamp Wednesday Challenge ~ Anything Goes


Supplies:  Unity Stamp Co. Whatever Keeps You Warm and Rustic Wood {paper pack}; Sakura Koi watercolor, paintbrush, Canson watercolor paper, Ranger archival ink in coffee, Altenew palette mat, My Favorite Things dies, heat tool, foam tape and mini Misti.

Be sure to visit the Unity blog for the entire article and tutorial.
Also, you can find my other features at Unity's
Technique Time and
Watercolor Wednesday.


Have a great day.
Gaylynn

10/28/2019

Ornament builders and second generation stamping card.

Here is a card and video showing how to mix and match ornament builder stamps for card making plus second generation stamping.


Sentiment:  Peace on earth.


I began by cutting the background layers from white and silver cardstock.  Then, I stamped the pine leaves.  The second generation stamping technique was used to stamp the leaves.  Next, the ornament pieces were arranged and stamped onto clear cardstock using VersaMark ink.  (I recommend using clear cardstock made for heat embossing to prevent warping.)  Blue embossing powder was applied and heat embossed.  I die-cut the ornaments and extra circle cut ornament layers for reinforcement.  To finish, everything was layered and assembled.

I made a quick video tutorial showing the process for this project.
{{Please subscribe to my video channel and like this video.  Many thanks.}}
YouTube:  Gaylynn NeatThingsBtq


Here is a closer look.


Supplies:  Unity Stamp Co. Ornament Builders {Set 1 and Set 2}, Winter Blessings and A Time Of Peace; foam tape, use clear cardstock made for heat embossing, My Creative Time dies, original misti, My Favorite Things rectangle dies, VersaMark, MSC blue embossing powder, heat tool, adhesive gems, Pop Dots, Ranger archival ink in watering can and silver cardstock

Thanks for visiting.
Gaylynn

Birthday Card ~ My Creative Time Manly Monday

Today, the My Creative Time team is sharing Manly Monday projects.  I am always in need of masculine birthday cards.   So with a few supplies on hand, this card was created.


Sentiment:  Happy birthday.

For a masculine theme, I chose a zig zag die-cut card overlay.  I used navy blue for the background with yellow and silver card accents.  This will work for a guy or a gal, I think.

Here is another look.


Supplies:  My Creative Time Zig Zag Background Die, Baby Cake Dies, Money Envelope dies and Stitched Chevy Dies; cardstock, Pop Dots, Ranger multi medium matte glue and silver cardstock.

Please visit Emma's My Creative Time blog for more inspiration.

Thanks for visiting.
Gaylynn

10/27/2019

One tone coloring ~ Holiday snowman card and video.

Today, I am sharing a holiday card featuring the cutest snowmen using one tone coloring.  I used a bit of patterned paper also.


Sentiment:
Wishing you and yours a magical holiday season and wondrous new year.


For this card, I used a large snowman background stamp but used only half of the stamped panel.  I trimmed a wavy edge using a die-cut.  The background for the other side of the card is from Unity's patterned paper.  I love the mix of colors and patterns in this.  For a bit of one-tone coloring, I used Copic markers and then used ink blending for the sky.  It was very quick and easy to make.

Here is a closer look.


Supplies:  Unity Stamp Co. Brisk Salutations, Cheerful Prancing and Rustic Textiles {paper pack}; distress ink in peacock feathers, foam tape, blending makeup brush, mini mister, My Creative Time More Stitched Edges dies, Copic markers BG32, B01, BG10; Simon Says Stamp intense black ink for alcohol markers.

Thanks for visiting.
Gaylynn

Apple blossom holiday card with glitter, Copics and microbeads.

Today, I am sharing a holiday card featuring apples, apple blossoms, Copic coloring and microbeads as accents.


Sentiment:
May the peace and joy of the season be with you all year long.


This card was made in a few steps.  I trimmed a panel for the stamping.  Then I made a handmade frame using nesting die-cuts on copper glitter paper.  The color was added to the apples and apple blossoms.  And then, for texture detail, I adhered copper microbeads.

I made a quick video tutorial showing the process for this project.
{{Please subscribe to my video channel and like this video.  Many thanks.}}
YouTube:  Gaylynn NeatThingsBtq


Here is a closer look.


Supplies:  Unity Stamp Co. Winter Apple Blossom; foam tape, Copic markers 0, E33, E18, R02, R27, Y02, Y21, YG03, G21, G99; Simon Says Stamp intense black ink for alcohol markers, My Favorite Things die-namics, MSC microbeads, copper glitter paper and Ranger multi media matte glue.

Thanks for visiting.
Gaylynn

10/26/2019

Bible journal art with stamping and Copic markers.

Hi there.  Today, I am sharing a bit of art for my bible journal page.  I use stamping along with Copic markers.


Sentiment:
Trust in the Lord with all your heart,
and lean not on your own understanding.
Proverbs 3:5


Sometimes, I like to extend my papercraft projects to other things, like bible journaling.  I have found that stamping and inks can be challenging to use on the thin bible pages.  One of my favorite ways to add art to the margins of my bible journal is by stamping and coloring on cardstock.  Then, cutting out the art to adhere to the page.
I love this girl with rosaries and the inspirational message.  I knew it had to be part of my journal.

{See my bible journal tab for links to my other bible journaling projects and tutorials.
I share ways to incorporate art and stamping with bible journals, regular journals or planners.}


I made a quick video tutorial showing the process for this project.
{{Please subscribe to my video channel and like this video.  Many thanks.}}
YouTube:  Gaylynn NeatThingsBtq


Here is a closer look.


This is the bible journal that I use, but there are many varieties available with margins for writing and art.


Supplies:  Unity Stamp Co. My Heart Trusts; waterproof ink, Copic markers BG18, BG32, YR00, E00, E11, E33, E13, E44, R32; My Creative Bible KJV.

Thanks for visiting.
Gaylynn
10/25/2019

Tis the season holiday frog watercolor card.

Today, I am sharing a holiday watercolor card with a cute little frog.  It is framed in gold glitter.


Sentiment:  'Tis the Season.

This little frog is sporting a Santa hat.  For the frog colors, I used Copics.  The frame was die-cut using gold glitter paper.  And, the background is watercolor.    This was fun and easy to do, using a mix of color mediums.


I made a quick video tutorial showing the process for this project.
{{Please subscribe to my video channel and like this video.  Many thanks.}}
YouTube:  Gaylynn NeatThingsBtq


Here is a closer look.


Supplies:  Unity Stamp Co. Cuddlebug Frog; Ranger watercolor paper and multi media matte glue, Sakura Koi watercolor, My Creative Time stitched squares inside & out dies, Copic markers R02, R27, 0, W3, B0000, G21; gold glitter paper and a heat tool.

Thanks for visiting.
Gaylynn

10/23/2019

Embossed ombre tag and money envelope + video.

For Technique Time at Unity, I am sharing an embossed ombre tag and money envelope.  I use a mix of stamping and heat embossing.


Sentiment:  Merry Christmas


Here is a holiday gift wrap idea.  For those who want cash for Christmas, a decorated envelope and gift tag makes a nice presentation.

Here are helpful tips for creating the ombre tag and money envelope.  To begin, I pre-cut an envelope panel and a vellum panel for stamping.  I used a die-cut money holder envelope, but an existing solid envelope works.  The gray envelope panel was stamped with background strips and heat embossed in white.  Next, the vellum was stamped and heat embossed using three shades of ColorBox ink.  This creates an ombre tag and money holder accent.  Then, the vellum was trimmed and made into a tag.  Finally, to finish, adhesive gems were added and then everything was layered onto the envelope.


I made a quick video tutorial showing the process for this project.
{{Please subscribe to my video channel and like this video.  Many thanks.}}
YouTube:  Gaylynn NeatThingsBtq


Here is a closer look.


Supplies:  Unity Stamp Co. Say It Big {Holiday} and Background Builders {Set 1 and Set 2}VersaMark ink, Clearsnap ColorBox ink, PTI vellum cardstock, Wonder tape, My Creative Time money envelope die, adhesive dots, white and clear embossing powder, heat tool, EK powder tool, Original Misti.

Be sure to visit the Unity blog for the entire article and tutorial.
Also, you can find my other features at Unity's
Technique Time and
Watercolor Wednesday.


Have a great day.
Gaylynn

Mini Note Pad Holder ~ MCT 3-D Wednesday

Today, the My Creative Time team is sharing 3-D projects.  I wanted to make a holiday stocking stuffer using a mini note pad wrap.


Sentiment:  Ho HO Ho

This was super easy and quick to make.  The note holder die was cut in just one pass.  It wraps perfectly around a 2" x 2" sticky note holder pad.  I used holiday patterned paper from my stash and topped it with the fun sentiment.  


Supplies:  My Creative Time 2 x 2 Note Holder Die and Ho Ho Ho die; BasicGrey Nordic Holiday (retired) paper and a 2x2 inch post-it note pad.

Please visit Miss Emma's My Creative Time blog for more inspiration.

Thanks for visiting.
Gaylynn

10/19/2019

Set of quick and easy holiday gift tags with layers.

Here is a set of coordinating holiday gift tags, made quick and easy with layers.  These are great for holiday gift wrapping, party favors, wine bottle tags or table decor.


For these tags, I made them in steps and with no coloring.  First, I die-cut and trimmed all of the tag layers from patterned paper, cardstock and StazOn ink.  Then I stamped the icons and sentiments to make little scenes.  The stamping on white was fussy cut and added to some of the tag pieces.  I adhered and layered everything and then twine, stars and hearts were added to finish.

I made a quick video tutorial showing the process for this project.
{{Please subscribe to my video channel and like this video.  Many thanks.}}
YouTube:  Gaylynn NeatThingsBtq


Supplies:  Unity Stamp Co. Joy and ThingsKrafty Season {paper pack}Gina K Designs jet black amalgam ink, StazOn ink, Ranger multi media matte glue, white and kraft color cardstock, twine, MFT die-namics and foam tape.

Thanks for stopping by.
Gaylynn

Set of 3 holiday watercolor cards with ink smooshing.

Here is a set of three coordinating holiday greeting cards made using vintage watercolor ink smooshing.


For these cards, I first stamped onto watercolor paper, arranging the stamps to make three scene panels.  For a vintage look, I added neutral tones of watercolor using an ink smooshing technique.  The patterned strips background was stamped on kraft paper using white ink and left to dry.  I prepared layers for three cards and pretrimmed all of the panels.  Once dry, I layered and assembled the cards.


I made a quick video tutorial showing the process for this project.
{{Please subscribe to my video channel and like this video.  Many thanks.}}
YouTube:  Gaylynn NeatThingsBtq


Here are more of the cards.


Supplies:  Unity Stamp Co. Holly Jolly Critters, Joy and Things, Background Builders Seasonal Set One and Set Two, Christmas Linen {paper pack 1 and pack 2}; Gina K Designs jet black amalgam ink, Canson watercolor paper, Mini Misti, Ranger mini mister, twine, ColorBox ink, MFT die-namics, Zig clean color real brush markers 064, 072 and 067, Altenew small palette mat, heat tool and foam tape.

Have a fabulous day.
Gaylynn

10/18/2019

Holiday Cards ~ MCT 96th Edition Release, Sale and Blog Hop

Hello, it's Gaylynn here.  The My Creative Time 96th Edition release, sale and blog hop has begun.
You may have arrived from Emily's blog.


Sentiment:  Merry Christmas

Today, I am sharing two winter-themed Christmas cards.  These feature the new snowflake tag die and the Christmas tree tag die.  I decided that I wanted to make each with a little scene inside and use them as card embellishments.  They are in the colors of light blue, silver foil and white.  The background was stamped with a small accent stamp from the Halloween Fun set using gray ink.  I repeated the stamping for that section to get a contrasting background.  I love how they turned out.

 *** BLOG HOP GIVEAWAY ***
For our blog hop giveaway, Emma is giving away a $25 gift card to the "My Creative Time" store to ONE LUCKY winner! ALL you have to do is leave a comment on each of our blogs! You are NOT required to comment on EVERY SINGLE blog, but the more you comment on, the MORE chances you have for winning! VERY IMPORTANT, PLEASE leave a way for us to contact you w/your comment just in case "YOU" are the lucky winner!


*** SALE ALERT ***
ALSO, DON'T FORGET our sale starts RIGHT NOW HERE! Use the code: OCT2019 to receive a 15% discount off your entire purchase! This sale applies to "IN-STOCK" items ONLY. This sale will end on Friday, October 25, 2019 at midnight PST.


***FREEBIE***
Starting Friday, October 18, 2019 at 8am PST we will be giving away this ADORABLE new "HO HO HO die". This new die will be given to the FIRST 25 shoppers! If you are one of the 1st 25 shoppers it will automatically be added to your package at the time of packing/shipping. Once 25 shoppers come through, this die will be available for purchase! So, if it's available in the store, you are not one of the 25. No exceptions will be made. This freebie is not part of the "Bundle" and will be sold separately!


Here are my sneak peek blog projects from this release.
Day 1


Day 2
Day 3


Here is the other card with the same layout.


Supplies for today's project: My Creative Time Snowflake Tag Dies, Christmas Tree Tag Dies, MoneyHolder Dies, Floating Cloud dies and Halloween Fun; Ranger archival ink in watering can, silver foil cardstock, PPP small droplets, Ranger multi medium matte glue and foam tape.

Hop along with us.
Your next stop in the hop is Jessica's blog. The entire blog hop lineup is on Emma's My Creative Time blog. Thanks for visiting. I look forward to your comments. Gaylynn


10/17/2019

Money Holder ~ Day 4 MCT 96th Edition Sneak Peeks

Hello, it's Gaylynn.  Here is a sneak peek of the My Creative Time 96th Edition release.  Today, I am sharing a handmade money holder for the holidays.


Sentiment:  Merry Christmas

This is a holiday themed money holder.  It is a fantastic gift wrap idea for those who prefer good ol' cash as a gift.  I included the pretty Christmas die-cut sentiment along with the festive Santa hat.  The money holder envelope fits cash perfectly.  It was die-cut from a retired holiday 12" x 12" paper pad from my stash.  
I love the silver, red and white combination.  I can tell that this is going to be used a bunch for many occasions.

***Sneak Peek Giveaway!***
 We will be giving away the sets we are showcasing each day to ONE lucky winner! For example, the set we are showcasing on Wednesday, Emma will announce the winner of that on Thursday, and the sets we are showcasing on Thursday, Emma will announce that winner on Friday on the MCT blog! ALL you have to do is leave a comment on each of our blogs! You are NOT required to comment on EVERY SINGLE blog, but the more you comment on, the more chances you have for winning! VERY IMPORTANT, PLEASE leave a way for us to contact you w/your comment just in case "YOU" are the lucky winner! For EXTRA entries, you can spread the word about this release on Facebook, tweet about it OR even Instagram it! #mycreativetime! GOOD LUCK EVERYONE, and let's start spreading the word!

Supplies: My Creative Time Big Santa Dies and Money Holder Dies; MSC paper (retired), cardstock, foam tape, Ranger multi medium matte glue and Wonder Tape; twine.
More sneak peeks are on Emma's My Creative Time blog. Thanks for visiting. I look forward to your comments. Gaylynn