Showing posts with label interactive. Show all posts

6/10/2023

Masculine Dodge Charger Classic Car Card

 For the person who loves classic cars, this card would be perfect.  It features what I think is a Dodge Charge in orange.  The best part is that it wobbles with an interactive element.


Sentiment:

To that guy who always keeps it classy.
They don't make 'em like you anymore!
Old is the new cool.

I like the sentiments as much as the car.  The guys need cards too!

5/09/2023

Watercolor graduation wobble card.

Hello and welcome.  Here is another project for the Unity blog. I have a watercolor graduation wobble card with a bit of humor.  This one was made simple for a guy or gal.


Sentiment:  Nice hat.  Congrats.

For this card, I only used the cap at the stamp focus along with a fun sentiment.

1/18/2023

Coffee Break Watercolor Interactive Gift Card Holder

  Hello.  How about a card and gift card in one?  This is a watercolor coffee themed interactive gift card holder.  These always make a great presentation for the receiver.


Sentiment:  Take a little coffee break.

This would work for coffee or tea, just by changing out the sentiment.  It is a perfect gift for many occasions like thank you, birthdays, teacher appreciation, friendship and more.

12/02/2022

Tag Card ~ Day 5 My Creative Time 5 Days of Christmas

 Hello, and welcome to the My Creative Time "5" Days of Christmas"! This week we will be sharing with you lots of last-minute Christmas ideas, such as cards, tags, treat holders, gift card holders and whatever else comes to mind that will help YOU get your creative juices flowing for the holidays! Just leave your comments on each of our blogs!

Today is Day 5 of our 5 Days of Christmas! We all will be showcasing our own project of choice!


Sometimes, I like to use a gift tag on a greeting card.  It always add interest and some dimension.  This one is extra nice as it has a flap that opens and closed on the card front.

6/29/2022

Interactive pop-up card technique ~ bird theme

 Hello.  Today, on the Unity blog, I am sharing an interactive pop-up card technique featuring a fun bird on the inside and on the outside.


Sentiment:  
Oh hello!  Miss you like crazy.

I made a quick video tutorial showing the process for this project.

{{Please subscribe to my video channel and like this video.  Many thanks.}}


Almost any pop-up element cut-out can be used with many different stamps to create a similar interactive pop-up feature inside of a greeting card.

1/26/2022

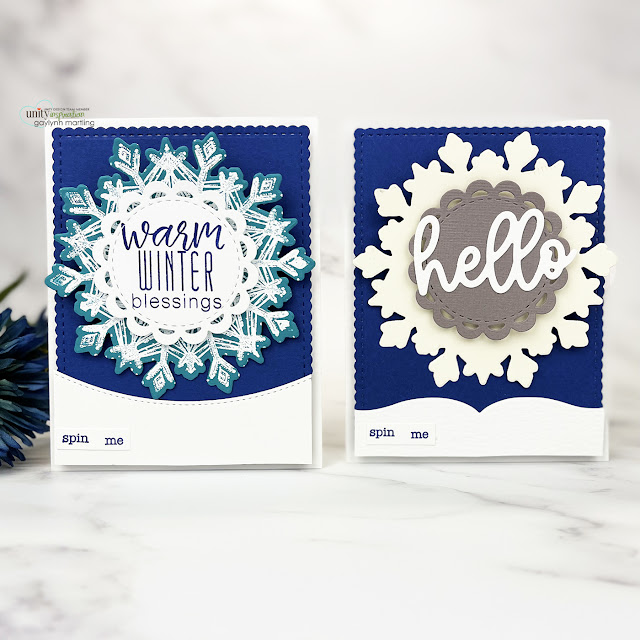
2 Spinner cards using a brad ~ Spin around card technique

    Hello.  Spinner cards using a brad are fun to make and to receive.  Today, I am sharing one technique for making interactive spin around cards.


Sentiments:
Hello.
Warm winter blessings.

For these two spinner cards using a brad, the moving element is used in a creative way to provide fun interactive spin around results.  The spin card is best if hand-delivered instead of mailing unless it is mailed in a protective package.

1/18/2022

Heart Shaker Valentine Card ~ Day 2 MCT 117th Edition Sneak Peeks

  Hello, it's Gaylynn.  The My Creative Time 117th Edition release and sale is coming up on Friday.  But for today, the team is sharing adorable Day 2 sneak peeks, just in time for Valentine's Day.


Sentiment:
Happy Valentine's Day.
You make my heart smile.

This is a sweet and cute heart shaker card featuring a little gingerbread girl.  I used some cut-out hearts and sequins for the inside of the heart.  Added watercolor hearts were cut from a previous watercolor scrap that I had on hand.  Extra hearts were made from a few of the die sets noted below.  The colors were kept in the pink family with tan accents for the sentiment and the gingerbread girl.

1/12/2022

Interactive wobble pun card + background stamping techniques

  Hello.  Interactive wobble card making adds a surprise element for the recipient.  Today, on the Unity blog, I am sharing this super fun technique which is always well received.


Sentiment:  Hope your birthday is loads of fun.  Rinse.  Spin.  Drain.

Here, I made a cute interactive wobble pun card with a washing machine element along with a coordinating stamped background.

I made a quick video tutorial showing the process for this project.
{{Please subscribe to my video channel and like this video.  Many thanks.}}

11/08/2021

Friendship 4x4 Shaker Card ~ MCT Made In Minutes

 Hello.  The My Creative Time design team is sharing projects which are made in 30 minutes or less.  Today, I am sharing a friendship mini 4x4 square shaped card with easy layers.


Sentiment:  Friend

For this card, I made the background into a shaker with stars and hearts confetti glitter inside.  I used MCT dies for all of the layers with no coloring involved.

10/01/2021

Tree Shaker Card ~ MCT 114th Edition Blog Hop, Release & Sale

  Hi, it's Gaylynn.  The My Creative Time 114th Edition release, sale and blog hop has begun.  The design team is sharing project inspiration on our blogs.  Please visit each blog in the blog hop and leave a comment on each of the release posts.

For the blog hop, you may have arrived from Emily's blog.


Sentiment:  Merry Christmas.

For this holiday card, I used two Christmas trees, one being a shaker element filled with sequins and confetti.  The tree pieces were die-cut and the front tree includes ink blending for the background.  Then the shaker was assembled.  Finally, I layered the two trees and a sentiment tag onto the card base, to finish.

9/21/2021

MFT 2021 Card Design Superstar Challenge ~ Innovative Master

 Hello.  Gaylynn here.  Today's card was made exclusively for the My Favorite Things 2021 Card Design Superstar Challenge in the category of Innovative Master.


Sentiment:
I will always be here for you.

This sweet slimline card was made using the wonderful slimline die-namics, including the Slide In coordinating dies.  This allows for a fun slider tag card with a pull tab.  It makes a great tag element, slimline style.  For this card, I used the sweet elephants on the front and on the inside.  For the front, I used Copic markers in soft colors.  And for the background gray panel, I heat embossed an elephant, balloon and butterflies in white.  For a hint of color, I added touches of color pencils in blue and gray shades for the inside.  These two panels were placed over the slimline card base.
This white card base was cut at 8 1/2" x 7" and scored at 3 1/2".

Here is another look when the slider panel was pulled upward.


Supplies:

{FTC: Some links include affiliate links. I may receive a small commission for the referral but at no cost to you. Also, I am a participant in the Amazon Services, LLC Associates Program, an affiliate advertising program designed to provide a means for me to earn fees by linking to Amazon.com and affiliate sites. If you want to learn more about a product that I used here or to purchase it, the link is available to click on. It would make my day if you would do so.} Featuring MFT Stamps: Adorable Elephants Stamps Adorable Elephants Die-namics Slimline Starter die-namics Slimline Slide In die-namics Interactive Labels Card stock in cement gray and sno cone Extreme black hybrid ink Also, Copic markers C1, N1, N3, B14, B00, R20, Y08, YG0000 White embossing powder Prismacolor color pencils PC1060, PC938, PC1051, PC1063, PC904, PC1023
Misti


This project was created exclusively for the
Thank you for visiting.

Gaylynn

8/05/2021

Ocean Box Card ~ MFT Camp Create 2021 Day 5 Delightful Die Cutting

 Hello.  Gaylynn here.  I am participating in the camp projects.  For today, the theme is delightful die-cutting.  I decided to make a tropical box card using interactive dies and sea life icons.


Sentiment:  I love you deeply.

Here are tips for making this card.  To begin, die-cut and assemble the box card.  For added ocean elements, add pieces of wave die cuts for the inside section.  Stamp and place the sentiment label on the front.  Next, stamp, color and die-cut the sea life and background accents.  Finally, adhere all of the sea life and elements into the box card, to finish. 

I made a quick video tutorial of this box project, but MFT has other examples of options for assembling the box cards.  This card flattens to fit into an A2 size envelope.


Here is another look.


The full project video tutorial with included project reference guide is part of my card making class here:
12 Interactive & 3-D Cards Bundle 3.


Supplies:
My Favorite Things Outside The Box Level Up, Ocean Waves die-namics, Under The Sea die-namics, Sweet Safari stamps, Sweet Safari die-namics, Friends With Fins stamps, Friends With Fins die-namics, card stock in Prickly Pear, Fire Coral, Caribbean Sea, Summer Splash, Sno Cone; Extreme Black hybrid ink pad.
Also, Copic markers BG13, BG11, BG32, E57, Y17, BV23, C0, C4, C2, C8, BG72, C6, Y12, YG17, G43, YG61, YG0000.


MFT Camp Create ~ Day 5 Delightful Die Cutting


Please visit the My Favorite Things blog for more inspiration.

Thank you for visiting.

Gaylynn

7/15/2021

Open framed window gnome card inside & out ~ card tutorial

Today, I am sharing a cute open framed window card featuring an adorable gnome.  This one has a get well theme.


Sentiment:
Get well wishes for a friend like gnome other.

Helpful tips:

To create this card, begin by stamping onto the front of an A2 4 1/4" x 5 1/2" folded card front.  Stamp the gnome and the sentiment using Copic friendly ink, with enough room to cut out the gnome portion.  Next, die-cut the gnome from the stamped portion only on the front card panel.  Also, nesting two square layering dies together over black cardstock creates a frame to use at the end.  Then, remove the gnome die-cut piece and color in the stamping.  I used Copic markers.  Next, place the gnome piece inside of the open frame of the closed card base to adhere it to the inside panel.  Then, using glue, carefully adhere the black frame around the open front card panel.  Finally, to finish, reinforce the bottom front panel with a strip of heavy cardstock.  My video will show the process.

Here is a look at the closed card front.


And here is a view of the inside of the card.


I made a quick video tutorial showing the process for this project.
{{Please subscribe to my video channel and like this video.  Many thanks.}}
YouTube:  Gaylynn NeatThingsBtq


 Supplies:
Unity Stamp Co. stamp set called Oops...Ghome You Didn't. 
Also, flat double-sided tape, MFT in & out stitched rounded square STAX die-namics, Simon Says Stamp fog cardstock, Ranger multi medium matte glue, tweezers, Copic markers R27, R24, R02, E57, E35, E31, E21, E51, Y00, BG32, G00. 
 
Thank you for visiting. 
Gaylynn


5/02/2021

Double fold floral card tutorial + Unity stamps, paper & dies

 For today, I am sharing an interactive double fold card tutorial.  This one features florals from stamping and from patterned paper.

Sentiment:  Let life unfold, Beautiful.


Helpful tips:

Here are helpful tips for making this interactive double fold card.  First, trim and score the card base, the inside fold and the patterned paper pieces.  Next, stamp and watercolor the flowers onto the smooth side of watercolor paper.  Then, fussy cut (cut out) the flower and the stamped front sentiment.  Also, stamp, die-cut and layer the inside beautiful sentiment onto the inside of the small fold piece.  Next, assemble the layers to make a left fold and a right fold.  Finally, layer the papers, the flower and the outer sentiment, to finish.
A2 card base cut 8 1/2" x 4 1/4, score 5 1/2".
Background paper cut 5 1/4" x 4".
Front trim cut 4" x 2 3/4".
Left fold mini card layer, cut 8" x 3", score 4".
 
Here is another look:


Also, cardstock, scissors, scoring board, Fiskars paper trimmer, Altenew watercolor, Ranger watercolor paper, My Favorite Things premium dye ink in poppin' pink.

Thank you for visiting.
Have a beautiful day.


4/24/2021

Pop-up and wobble 2 interactive cards ~ 2 ways

 For today, I am sharing interactive cards, two ways.  This set features a laptop computer as a pop-up card and another as a wobble card.


Sentiments:

Virtual Hugs
Happy Father's Day

Interactive cards are always well received and unexpected.  They are fun to make and to receive.


Helpful tips:
Here are helpful tips for making these two interactive cards.  First, trim accent pieces of patterned paper for the card fronts.  Also, trim a full card length tan insert and another card insert from white cardstock.  I used black card bases to coordinate with the paper used.  Next, stamp and color two laptops.  Then fussy cut them. (cut out)  Layer the virtual hugs laptop and paper over the card front using an Action Wobble spring.  For the Father's Day laptop, make a pop-out cut into the long liner insert.  I used a die-cut over the score line.  (see the video)  Next, adhere the long liner inside of the card base.  Then, adhere the second laptop to the bottom fold of the pop-out cut.  Finally, layer paper and ribbon on the second card front, to finish.
 

Here is another look:


Supplies:  Unity Stamp Co. Virtual Hugs and Farmhouse Plaid {paper pack}.
Also, My Creative Time stitched pop-up dies, double-sided paper, cardstock, ribbon, action wobble, scissors, Copic markers C1, C3, 0, W5, W3, 100; scoring board, paper trimmer.

Thank you for visiting.
Enjoy your day.


3/19/2021

MCT 109th Edition Release & Blog Hop ~ Plants

 Hello, it's Gaylynn.  The My Creative Time 109th Edition release, sale and blog hop has begun.  For the blog hop, you may have arrived from Emily's blog.


Sentiment: 
Can't wait to hang out again!

This shaker card was fun to make.  I layered a few cuts from the tag dies and stacked them with sequins inside to make an interactive shaker card.  A frame of gold glitter was added.  The layered potted plant was placed on the top layer along with the sentiment.  To finish, I added marker dots in coordinating colors of blue and yellow to accent the card colors.

 *** BLOG HOP GIVEAWAY ***
Leave your comments on each blog for a chance to win a $25 Gift Card to the My Creative Time store. One lucky winner will be chosen and noted on the MCT blog! GOOD LUCK my friends! (Please don't forget to leave a way/email for MCT to contact you, if you were to be one of the lucky winners.) 

Here is a closer look at my card.


*** SALE ALERT ***
DON'T FORGET our sale starts RIGHT NOW HERE! Use the code: MAR2021 to receive a 15% discount off of your entire purchase! This sale applies to "IN-STOCK" items ONLY. This sale will end on Friday, March 26, 2021, at midnight PST.

Here are my sneak peek blog projects from this release.

Supplies for today's project: My Creative Time I'm Rooting For You, Plant Dies, Tall Tag Frame Dies and Tall Tag Frame Die Layers; gold glitter paper, cardstock, Papertrey Ink clear cardstock, Ranger multi medium matte glue, flat and foam double-sided tape, sequins and Ranger jet black ink pad, Copic markers B05 and Y23.

Hop along with us.

Your next stop in the hop is Ginger's blog. The entire blog hop lineup is on the My Creative Time blog.

Thanks for visiting and hopping along. I look forward to your comments.

Gaylynn

3/10/2021

Tulip Flowers Scene Girl ~ Easel Card Tutorial

 For Technique Time, I am showing a way to make an easel card that includes an outdoor scene.  In this tutorial, no dies are used.


Sentiment:  Hi.

An easel card technique is a great way to add interest and dimension to a handmade card.  It is interactive and is includes pretty scene building.


Helpful tips:

Here are helpful tips for creating this easel card scene.  To begin, stamp the girl, the flowers and the sentiment.  Next, trim and score a card base and a mint color frame panel.  Then, trim a cloud panel and a bottom trim.  Also, add color to the girl and flowers and then fussy cut (cut out) the girl and the flowers.  I used a circle punch for the sentiment.  Next, add light ink blending in two colors onto the cloud panel using a cloud stencil.  Finally, adhere the scored green panel onto the card base and add the accent layers to finish the easel card.

A2 card base:  Cut 11" x 4 1/4" and score at 5 1/2".
Mint frame layer:  Cut 10 1/4" x 4" and score at 5 1/2" and 7 3/4".
Cloud layer:  Cut 5" x 3 3/4".
White front strip:  Cut 3 3/4" x 2 1/4".


Here is another look.


Supplies
:
Also, foam and flat double-sided tape, cardstock, Misti, Simon Says Stamp intense black ink, distress oxide ink in cracked pistachio and fossilized amber; 1 1/4" paper punch, scoring board, bone folder, Copic markers E44, E33, E71, E11, Y21, RV29, RV11, BG18, BG15, BG32, BG10.

    Thank you for visiting.
   Gaylynn


3/03/2021

Coffee or tea mug gift card holder + gold watercolor ~ tutorial

  For today, I am sharing my coffee or tea themed mug gift card holder, an interactive card that doubles as a gift surprise.  This also has touches of gold watercolor added.


Sentiment:  It's a mug hug.

This is a great way to send a card to someone with a surprise inside.  The card front flips open to reveal a gift card or money tucked inside.  Added gold watercolor provides shimmer to the card.

Helpful tips:
Here are helpful tips for creating this gift card holder greeting card.  To begin, stamp the mug and the sentiment onto watercolor paper.  I decided to stamp with embossing ink and heat emboss in gold, but stamping alone works also.  Next, trim or die-cut the card layers and a container for the gift card or money.  Then, add watercolor to the mug and to the top portion of the holder section.  Once dry, adhere the mug to the front flap of the gift card holder.  Then, layer everything onto the card front with extra accents added.


Here is another look.


Supplies:
Unity Stamp Co. It's A Mug Hug.
Also, foam and flat double-sided tape, cardstock, mini Misti, Ranger watercolor paper, My Creative Time Fancy Gift Card Holder Die, watercolor brush, Gansai Tambi Starry Colors watercolor, gold foil paper, Wow embossing pad, gold embossing powder, EK powder tool, heat tool, adhesive gems, gold cording.

Thank you for visiting.
Gaylynn

2/17/2021

Interactive slider card ~ mouse scene tutorial

 For Technique Time, I show a way to incorporate elements to make an interactive slider card with a mouse scene.


Sentiment:  Just wanted to say hello.

This is an interactive slider card with a cute mouse scene.  There is a lift tab and when pulled up the mouse scene lifts up to reveal the hello sentiment inside.

Helpful tips:
Here are helpful tips for creating this interactive slider card.  To begin, stamp a card front using the interactive verbiage stamp set.  I used the original Misti and stamped it onto an oversized cardstock piece.  Next, die-cut or trim around the scene panel to make a flip-up section.  Then, make a little scene with the mouse and a sentiment strip for the front.  Also, trim a lift panel to go behind the scene panel.  Assemble according to the video tutorial.  Finally, layer it all to allow the lift panel to move up and down on the card front.


And here are more views.


Supplies:
Also, foam and flat double-sided tape, cardstock, Original Misti, MFT extreme black ink, Ranger ink in cobalt, distress oxide ink pad in broken china; Wow embossing pad, MFT die-namics slider surprise, stitched scallop basic edges and a flag; Post-It tape, ink blending brush, Copic markers B26, B05, BG32, W1, W5, R20.

Thank you for visiting.
Gaylynn