Showing posts with label confirmation. Show all posts

9/01/2021

Paper layers, Unity stamps & Copic coloring ~ cross card tutorial

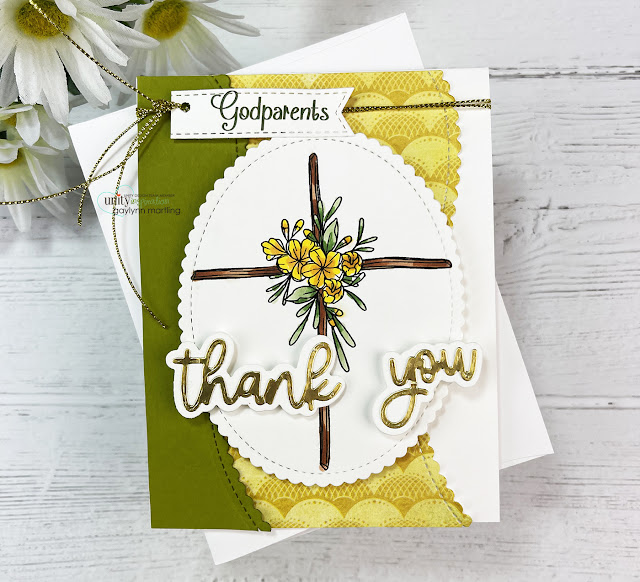
  Today on the Unity blog, I am sharing this bright and sweet cross card using paper layers, Unity Stamps & Copic coloring.


Sentiments:  Godparents.  Thank you.

Combining colorful paper layers, Unity stamps & Copic coloring makes card making easy and the design options are endless.


Helpful tips:

Here are helpful tips for using paper layers, Unity stamps & Copic coloring, for this card.  To begin, stamp the cross onto white cardstock using Copic friendly ink.  Next, die-cut or trim a cross panel, background paper accents and the thank you sentiment layers.  Also, stamp and trim a sentiment label for the top of the card.  (I printed the Godparents word but stamps will work also to fit your occasion.)  Then, color in the cross and the florals using coordinating colors to match the background paper.  Finally, layer it all using flat and foam double-sided tape plus add cording to the top of the card, to finish.

Here is another look.


I made a quick video tutorial showing the process for this project.
{{Please subscribe to my video channel and like this video.  Many thanks.}}
YouTube:  Gaylynn NeatThingsBtq


Supplies:

Also, flat and foam double-sided tape, Gina K. Designs connect glue, My Favorite Things card stock in prickly pear and gold shine, stitched mini scallop oval STAX die-namics, stitched scallop basic edges 2, essential stitched sentiment strips die-namics; May Arts gold cording, BasicGrey PB&J paper, Copic markers Y08, Y17, YR12, 0, E13, E39, YG67, YG61. 

Be sure to visit the Unity blog for the entire article and tutorial.
Also, you can find my other features at Unity's
Technique Time and
Watercolor Wednesday.

Thank you for visiting.

   Gaylynn
         

3/26/2021

Stenciling and ink blending mini slimline cross card tutorial

 Hi there.  Today, I am sharing a quick way to add a bit of color over stamping.  I used a stencil with distress ink blending for a mini slimline card and envelope inspirational set.


Helpful tips:
Here are helpful tips for creating this card.  To begin, stamp the cross onto cardstock.  Also, trim or die-cut all of the card layers and the card base.  I also made a handmade envelope that fits this mini slimline card using die-cuts.  I smaller white office-style envelope should work just fine.  Next, using a stencil and distress ink, blend dots of color in two shades.  No other coloring is needed.  Optional, samp dots or a simple background to accent the stamping.  Finally, layer it all to finish.

The card size assembled is approximately 3 1/4" x 5 1/2"

I made a video tutorial showing the process for this project.
{{Please subscribe to my video channel and like this video.  Many thanks.}}


Here is another look:


Supplies:  Unity Stamp Co. By His Wounds.
Also, My Creative Time cute card dies and cute envelope die; Ranger distress ink pads in squeezed lemonade and dried marigold plus jet black archival ink pad; ink blending brush, BasicGrey picadilly paper (retired), My Favorite Things card-sized confetti stencil, flat and foam double-sided tape, cardstock.

Thank you for visiting.
Enjoy your day.


3/24/2021

Cross in metallic gold stenciling prayers card tutorial

 Adding a bit of gold stenciling gives a card a pretty shimmer accent.  Today, on the Unity blog, I am showing one way to add stenciling using a wet embossing technique in metallic gold.


Sentiment:  Prayers

For this card, I added gold stenciling over the stamped floral background.  It adds the perfect touch along with added flower accents.


Helpful tips:

Here are helpful tips for creating this metallic gold cross inspirational card.  To begin, trim or die-cut the stamped layer and accents.  Next, stamp the floral background and extra flowers.  Also, fussy cut (cut out) the extra flowers.  Then, prepare a craft space for wet embossing using a plastic craft mat, a stencil, spatula and embossing paste.  Next, using embossing tools, spread an even layer of gold stenciling paste over the cross.  Once finished, clean off the paste from all tools immediately.  Then, allow the embossing to dry for at least one hour.  Once set, layer the card front.  To finish, accent with added flowers and a sentiment.

Here is another look.


I made a quick video tutorial showing the process for this project.
{{Please subscribe to my video channel and like this video.  Many thanks.}}
YouTube:  Gaylynn NeatThingsBtq


 Supplies:
Also, foam and flat double-sided tape, cardstock, mini Misti, Ranger archival ink in Viridian, My Favorite Things stitched scallop basic edges die-namics; My Creative Time more stitched rectangular dies, Dreamweaver metallic gold embossing paste, Simon Says Stamp prayers die, spatula, plastic craft mat.

Be sure to visit the Unity blog for the entire article and tutorial.
Also, you can find my other features at Unity's
Technique Time and
Watercolor Wednesday.

    Thank you for visiting.
   Gaylynn


3/18/2020

Spiritual card with water soluble oil pastels watercolor + ink smooshing

Hi there.  Today, I am sharing an inspirational cross card project using Prima water soluble oil pastels for watercolor and ink smooshing.


Sentiment:  Saved by Grace through Faith.

Here are helpful tips for using water soluble oil pastels as watercolor.  To begin, stamp then trim or die-cut all of the layers to fit your project.  Next, heat emboss the lace stamping in white over the lavender background panel.  Then, mix two colors of water soluble oil pastels with water using a mixing tray and a brush.  Have a plastic craft mat in place during watercoloring.  Add one color at a time to a piece of acetate and then move the color around to get a design you like.  Next, carefully place the acetate over the cross panel, wet side down.  Repeat as needed. Finally, once dry, layer everything and add adhesive gems to finish the card.

I made a quick video tutorial showing the process for this project.
{{Please subscribe to my video channel and like this video.  Many thanks.}}
YouTube:  Gaylynn NeatThingsBtq


Here is another look.


Supplies:  Unity Stamp Co. Saved by Grace and also Timeless; Prima water soluble oil pastels, MCT more scalloped stitched ovals and stitched belly band diesdouble-sided foam tape, My Favorite Things A2 dies, adhesive gems, white embossing powder, VersaMark ink, heat tool, watercolor brush, lavender and ivory cardstock, clear flat double-sided tape, acetate, original Misti.

Thanks for visiting.
Gaylynn

11/15/2019

How to watercolor with distress ink refill bottles and stamping.

Today, I am sharing an inspirational watercolor card with a girl and scripture.


For this card, I began by stamping onto watercolor paper and then die-cutting the edges.  Next, I added watercolor using distress ink refill in three colors along with a paintbrush.  Also, I used a palette mat to help apply color and water to the stamping.  Next, I added Zig watercolor for skin tone.  Finally, the one-layer card was assembled to finish.

I made a quick video tutorial showing the process for this project.
{{Please subscribe to my video channel and like this video.  Many thanks.}}
YouTube:  Gaylynn NeatThingsBtq


Here is a closer look.


Supplies:  Unity Stamp Co. No Limit To Love and His Words; foam tape, My Creative Time More Stitched Edges Dies, paintbrush, Ranger archival ink jet black, Canson watercolor paper, Altenew palette mat, Zig clean color real brush markers in 071 and 028; heat tool, Ranger distress ink refill bottles in spun sugar, frayed burlap and tumbled glass.

Thanks and have a great day.
Gaylynn

10/31/2018

Watercolor Flowers and Background Accents Card

For Watercolor Wednesday on the Unity blog, here are watercolor flowers against background accents.


Sentiment:  Be strong & He will strengthen your heart.  Psalm 31:24

For this card, I stamped onto watercolor paper and then die-cut the panels.  I use watercolor pencils for the flowers and the background.  Everything was layered to finish.

The full article and tutorial are up on the Unity blog.
I also made a quick video tutorial showing the process for this project.
YouTube:  Gaylynn NeatThingsBtq


Here is another look:


Supplies:  Unity Stamp Co. I Am With You October 2018 Sentiment Kit; Ranger archival ink and watercolor paper, paint brushes, heat tool and My Creative Time dies.

Be sure to visit the Unity blog for the entire article and tutorial.
Also, you can find my other watercolor features at Unity's Watercolor Wednesday.

Enjoy your day.
Gaylynn

2/03/2017

Bible Journal Paper Art & Quick Tip Video Tutorial

Today, I am sharing a bible journal page decorated with paper art.


Sentiment:  Fill your mind with beauty & truth. ~ Philippeans 4:8

I love making my journal pages pretty and inspirational.

Sometimes I decorate my bible journal pages using paper art to avoid certain markers and inks bleeding through to the back side of the thin pages.

Other times, I get creative directly onto the pages themselves.
I am no expert in this area.  But, I have a few posts documenting my trial and error process.
I explore different art mediums and the outcome when used on thin bible pages directly.
These techniques can also be used in planners and other journals.
To see these posts, go to bible journaling.

I made a video tutorial for this bible page.
My YouTube is Gaylynn NeatThingsBtq


I hope this encourages you to add more beauty to your journaling.
If you would like see a particular technique or project in a video tutorial, please mention it in the comments.

Link Ups:  Word Art Wednesday ~ Anything Goes Challenge #268-269

Supplies:  Unity Stamp Co. Grace Upon Grace by Phyllis Harris, cardstock, Copic  markers, My Creative Bible, double sided tape and Ranger archival ink.

Have a wonderful weekend.

4/22/2016

Something Big Encouragement Card

This is a card going out to my daughter for working so hard in college and having big dreams.


Sentiment:
She always knew she could do something big.

This little girl is adorable and she goes perfectly with the sentiment.
I just love the sweetness of it.  But I had to make it with more of a grown up style.

Link Ups:

Unity Stamp Co. Facebook Group Challenge ~ Anything Goes / Unity Girl

Simon Says Stamp Wednesday Challenge ~ Make it Girly

Less is More Challenge ShowCASe #272 3 Stamps

Supplies include Unity stamp She Always Knew itty bitty and Happy Little Moments SMAK; dies by Avery Elle and My Favorite Things, BasicGrey paper, vellum, embossing powder, eyelets and Copic markers.

I hope this brings a smile.

4/22/2015

Confirmation Party Favors

Here are lollipop holders for confirmation party favors.


Sentiment:  Confirmation Blessings


I added die-cut wraps, frames, stamped cross and printed sentiment then alternated the colors of pink, yellow, gold and white.  There is a touch of tulle to make it more girly.

Link Ups:

My Creative Time Designer Challenge - I focused on pink, yellow, white & gold.

Unity Stamp Co. Friends With Flair.

Supplies include:  My Creative Time Stitched Lollipop Holder, Scalloped & Stitched Circles and Chunky Jar Accessories dies, Unity Stamp Co. Everything Easter.