Showing posts with label pop up. Show all posts

11/20/2022

Layered poinsettia holiday card with Copic markers & stamping.

 For today, I am sharing a traditional poinsettia flower Christmas card with Copic marker coloring.  Most any markers or color mediums are fine to use with compatible ink for stamping.


Sentiment:  Good tidings to you.

For holiday greetings, this is a traditional style card with a touch of vintage accents.
Catch the short video over on my Instagram @neatnook 
and on TikTok @neatnookcreations for this project.

6/29/2022

Interactive pop-up card technique ~ bird theme

 Hello.  Today, on the Unity blog, I am sharing an interactive pop-up card technique featuring a fun bird on the inside and on the outside.


Sentiment:  
Oh hello!  Miss you like crazy.

I made a quick video tutorial showing the process for this project.

{{Please subscribe to my video channel and like this video.  Many thanks.}}


Almost any pop-up element cut-out can be used with many different stamps to create a similar interactive pop-up feature inside of a greeting card.

1/12/2022

Interactive wobble pun card + background stamping techniques

  Hello.  Interactive wobble card making adds a surprise element for the recipient.  Today, on the Unity blog, I am sharing this super fun technique which is always well received.


Sentiment:  Hope your birthday is loads of fun.  Rinse.  Spin.  Drain.

Here, I made a cute interactive wobble pun card with a washing machine element along with a coordinating stamped background.

I made a quick video tutorial showing the process for this project.
{{Please subscribe to my video channel and like this video.  Many thanks.}}

4/24/2021

Pop-up and wobble 2 interactive cards ~ 2 ways

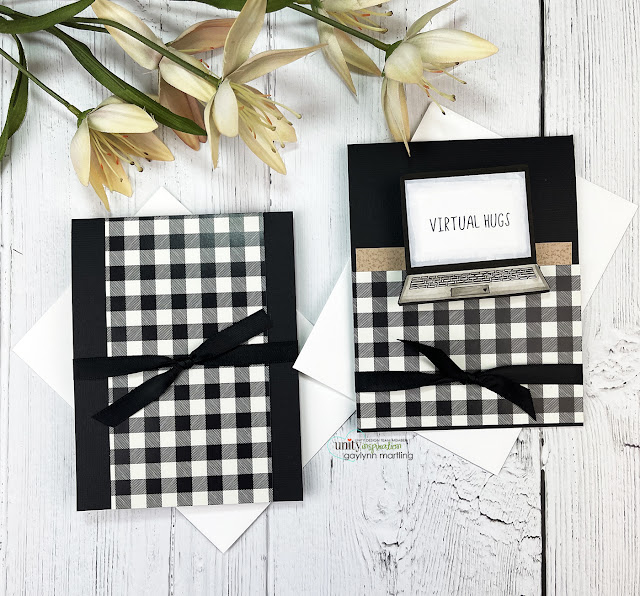
 For today, I am sharing interactive cards, two ways.  This set features a laptop computer as a pop-up card and another as a wobble card.


Sentiments:

Virtual Hugs
Happy Father's Day

Interactive cards are always well received and unexpected.  They are fun to make and to receive.


Helpful tips:
Here are helpful tips for making these two interactive cards.  First, trim accent pieces of patterned paper for the card fronts.  Also, trim a full card length tan insert and another card insert from white cardstock.  I used black card bases to coordinate with the paper used.  Next, stamp and color two laptops.  Then fussy cut them. (cut out)  Layer the virtual hugs laptop and paper over the card front using an Action Wobble spring.  For the Father's Day laptop, make a pop-out cut into the long liner insert.  I used a die-cut over the score line.  (see the video)  Next, adhere the long liner inside of the card base.  Then, adhere the second laptop to the bottom fold of the pop-out cut.  Finally, layer paper and ribbon on the second card front, to finish.
 

Here is another look:


Supplies:  Unity Stamp Co. Virtual Hugs and Farmhouse Plaid {paper pack}.
Also, My Creative Time stitched pop-up dies, double-sided paper, cardstock, ribbon, action wobble, scissors, Copic markers C1, C3, 0, W5, W3, 100; scoring board, paper trimmer.

Thank you for visiting.
Enjoy your day.


12/16/2020

Butterfly Pop-Up Card Inside Panel ~ Tutorial

 Hello.  For Technique Time at Unity, I am showing an easy way to add a pop-up card panel inside of your handmade cards.


Sentiment:  
Don't be afraid, for I am with you.
Don't be discouraged, for I am your God.
I will strengthen you and help you.
Isaiah 41:10

For this butterfly pop-up card, I used a few different stamp kits along with a bit of coloring and cuts.

Helpful tips:
Here are helpful tips for creating this butterfly pop-up card with an inside surprise.  To begin, stamp the butterflies with Copic friendly ink.  Also, stamp the sentiment and background panels.  Next, trim an inside liner to cover the inside of the card.  Also, trim a matching front panel layer and the script background layer.  Then, color in the butterflies and fussy cut them (cut them out).  Next, add cuts across the score line of the inside liner panel.  I used a die-cut, but carefully cutting with a ruler works also.  Then, fold out that panel along score lines.  Also, adhere the third butterfly onto the bottom portion of the inside pop-up panel piece.  Finally, to finish, layer the card front and add the inside sentiment.


Here is another look.


Also, foam and flat double-sided tape, cardstock, MFT Pop-Up Elements Narrow and Wonky Stitched Rectangle STAX die-namics; Fiskars paper trimmer, Papertrey Ink vellum cardstock, Copic markers BG32, BG10, YR00.

Thank you for visiting.
Gaylynn

11/06/2020

Pop up flowers slimline card + watercolor pencils tutorial

 Hello.  We are celebrating a Brown Thursday event with Unity Stamp Company.  It is not just for Thursday though.  It is a kick-off seasonal party that got its name long ago instead of using black Friday.  

Here is a fun and whimsical slim or tall style card for almost any occasion or just because.   For the color, I used watercolor pencils and pop up flower layers.


Sentiment:  Make today amazing.

For watercolor, I used watercolor pencils, water and a brush to create a spotlight look to just a few flowers.  Extra flowers were popped up and layered for added texture.

Here are tips for making this card.  First, stamp the large floral pattern twice onto the smooth side of watercolor paper.  Next, trim or die-cut background layers and a card base.  Next, add watercolor accents to the tall panel.  Then add watercolor to two extra flowers from the other stamped panel.  Also, add paint platters for added accents, optional.  Once dry, fussy cut (cut out) the top portion around the two large flowers.  Then, fussy cut the two extra flowers for layering.  Next, layer the panels, sentiment and the tall flower panel.  Also, offset the layering of the two extra flowers, using foam tape for adhesive.  Finally, add the sentiment, to finish.

I made a quick video tutorial showing the process for this project.
{{Please subscribe to my video channel and like this video.  Many thanks.}}
YouTube:  Gaylynn NeatThingsBtq


Here is another look.


Supplies:  Unity Stamp Co. Funky Flowers {slimline}; My Creative Time tall frame dies, tall frame die layers and scallop tall frame dies; cardstock, double-sided flat and foam tape, Derwent Inktense watercolor pencils 0200 and 0510; a paper punch, TCW Ken Oliver watercolor paper, Fiskars paper trimmer, Liquitex Basics white acrylic paint, paint brush, scissors.

Thank you for visiting.
Gaylynn

6/08/2020

Fun fold cards ~ double gate fold, double easel & double side folds

Today, I am sharing three fun fold cards made during a recent retreat at the Pink & Main store in Athens, GA.  I am have not dabbled in fun folds in a very long time, but this was refreshing to do with pretty papers, stamps and dies.


Sentiment:  Let your faith be bigger than your fear.

First up is a double easel card with pretty papers and a big sentiment, front and center.
This may be called a step card, but I believe it is also a double easel card style.  Both the background and the sentiment tag sit upright once the card front is opened out.  This is A2 size and the teal card base opens like a regular top fold card.  I LOVE this design and will certainly be using this more often.


Next up, a double side fold card.


Sentiment:  Hello friend.  You are loved.

This butterfly card includes two fun fold side folds which interchange and open to the sentiment.  Again, we have lovely floral papers and sweet stamping.


Sentiment:  Life is tough, but darling, so are you.

Next up is a booklet style card made from a double gate fold technique, gorgeous papers and stamps.
This makes a smaller card when flat, but it expands once opened into interesting inside panels.  This is great for notes, art or photos for a mini photo album.  The front ties the card closed with a pretty ribbon.


It is in my plans to incorporate these techniques into separate videos in the future.

These projects do not include a video tutorial for this post.
However, for my projects with video tutorials, please see my YouTube channel at
Gaylynn NeatThingsBtq
Also, to view my videos here on the blog, click
video.

The supplies are patterned paper, cardstock, clear stamps, ink, dies and embellishments by Pink & Main.

I want to give a shout out to Michelle Currie, owner of Pink & Main, and her staff for the fabulous card class, stamps, dies, inks and more.  Also thanks for hosting the 2020 Unstoppable Retreat in Athens, GA.  This lovely store and class space are located inside the local mall.  It was great meeting Michelle and learning how her business expands beyond the store and extends with classes, their online shop, social media and their booth presence at craft events, year-round and more.

Thanks for visiting.  I would love to hear from you.
Gaylynn

5/21/2020

2 Interactive cards ~ light up and camera shaped pop up cards

Today, I am sharing two different interactive cards.  One is a light-up card and the other is a camera shaped card, both interactive.


Sentiment:  Smile.  Say Cheese!

This slim card opens and closes sideways, keeping the camera shape intact.  The card folds flat for envelope mailing.   The above photo shows the card folds opened slightly so that it stands up on its own.  With layered cuts and folds, this card came to life.

Here is another look at the camera card.


When the camera is pulled open even more, it reveals a pop-up girl.  She is tucked inside until the card is fully opened and then she pops up from right to left.  How cute is that?  These two cards were some of my projects made at the Unstoppable craft retreat in Athens, during one of my classes there.  

Here is another one of the projects made there.  This one is an interactive light-up card.  It includes tiny EZ-lights behind the girl and hearts.  The first photo shows the card without pressing on the lights.


If you press the "press me" area, the camera lights appear looking like a flashbulb.  It lights up when pressed.  How fun is that?


These got me inspired to make more interactive type cards.
I want to give a shout out to Amanda Stevens with Pear Blossom Press for the fun class demonstration and for sponsoring her EZ-Light.  Also, thanks to Kindred Stamps for the sweet Oh Snap stamp set shown on both cards.

These projects do not include a video tutorial.
However, for my projects with video tutorials, please see my YouTube channel at
Gaylynn NeatThingsBtq
Also, to view my videos here on the blog, click
video.

Have a lovely day.
Gaylynn