Showing posts with label decoration. Show all posts

12/07/2022

Holiday Favor or Treat Box ~ My Creative Time I Need A Favor

 Hello, and welcome. Today, the My Creative Time team is sharing favor project ideas. I am sharing a sweet favor box with a cute gingerbread accent.


 This is super quick and easy to make, especially during the busy holiday season.  The box is one die, making it perfect for thank you, table decor, place settings, party treats or favors.

11/29/2022

Lollipop Holder ~ Day 2 My Creative Time 5 Days of Christmas

Hello, and welcome to the My Creative Time "5" Days of Christmas"! This week we will be sharing with you lots of last-minute Christmas ideas, such as cards, tags, treat holders, gift card holders and whatever else comes to mind that will help YOU get your creative juices flowing for the holidays! Just leave your comments on each of our blogs!

Today is Day 2 of our 5 Days of Christmas! We all will be showcasing some quick and EASY Treat Holders!


How about matching Mr. & Mrs. treat holders?  For quick and easy favor wraps, these are perfect,  They make adorable Christmas and winter holiday party favors, thank you tokens, table decor, hostess gifts, teacher & classroom treats and more.

10/01/2022

October 2022 Friends of Unity Blog Hop ~ Anything But A Card ~ Gift Box

 Hello and welcome.  For today, I am sharing a 3D mini gift or favor box project for the Friends of Unity blog hop.  This social media hop inspiration is anything but a card.  I hope you will join in on the fun and inspiration.  Simply comment on each stop in the hop.


I used Autumn leaves to decorate this little gift box.  It works perfectly for a place setting decoration or place card, hostess gift, party favor box, mini gift wrap or thank you tokens.


1/05/2022

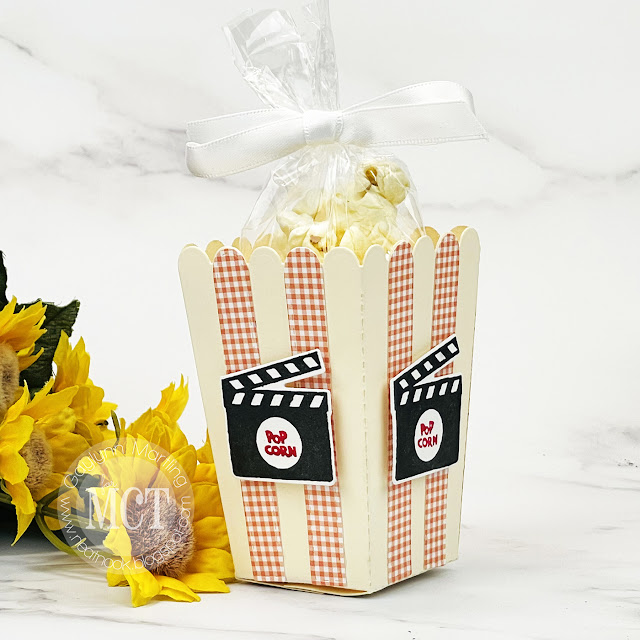
Mini popcorn favor box ~ MCT I Need A Favor

 Hello.  Happy New Year to you and yours.  May this year be a good one.

The My Creative Time design team is sharing treat or favor projects.  Today, I am sharing a cute little movie themed popcorn favor box filled with popcorn.


This little box is great for movie night treats or as a party favor.  These also make great gift card holders and little thank you gifts.  And, if your table is set with a movie theme, they are great table decor items.
The box measures approximately 2" x 3 1/2".

12/08/2021

Christmas or Holiday sleigh shaped gift or favor box

 Hello.  The My Creative Time design team is sharing gift or favor projects.  Today, I am sharing a holiday sleigh shaped treat box filled with wrapped candy canes.


This little sleigh is going to be displayed on a table with the mint candy canes inside for sharing.

2/12/2021

Cardinal bird card layering + Copic markers ~ tutorial

Here is my cardinal bird card with background stamping and focal point layering.  This one uses Copic markers and Unity stamps.


Sentiment:  Just a note.

Helpful tips:
Here are helpful tips for creating this bird card.  To begin, stamp the background leaves and olives.  Next, stamp the bird and sentiment.  Then, add color using the medium of choice.  For this card, I used Copic markers with lots of layers.  Next, trim or die-cut the background, the sentiment, tiny hearts and two tag layers.  Also, fussy cut (cut out) the bird.  Then, make a layered center focal point for the card by stacking the tags, hearts, the bird and sentiment.  Finally, layer it all over the card base, to finish.

I made a video tutorial showing the process for this project.
{{Please subscribe to my video channel and like this video.  Many thanks.}}
 

Here is another look:


Supplies:  Unity Stamp Co. Gotta Love Sentiments, Peaceful Unity {2/2021 background of the month} and Live For Today.
Also, My Creative Time Square Tag Dies and Rectangle Frame Die Layers; flat and foam double-sided tape, cardstock, cording, MFT extreme black ink, mini Misti, Copics markers G21, YG03, G99, YG91, E7, E44, R02, R27, R08, 0, W9, C9, C3.

Thank you for stopping by.

1/29/2021

Sakura Koi watercolor tones + stamping card tutorial.

 This is an inspirational slimline card featuring Sakura Koi watercolor tones with stamping.  I used blends of watercolors for this slimline or tall style card.

Sentiment:
Do small things with great love. ~ Mother Teresa

Helpful tips:
Here are helpful tips for creating this inspirational slimline card.  To begin, stamp the hands and the sentiment onto the smooth side of watercolor paper.  Next, mix watercolor to the shades you want for the stamping.  I chose to mix colors to get the tones that I was looking for.  Then, add color and blend the color out with a wet paint brush.  Also, add more color layers if you want to.  Next, trim or die-cut a slimline or tall card base and card layers.  Also, Finally, layer everything to finish.

This card base was cut 7 1/2" x 7 1/2" and scored at 3 3/4" to coordinate with the MCT tall die-cut layers.

I made a video tutorial showing the process for this project.
{{Please subscribe to my video channel and like this video.  Many thanks.}}
 

Here is another look:


Supplies:  Unity Stamp Co. Together We Do More and Small Things, Great Love.
Also, My Creative Time Tall Frame Dies, and Tall Frame Die Layers; adhesive gems, flat double-sided tape, Sakura Koi watercolor, Ranger watercolor paper and plum archival ink; Altenew palette mat, watercolor brush, heat tool.

Thank you for visiting.
Gaylynn

9/22/2020

Wine tag or gift tag ideas tutorial ~ Snarky Edition

  Hi there.  For today, I am sharing two gift tag ideas.  One is a wine tag and the other is a favor tag or for other gift-giving.


Sentiment:
Life update:  Still a mess.

Here are tips for wine and gift tag ideas.  First, die-cut or trim the background and stamp layers.  Next, stamp onto the top panels.  Then, color in the stamping to coordinate with the packaging or gift colors.  Also, adhere the coordinating panels for each tag.  Next, score the longer panel for wine bottle placement.  Also, hole punch or die-cut a circle on one end of the long panel.  Then, for the favor tag, tie the smaller tag in place with twine or ribbon.  Use the wine tag when you are ready for a hostess gift or party event.


I made a quick video tutorial showing the process for this project.
{{Please subscribe to my video channel and like this video.  Many thanks.}}

Supplies:  Unity Stamp Co. Still A Mess; My Creative Time Tall Frame Die Layers, Scalloped Stitched Rectangular Dies, Scallop Tall Frame Dies and More Stitched Circles; MSC scoring board, bone folder, cardstock, double-sided flat and foam tape, Copic markers R37, R02, R32, E13, E11, YR00, Y11, YR23, B0000.

Thank you for visiting.
Gaylynn

9/17/2020

Day 4 MCT 104th Edition Sneak Peeks ~ Halloween Favor Box

 Hello, it's Gaylynn.  Here is Day 4 of the My Creative Time 104th Edition sneak peeks.  For today, I made a favor box in the shape of a coffin for Halloween.  It is accented with a spooky spiderweb die-cut, a spider and a coffin sentiment tag.


Sentiment:  Open if you dare.

For this spooky coffin-shaped Halloween favor or treat box, I used assorted patterned paper and cardstock.  Then, I die-cut the box pieces and accessories.  The sentiment was stamped and layered.  To affix the box, I recommend an extra tacky tape, score tape or hot glue.  Behind the spiderweb, I added a piece of black cardstock.  This can be left to view the inside contents, also.  Everything was assembled, to finish.

*** Sneak Peek Giveaway ***
We will be giving away the sets we are showcasing each day to ONE lucky winner!  For example, the set we are showcasing on Wednesday, Emma will announce the winner of that on Thursday and the sets we are showcasing on Thursday, Emma will announce that winner on Friday on the MCT blog!  ALL you have to is leave a comment on each of our blogs!  You are NOT required to comment on every single blog, but the more you comment on, the more chances you have for winning!  VERY IMPORTANT, PLEASE leave a way for us to contact you with your comments just in case YOU are the lucky winner!  
For EXTRA entries, you can spread the word about this release on Facebook, tweet about it OR even Instagram it.... #mycreativetime

Supplies for today's project: My Creative Time Happy Witchin', Spooky Tag Dies and Coffin Treat Box Die; cardstock, score tape, hot glue, patterned paper, twine.

For more sneak peek inspiration, visit Emma's My Creative Time blog.
I hope that you enjoyed the sneak peek projects this week. Please, check back tomorrow for the blog hop.

Thanks for visiting. I look forward to your comments.
Have a great day. Gaylynn


2/20/2020

Favor box ~ Day 4 MCT 100th Edition Sneak Peeks

Hi, it's Gaylynn.  Here is Day 4 of the My Creative Time 100th Edition sneak peeks.


Sentiment:  Treats just for you.

Here are tips for making this.  Begin by die-cutting the tube treat box, using patterned paper or vellum.  Then assemble the box using extra tacky double-sided tape along the edge.  Next, die-cut the egg tags.  Also, stamp the sentiment onto the top egg piece.  To finish, tie the egg tag to the tube box.


*** Sneak Peek Giveaway #1 ***
We will be giving away the sets we are showcasing each day to ONE lucky winner!  For example, the set we are showcasing on Wednesday, Emma will announce the winner of that on Thursday and the sets we are showcasing on Thursday, Emma will announce that winner on Friday on my blog!  ALL you have to is leave a comment on each of our blogs!  You are NOT required to comment on every single blog, but the more you comment on, the more chances you have for winning!  VERY IMPORTANT, PLEASE leave a way for us to contact you with your comments just in case YOU are the lucky winner!  
For EXTRA entries, you can spread the word about this release on Facebook, tweet about it OR even Instagram it.... #mycreativetime

*** Sneak Peek Giveaway #2 ***
In addition to our regular sneaky peek giveaway, we will be doing a second giveaway to celebrate our 100th Edition Release! Again, all you have to do is leave comments on EVERY stop in this blog hop and then you will be entered to win a $20 gift card to the “My Creative Time Store”. Emma will announce all 9 winners for the $20 gift cards the My Creative Time blog on Monday, February 24, 2020! GOOD LUCK my friends! Also, don’t forget to leave a way for us to contact you if you were to be one of the winners!

Supplies for today's project: My Creative Time Tube Treat Box, Pretty Egg Tag Dies and Eggstra Special; vellum paper; Ranger Wonder tape, hemp cording, Ranger watering can archival ink.

For more sneak peek inspiration, visit Emma's My Creative Time blog.
Thanks for visiting. I look forward to your comments. Gaylynn

1/16/2020

Heart shaped box ~ Day 4 MCT 99th Edition Sneak Peeks

Hi, it's Gaylynn.  Here is Day 4 of the My Creative Time 99th Edition sneak peeks.


Sentiment:  LOVE

For this project, I began by die-cutting the heart box and the LOVE word using navy cardstock.  Then, the heart was die-cut using gold glitter cardstock.  The box was assembled along the score lines.  It was adhered together in three sections using extra tacky double-sided tape.  I used a tissue paper wrap for the insert and then tied it with gold cording, to finish.

***Sneak Peek Giveaway***
We will be giving away the sets we are showcasing each day to ONE lucky winner!  For example, the set we are showcasing on Wednesday, Emma will announce the winner of that on Thursday and the sets we are showcasing on Thursday, Emma will announce that winner on Friday on my blog!  ALL you have to is leave a comment on each of our blogs!  You are NOT required to comment on every single blog, but the more you comment on, the more chances you have for winning!  VERY IMPORTANT, PLEASE leave a way for us to contact you with your comments just in case YOU are the lucky winner!  
For EXTRA entries, you can spread the word about this release on Facebook, tweet about it OR even Instagram it.... #mycreativetime.
GOOD LUCK EVERYONE and let's start spreading the word!


Supplies for today's project: My Creative Time Heart Treat Dies; gold cording, navy blue and gold glitter cardstock; Wonder tape.

For more sneak peek inspiration, visit Emma's My Creative Time blog. Tune in tomorrow for the blog hop and full release reveal.
Thanks for visiting. I look forward to your comments. Gaylynn


12/04/2019

Canvas mixed media art with tissue paper and stamping.

For Technique Time at Unity, I am sharing a mixed media art canvas using stamped tissue paper and acrylic paint.


Sentiment:  Love your story.

This is an inspirational themed art canvas with a rustic look.  This involves a few steps.  See below for details and a video tutorial.


Here are helpful tips for creating this canvas.  To begin, stamp tissue paper with selected art or words.  Then, tear the tissue to separate the sections.  Next, mix a dab of acrylic paint into a bit of matte gel for each color.  For ease, use a plastic craft mat or palette to separate colors.  Have on hand a pre-primed stretched canvas or prime a canvas and then leave it to dry.  Next, make a background using swipes of three premixed paint colors.  It helps to use a foam blending brush.  Then, assemble the tissue paper pieces onto the wet paint and then brush each tissue section with uncolored matte gel.  Once that has completely dried overnight, blend distress ink around all edges for a rustic look.  Finally, add your choice of extra embellishments or accents to finish.


I made a quick video tutorial showing the process for this project.
{{Please subscribe to my video channel and like this video.  Many thanks.}}
YouTube:  Gaylynn NeatThingsBtq


Here is a closer look.


Supplies:  Unity Stamp Co. All The Stories (Dec 2019 Uniquely Unity Ang.Mag. kit); Liquitex matte gel and acrylic paint in aqua green, light portrait pink and gray value 3; tissue paper, paper flowers, brads, Tim Holtz ticket, glue gun, foam blender, 5x7 deep edge Winsor & Newton artists' canvas, spatula, Ranger jet black archival ink, distress ink in black soot and plastic craft mat.

Be sure to visit the Unity blog for the entire article and tutorial.
Also, you can find my other features at Unity's
Technique Time and
Watercolor Wednesday.


Have a great day.
Gaylynn

8/13/2019

Just you you strawberry gift or wine tag.

Today, the My Creative Time team is sharing Tag It Tuesday projects.  I decided to make a cute strawberry gift tag.  It would work for most any gift, baked goods, gift bag or even as a wine tag.


Sentiment:  Just for you.

This sweet gift tag includes a die-cut strawberry.  If you look closely, you will see that the seeds are actually tiny hearts.  I used assorted patterned paper for the strawberry and the stem.  With a bit of twine and a micro sentiment tag, it is ready for gift giving.

Supplies:  My Creative Time More Chunky Tag Dies, Especially For You, Cute Micro Dies and Strawberry Treat Dies; Ranger archival ink in coffee, Jen Hadfield paper, solid cardstock, foam tape and twine.

Please visit Miss Emma's My Creative Time blog for more inspiration.

Thanks for visiting.
Gaylynn

7/10/2019

Bible journal stamping + Prima chalk edger watercolor.

For Watercolor Wednesday, I am sharing bible journal stamping along with Prima chalk watercolor.


Sentiment:  The Lord hears when you call.

Here is a way to add art for bible journaling.  I am showing a way to add bible journal stamping along with Prima chalk edger colors for watercolor.  This type of watercolor is great for the thin bible pages and for stamping onto dry surfaces.  After the page was dry, I lightly iron the page to remove some of the wrinkles.  Then, I stamped using different colors of the Prima chalk edgers.

The thing I like most about these chalk inks is that the ink will not bleed through to the back of the page.  You see a light shadow, but no more than the existing page print shadow.

The full article and tutorial are up on the Unity blog.
I also made a quick video tutorial showing the process for this project.

{{Please subscribe to my video channel and give this video a like.  Many thanks.}}
YouTube:  Gaylynn NeatThingsBtq


Here is another look.


See my bible journal tab for links to my other bible journaling projects and tutorials.
I share ways to incorporate art and stamping with bible journals or planners.

Supplies:  Unity Stamp Co. Love In The Margins and Patience; My Creative Bible KJV, Prima chalk edger colors in 891350, 891213, 891299, 891305 and 891329; flat paint brush, Ranger mini mister, acrylic stamping block and heat tool.

Be sure to visit the Unity blog for the entire article and tutorial.
Also, you can find my other watercolor features at Unity's Watercolor Wednesday.

Thanks so much.  Have a great day.
Gaylynn

3/06/2019

To My Bunny Easter Favor Box ~ MCT 3-D Wednesday

Today, the My Creative Time team is sharing 3-D Wednesday projects.


Sentiment:  To my Bunny!

I decided to make a mini gift box for Easter.  It was die-cut and assembled with Wonder Tape.  I added a die-cut bunny which includes the sentiment.  This project comes together quickly.  It can easily be made into multiples for party favors or Easter treats.

Supplies:  My Creative Time Mini Gift Box Die, Basket Tag dies and Teeny Tag Holidays Revised; K and Company paper, Ranger Wonder Tape and twine.

Please visit Miss Emma's My Creative Time blog for more inspiration.

Have a great day.
Gaylynn

11/23/2018

Sleigh gift holder ~ MCT Black Friday Sale & Blog Hop

Hello, Gaylynn here. HAPPY BLACK FRIDAY my friends! It is time to shop! Besides the My Creative Time AWESOME sale and blog hop, we are showcasing a couple of brand new dies. They are “Sleigh Die” along with the “Sleigh Bed”.
Hop along with us.
You may have arrived from Emily's blog.


This is an open gift box in the shape of a sleigh.  It has a rectangle open box at the base.  The sides are in the shape of a sleigh.  I chose to use the same paper and bow on the back side of the sleigh box as well.
The inside of the box contains wrapped Tic Tacs as the treat.  The paper used for the box base and the treat wrap is the same red and white patterned paper, but for two purposes.
The photo looks to contain a gift card, which would totally work.
But this sleigh box contains a treat, perfect for party favors, thank you and more.


Image may contain: text Image may contain: text

***BlOG HOP GIVEAWAY***
Leave your comments on each stop of the hop ALONG with a way for us to contact you for a chance to win a $25 gift card to the MCT store. GOOD LUCK! ***SALE*** We are having a special “Buy More, Save More” sale! Use the following code that will apply to you at checkout.


Supplies: My Creative Time Sleigh Die and Sleigh Bed, silver and assorted paper, adhesive pearls and score tape.

Hop along with us for inspiration using these dies! Your next stop in the hop is Jessica's blog. The entire blog hop lineup is on Emma's blog. Thanks so much for visiting. I really look forward to your comments. Happy shopping.

11/07/2018

Hugs Post-It Note Holder ~ MCT 3-D Wednesday

Today, on the MCT blog, we are sharing 3-D projects.
Here is a fun way to wrap post-it notes for gift giving or for holiday stocking stuffers.


Sentiment:  Hugs

This was fun and easy to make.  I began by die-cutting double-sided patterned paper.  I stamped and cut out the hugs word.  A touch of color was added around the sentiment for accents.  Then everything was assembled.  This will be one of the stocking stuffer gifts this Christmas.

Here is another look.


Supplies:  My Creative Time Note Card Holder Die and Fun Notes; Copic markers, assorted cardstock.

Be sure to visit Miss Emma's My Creative Time blog for more inspiration.

Wishing you a wonderful day.
Gaylynn

10/19/2018

Santa Hat ~ MCT 84th Edition Release and Blog Hop

Hi, it's Gaylynn here with a Santa hat gift card or money holder for the holidays.
It is the MCT 84th Edition release, sale and blog hop.
You may have arrived from Emily's blog.


Sentiment:  Happy Holidays!

This is a fun way to wrap a gift card or cash for Christmas gift giving.  I used the Santa hat lollipop die-cut but trimmed off the hat portion for this decoration.  This is just one of the amazing new releases in the MCT shop.

Image may contain: text

*** BLOG HOP GIVEAWAY ***
For our blog hop giveaway, Emma is giving away a $25 gift card to the "My Creative Time" store to ONE LUCKY winner! ALL you have to do is leave a comment on each of our blogs! You are NOT required to comment on EVERY SINGLE blog, but the more you comment on, the MORE chances you have for winning! VERY IMPORTANT, PLEASE leave a way for us to contact you w/your comment just in case "YOU" are the lucky winner!


*** SALE ALERT ***
ALSO, DON'T FORGET our sale starts RIGHT NOW here! Use the code: OCT2018 to receive a 15% discount off your entire purchase! This sale applies to "IN-STOCK" items ONLY. This sale will end on Friday, October 26, 2018 @midnight PST.


***SPECIAL GIVEAWAY***
Starting on Friday, October 19, 2018 @ 8am PST, Emma is going to have random.org choose 2 winners! The 1st winner will win the “85th Edition ENTIRE Release” and the 2nd winner will win the newest AWESOME die that will be featured for Black Friday! Random.org will choose from the the first 50 shoppers that come through on Friday, Oct 19, 2018 at 8am PST! GOOD LUCK my sweet friends! P.S. The winner will be announced on the MCT blog and the My Creative Time facebook page.


Here are my sneak peek blog projects from this week's release.
Day 1


Day 2

Day 3

Here are a couple of projects together using the versatile Santa hat lollipop holder die.


Supplies: My Creative Time Santa Hat Lollipop Holder Die, Treat Envelope Die, Teeny Tag Greetings Revised and Teeny Tag Holidays; snow pen, BoBunny paper, twine and Ranger archival ink.

Hop along with us.
Your next stop in the hop is Miss Jessica's blog. The entire blog hop lineup is on Miss Emma's My Creative Time blog. Thanks for stopping by. I look forward to your comments. Gaylynn