Showing posts with label money holder. Show all posts

7/12/2023

Money holder card idea for gift giving.

 Today for the  Unity blog, I am sharing a money holder card idea that works for gift celebrations occasions, friends, teachers or just a thank you.  This one includes an interactive money loop along with creative stamping.


Sentiment:  You deserve a treat.

No coloring is involved in the making of this card.  I used a bit of paper piecing for the mug and colorful stamping for the background.

6/23/2022

Gift Card Holder ~ Day 4 MCT 122nd Edition Sneak Peeks

 Hello, it's Gaylynn.  The My Creative Time 122nd Edition release and sale are coming up on Friday.  But for today, the team is sharing adorable Day 4 sneak peeks.  Here is the newest MCT gift card holder die.


I think that the best part about this gift card holder is that no tape or glue was necessary to assemble the holder container portion.  

3/09/2022

St. Patrick's Day ~ My Creative Time Gift Card Giving

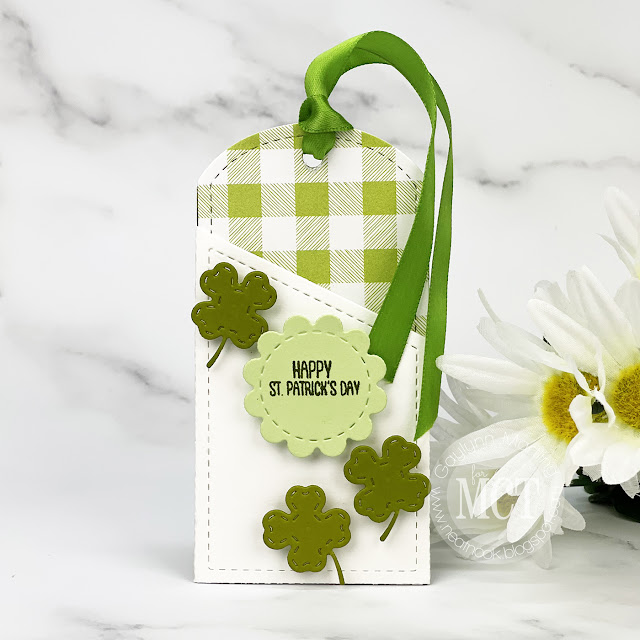
 Hello.  The My Creative Time design team is sharing gift card giving projects.  Today, I am sharing a St. Patrick's Day inspired gift card holder, money holder or wine tag. 


Sentiment:  Happy St. Patrick's Day

This is a gift card holder and/or a gift tag with little green 4 leaf clover accents.  It is perfect for St. Patrick's Day gift giving as party favors, a gift card holder or as a money holder or wine tag.

1/20/2022

Treat Holder ~ Day 4 My Creative Time Sneak Peeks

    Hello, it's Gaylynn.  The My Creative Time 117th Edition release and sale is coming up tomorrow.  But for today, the team is sharing adorable Day 4 sneak peeks, just in time for Valentine's Day.


Here is a 2x3 treat or favor wrap that folds into a gift box shape, open-ended.  This is great for small treats or gifts or even money gifts that can be fastened to the inside.  For this favor wrap, I first used ink blending on white cardstock and then die-cut the wrap.  Pink and light brown pastel colors were blended for a variegated look.  I added the negative of one of the gingerbread cookie girls for the box decoration.

12/02/2021

Gift Card Holder ~ Day 4 MCT 5 Days of Christmas

 Hello, and welcome to the My Creative Time "5" Days of Christmas"! This week we will be sharing with you lots of last-minute Christmas ideas, such as cards, tags, treat holders, gift card holders and whatever else comes to mind that will help YOU get your creative juices flowing for the holiday! There will be a giveaway each day and all winners will be announced next week on the MCT blog! All you have to do is leave your comments on each of our blogs for a chance to win one of five $15 Gift Card to the My Creative Time store!

Today is Day 4 of our 5 Days of Christmas! We all will be showcasing some quick and EASY gift card holder ideas!


Sentiment:  Merry Christmas

This is a decorated folding money or gift card holder for Christmas holiday gift giving.  It works great as a stocking stuffer.  It is a pretty wrap for the ones who want to shop for themselves using a gift card or cash.  And, it is in the rich colors of navy blue and silver, fitting for a guy or a gal.

12/03/2020

MCT 5 Days of Christmas ~ gift card holder tag

 Hello, and welcome to the My Creative Time "5" Days of Christmas"! This week we will be sharing with you. The design team has LOTS of last-minute Christmas ideas, such as cards, tags, treat holders, gift card holders and whatever else comes to mind that will help YOU get your creative juices flowing for the holiday! There will be a giveaway each day and all winners will be announced next week on the MCT blog! All you have to do is leave your comments on each stop for a chance to win a $15 Gift Card to the My Creative Time store!

Today is the fourth day of our 5 Days of Christmas! We all will be showcasing some quick and EASY gift card holders!


Sentiment:  May your holidays be merry & bright.

This tag was die-cut onto patterned paper and assembled with score tape.  For the front, I added the snowflake layers included in this set.  The sentiment was stamped and die-cut as an added accent for this gift card tag.  This works perfectly as a gift card or money holder for holiday gift giving.

***GIVEAWAY*** Don’t forget to leave your comments on all of our blogs for a chance to win a $15 gift card to the My Creative Time store!

Supplies:  My Creative Time Gift Card Tag Dies, Peace On Earth, Gift Card Greetings; twine, foam tape, glue, score tape, BasicGrey Aspen Frost paper, cardstock, hole punch, Ranger archival ink in jet black.

Please visit Emma's My Creative Time blog for more inspiration.

Thanks for visiting.

Gaylyn

11/20/2020

Holiday Gift Card Holders ~ MCT 105th Edition Release, Blog Hop & Sale

 Hello, it's Gaylynn.  Great news, the My Creative Time 105th Edition release, sale and blog hop has begun.

For the blog hop, you may have arrived from Emily's blog.


Sentiments:
Merry Christmas and best wishes for a Happy New Year.
Peace on earth and best wishes throughout the New Year.

 *** BLOG HOP GIVEAWAY ***
Leave your comments on each blog for a chance to win a $25 Gift Card to the My Creative Time store. One lucky winner will be chosen and noted on November 25, 2020, on the MCT blog! GOOD LUCK my friends!
(Please don't forget to leave a way/email for MCT to contact you, if you were to be one of the lucky winners.) 


To make each of these card style gift card holders, begin by die-cutting the gift card holder pieces and elements.  Then, stamp the sentiments onto the front of the holder piece.  Next, assemble the gift card holder using score tape or extra tacky glue.  Also, use assorted solid and patterned paper for accents.  Next, make added tag accents for the gift card tags, like the stocking and the ornament.  Then, die-cut a background layer accented with paper or ribbon.  Finally, assemble all of the layers, to finish.

*** SALE ALERT ***
DON'T FORGET our sale starts RIGHT NOW HERE! Use the code: NOV2020 to receive a 15% discount off your entire purchase! This sale applies to "IN-STOCK" items ONLY. This sale will end on Wednesday, November 25, 2020, at midnight PST.


***FREEBIE*** (Ended)
Starting Friday, November 20, 2020, at 8am PST, Emma will be giving away this new "Ho Ho Ho Die #2." This new die will be given to the FIRST 40 shoppers! If you are one of the first 40 shoppers, it will automatically be added to your package at the time of packing/shipping. Once 40 shoppers come through, this die set will be available for purchase! So, if it's available in the store, you are not one of the 40. No exceptions will be made. This freebie is not part of the "bundle" and will be sold separately.

More good news is that Emma has restocked some of her most popular and requested products.  Be sure to browse the restock items while you shop.
Here are my sneak peek blog projects from this release.


Supplies for today's project: My Creative Time Gift Card Tag Dies, Peace On Earth stamps, Rectangle Frame Die Layers; cardstock, assorted paper, Ranger archival ink in jet black, ribbon tape, twine, score tape.

Hop along with us.

Your next stop in the hop is Ginger's blog. The entire blog hop lineup is on Emma's My Creative Time blog.

Thanks for visiting. I look forward to your comments.

Gaylynn


11/18/2020

Gift Card Holder Tag ~ Day 3 MCT 105th Edition Sneak Peeks

 Hi there, it's Gaylynn.  The My Creative Time 105th Edition release is coming up on Friday.  But for today, the team is sharing Day 3 sneak peeks.


Sentiment:  Treat yourself.

Here are helpful tips for creating this Holiday gift card holder tag.  To begin, die-cut the tag layers onto different color cardstock pieces.  Then, stamp the sentiment.  Next, assemble the gift card holder using score tape or extra tacky glue.  Then, make added accents for the tag front.  Finally, assemble all of the layers, to finish.

***Sneak Peek Giveaway!*** We will be giving away the sets we are showcasing each day to ONE lucky winner! For example, the set we are showcasing on Wednesday, Emma will announce the winner of that on Thursday and the sets we are showcasing on Thursday, Emma will announce that winner on Friday on the MCT blog! ALL you have to do is leave a comment on each of our blogs! You are NOT required to comment on EVERY SINGLE blog, but the more you comment on, the more chances you have for winning! VERY IMPORTANT, PLEASE leave a way for us to contact you with your comment just in case "YOU" are the lucky winner! For EXTRA entries, you can spread the word about this release on Facebook, tweet about it OR even Instagram it! #mycreativetime! GOOD LUCK EVERYONE and let's start spreading the word!

Supplies for today's project: My Creative Time Gift Card Tag Dies, Festive Branches and Gift Card Greetings; cardstock, assorted paper, Ranger archival ink in jet black, twine, adhesive pearls, score tape and multi medium matte glue.

See more inspiration on the My Creative Time blog.

Thanks for visiting. I look forward to your comments.

Gaylynn


11/07/2020

Poinsettia slimline card with distress marker watercolor ~ tutorial

 Hello.  Here is my holiday card celebrating a Brown Thursday event with Unity Stamp Company.  It is not just for Thursday though.  It is a kick-off seasonal party that got its name long ago instead of using black Friday.  


Sentiment:  Let's get merry.

This huge holiday poinsettia stamp is the focus of the slimline style card.  It is one of the slimline stamps from Unity and it fills the card.  I added a few frame layers and a tag for accents.

For watercolor, I used distress markers and blended lots of color layers for this.  This was stamped onto watercolor paper.  It was fun to get out those distress markers and blend away.  The tag was stamped and then paper punches were used to frame it.  The video will show the details.

I made a quick video tutorial showing the process for this project.
{{Please subscribe to my video channel and like this video.  Many thanks.}}
YouTube:  Gaylynn NeatThingsBtq


Here is another look.


Supplies:  Unity Stamp Co. Let's Get Merry {slimline}; My Creative Time tall frame diestall frame die layers; Ranger Tim Holtz distress markers forest moss, peeled paint, wild honey, festive berries and fired brick; adhesive pearls, paint splatters, heat tool, paint brush, ribbon tape, twine, cardstock, double-sided flat and foam tape, circle punches, TCW Ken Oliver watercolor paper.

Thank you for visiting.
Gaylynn

11/03/2020

Watercolor slimline card & envelope set ~ MCT Birthday Palooza

 Hi.  The My Creative Time design team is sharing birthday palooza themed projects.  For today, I am sharing a tall and slim style card and envelope set.  This can double as a money holder or a gift card holder.


Sentiment:  Happy Birthday.  Have a magical birthday.

To make this card, begin by die-cutting the envelope and the card base.  Use white cardstock for both.  Also, to make the card base, die-cut a tall die layer twice, score one end and adhere them together.  Then, stamp the top card layer onto smooth watercolor paper using embossing ink and heat emboss in copper.  Next, add watercolor over the embossing and onto a scrap piece of watercolor paper.  Also, die-cut the happy birthday sentiment over the scrap watercolor panel.  Next, assemble the envelope and then add ink blending.  To finish, add the envelope sentiment and embellish it with gems.

The assembled envelope measures 6 1/2" x 2 3/4"
The assembled card measures 6 1/4" x 2 1/2"


MCT is offering an election SALE.  Use code: VOTE2020 at checkout to get 20% off! Sale applies to IN-Stock items only!  Ends Wednesday, 11/4/2020 at 4pm PST. 


Supplies:  My Creative Time Money Envelope Die, Mermaid Kisses, You Are Cherished, Tall Frame Dies, Tall Frame Die Layers; Distress Oxide ink in worn lipstick and wilted violet; ink blending brush, Altenew watercolor half pans, paint brush, Ken Oliver TCW watercolor paper, copper embossing powder, heat tool, Wow embossing ink, cardstock, adhesive gems.

Please visit Emma's My Creative Time blog for more inspiration.

Thanks for visiting.

Gaylynn

10/19/2020

Santa holiday tall or slimline card ~ MCT anything goes

 Hello.  The My Creative Time design team is sharing anything goes, projects of our choice, today.  I decided to make another holiday card.


Sentiment:  From our family to yours!

Looking through stamps and dies to use for today, I found this set of big Santa dies.  And, they work perfectly paired with the coordinating tall dies which are slimline style.  

Here is an easy clean and simple CAS card.  The sentiment was stamped on the scallop layer.  I used mostly gray and white solid cardstock with a touch of polka dot patterned paper, for a pop of red.  To give the Santa die-cuts a bit more depth, I added shades of gray around the edges of each Santa cut, using Copic markers.  Finally, I layered the panels together, to finish this tall or slimline Christmas or holiday card.

envelope 4 3/8" x 8 1/4" 
card base cut 7 1/2" x 7 1/2" and scored 3 3/4"

Supplies:  My Creative Time Big Santa Dies, Dec 25th Stamp Set, Scallop Tall Frame Dies, Tall Frame Dies and Tall Frame Die Layers; Ranger multi medium matte glue and jet black archival ink, cardstock, BoBunny paper, flat and foam double-sided tape, Copic markers C3, C5.

Please visit Emma's My Creative Time blog for more inspiration.

Thanks for visiting.

Gaylynn 

8/24/2020

Mini note card & envelope ~ MCT Made In Minutes

 Hello.  Today, the My Creative Time team is sharing projects which can be made in minutes.  Here is my decorated mini note, tag and envelope set with a pet theme.  This one is great for a dog owner or as a thank you for pet sitting.  This is a bit small for a gift card, but cash also can be tucked inside.


Sentiment:  Just a note.

This was fun and simple to make.  To create this, simply die-cut the envelope onto double-sided cardstock.  Then score, fold and assemble the envelope.  Next, stamp and then die-cut or trim the sentiment and the other elements.  Now, add color to the stamping and layer the pieces.  For closure, tie twine around the closed envelope flap.  Also, tie a mini sentiment tag with the twine, to finish.  This closed envelope measures 3" x 3".
Tip, to open the envelope, slide the twine up and off.  The inside will hold the die-cut mini note panel.

Here is another look.


Supplies:  My Creative Time 3x3 Fancy Envelope Die, Fun Bubble Dies, Doggies and Kitties, Lots of Greetings; Prismacolor colored pencils PC924, PC1051, PC1054; cording, Ranger archival ink in jet black, Ranger multi medium matte glue; double-sided clear flat and foam tape, double-sided paper, gold foil paper, cardstock, mini Misti.

Please visit Emma's My Creative Time blog for more inspiration.

Enjoy your day.
Gaylynn

8/21/2020

MCT 103rd Edition Release, Blog Hop & Sale

 Hello, it's Gaylynn.  Great news, the My Creative Time 103rd Edition release, sale and blog hop has begun.

For the blog hop, you may have arrived from Emily's blog.


Sentiment:
To the world's best cat + dog Mom.

This was super fun and easy to make.  To create this card, simply stamp a sentiment and die-cut it with the adorable oval paw die.  Note, I used a fine liner pen to add a + sign for the owner of a cat and dogs.  Next, using cardstock and patterned paper, die-cut the background frames and the dog bone pieces.  Trim and score a card base to fit a little larger than the card front panel.  Finally, add ribbon and layer everything to finish.

I have other examples of tall or slim card sizes and coordinating envelopes.
See slim card.

 *** BLOG HOP GIVEAWAY ***
Leave your comments on each blog for a chance to win a $25 Gift Card to the My Creative Time store. One lucky winner will be chosen and noted August 26, 2020 on the MCT blog! GOOD LUCK my friends!
(Please don't forget to leave a way/email for MCT to contact you, if you were to be one of the lucky winners.) 

Here is another look at today's project.


*** SALE ALERT ***
DON'T FORGET our sale starts RIGHT NOW HERE! Use the code: AUG2020 to receive a 15% discount off your entire purchase! This sale applies to "IN-STOCK" items ONLY. This sale will end on Friday, August 28, 2020, at midnight PST. Here are my sneak peek blog projects from this release.


Day 2

Day 3
Supplies for today's project: My Creative Time Doggies and Kitties, Tall Paw Frame Dies and Tall Frame Die Layers; cardstock, BasicGrey 6x6 paper, Ranger potting soil archival ink, flat and foam double-sided tape, fine liner pen, paper trimmer, scoring board, ribbon.

Hop along with us.

Your next stop in the hop is Ginger's blog. The entire blog hop lineup is on Emma's My Creative Time blog.

Thanks for visiting. I look forward to your comments.
Gaylynn


7/02/2020

Watercolor hello slim or tall card ~ MCT Just Cards

Hello.  Today, the My Creative Time team is sharing card project ideas.  Here is my tall or slim style hello card with watercolor and silver embossing.


Sentiment:  Hello

This card is versatile to be used as a greeting card or money holder card.  It is great for many occasions or just because.  For this card, I die-cut the tall slim panels.  Then, I used silver heat embossing onto watercolor paper for the stamping.  Next, I added water and a touch of green Prima watercolor to the top layer.  Finally, everything was layered and silver cording was added, to finish.  

Supplies:  My Creative Time tall frame dies, tall frame die layers, fun notes and just because; original Misti, silver cording, Canson watercolor paper, brush, Prima Art Philosophy watercolor, VersaMark ink, silver embossing powder, heat tool, cardstock, clear flat and foam double-sided tape.

Please visit Emma's My Creative Time blog for more inspiration.

Enjoy your day.
Gaylynn

6/18/2020

Tall Slim Dies ~ MCT 102nd Edition Sneak Peek Day 4

Hi, it's Gaylynn.  Here is Day 4 of the My Creative Time 102nd Edition sneak peeks.
MCT is celebrating their 10 year anniversary.  Tune in Friday for the full release, blog hop and sale.


Sentiment:  Happy birthday.

This card was made using layers from two different tall or slim sets, tall frame dies and tall frame die layers.  These dies are slim style, tall or long depending on how you create with them.  They are placed on this card, alternating from unstitched and stitched panels. These will fit into an #9 business size envelope or ones a little smaller, like #9 or others.
The envelope that I used for this card measures 4 1/8" x 9".

For this card, I first trimmed a card base a little wider than the largest die.
The card base was cut approximately 7 1/2" x 7 1/2" and scored at approx. 3 3/4".
Then, I die-cut patterned paper and cardstock in different colors from largest to the smallest.  Next, I die-cut the sentiment and four dragonflies.  For added color on each dragonfly, I used distress oxide ink blending and stacked the dragonflies a little offset.  Finally, I layered everything onto the card base, to finish.


*** Sneak Peek Giveaway ***
We will be giving away the sets we are showcasing each day to ONE lucky winner!  For example, the set we are showcasing on Wednesday, Emma will announce the winner of that on Thursday and the sets we are showcasing on Thursday, Emma will announce that winner on Friday on the MCT blog!  ALL you have to is leave a comment on each of our blogs!  You are NOT required to comment on every single blog, but the more you comment on, the more chances you have for winning!  VERY IMPORTANT, PLEASE leave a way for us to contact you with your comments just in case YOU are the lucky winner!  
For EXTRA entries, you can spread the word about this release on Facebook, tweet about it OR even Instagram it.... #mycreativetime

Here is another look.


Supplies for today's project: My Creative Time Tall Frame Dies, Tall Frame Die Layers, Money Envelope Die and Pretty Butterflies & Dragonfly Dies; Ranger distress oxide ink in peacock feathers and worn lipstick, multi medium matte glue; mini Misti, cardstock, K & Company patterned paper, ink blending brush, adhesive gems, flat and foam clear double-sided tape.

For more sneak peek inspiration, visit Emma's My Creative Time blog.
Thanks for visiting. I look forward to your comments. Gaylynn

6/10/2020

Pocket fold card ~ note or gift card holder tutorial.

Hello.  For Technique Time at Unity, I am sharing a way to make a pocket card, folded for use as a note holder or as a gift card holder.


Simple folds can make unique cards, like this pocket card.

Here are helpful tips for making this pocket card.  To begin, pre-cut and score the card base.
Cut cardstock to 4 1/4" x 11"
Score at 5 1/2" and 9"
Next, add tacky adhesive like Wonder Tape or Score Tape to the inside fold at the edges and also to the outer flap, to fasten them down.  Also, leave room for a trimmed note panel to fit inside.  Next, stamp and trim the sentiment script background piece and trim a frame layer from patterned paper.  Then, stamp the with love sentiment over the script panel.  Next, trim a note panel to fit inside the pocket.  Next, use repeat stamping on the note panel to add the pink flowers and green sprigs, for a top note border.  Finally, layer the pocket card base and accent with twine to finish.

Here is another look.


Supplies:  Unity Stamp Co. Large Amounts of Love and A Faithful Letter; My Creative Time scalloped stitched rectangular dies, Ranger archival ink in rose madder, viridian and jet black; Prismacolor colored pencils PC930 and PC929; BasicGrey paper, cardstock, paper trimmer, Wonder Tape, black twine, MSC scoring board, flat and foam double-sided clear tape. 

Thanks for visiting.
Gaylynn

5/11/2020

How to make slim cards. 2 masculine cards ~ Father's Day or birthday

Hello.  I am sharing two slimline masculine cards, perfect for Father's Day, Birthday or any time.


Sentiment:  My Father is the best Dad ever.

This first card was made using teal and gray colors.  I used a diagonal die-cut layer in white with a gray background trimmed piece of cardstock.  A paper trimmer was used to make the background panel and the card base.  It is not necessary to use die-cut layers to get the slim line card style.  A paper trimmer works perfectly for trimming to fit your envelope size.


Here is a similar one.

Also, I made another card in blue and gray.  This time, I die-cut the diagonal panel in gray and trimmed a white background layer.  Again, die-cuts are not necessary.  A neutral stamped panel behind the ties would give a great background look.

How to make a slim card base to fit into an #9 or #10 business size envelope:
Use a thicker cardstock and a paper trimmer.
Cut the cardstock 9 1/4" x 8".
Using a scoring board, score the shortest end at 4".

Here is another look.


Supplies:  Unity Stamp Company Beginning Of Anything {May 2020 Kit of The Month}, Ranger multi medium matte glue, #10 envelope, Pink Fresh Studio slim fancy diagonal stripes die and slim ornate banner set; Simon Says Stamp fog cardstock, double-sided flat and foam tape, Copic markers 0, W1, W3, W5, C1, BG32, BG10, B0000, B01, B14.

This project does not include a video tutorial.
However, for my projects with video tutorials, please see my YouTube channel at
Gaylynn NeatThingsBtq

Also, to view my videos here on the blog, click
video.

Thanks so much for visiting.
Gaylynn