Showing posts with label fun folds. Show all posts

6/05/2024

Bible journaling fun fold tag art ~ Luke 23 31

 This project is Bible journaling fun fold tag art with a vintage finish.  This one incorporates stamping both onto cardstock and onto the thin bible pages.


Sentiment:
Love them anyway.  Luke 23 31

Adding art to bible pages adds beauty and interest.

1/25/2023

Juniper fun fold card with colored pencils.

 Hi crafty friends.  Today for the Unity blog, I am sharing a juniper fun fold card with colored pencils.  It includes a flip up element for writing your inside greeting.  The style can be used with almost any stamp or theme.


Sentiment:
His mercies are new every morning; Great is His faithfulness.  "The Lord is my portion," says my soul, therefore I hope in Him!"  Lamentations 3:23:24

For color, I used colored pencils along with ink blending to accent the juniper stamping.  I also incorporated an inspirational spiritual theme.

6/29/2022

Interactive pop-up card technique ~ bird theme

 Hello.  Today, on the Unity blog, I am sharing an interactive pop-up card technique featuring a fun bird on the inside and on the outside.


Sentiment:  
Oh hello!  Miss you like crazy.

I made a quick video tutorial showing the process for this project.

{{Please subscribe to my video channel and like this video.  Many thanks.}}


Almost any pop-up element cut-out can be used with many different stamps to create a similar interactive pop-up feature inside of a greeting card.

8/05/2021

Ocean Box Card ~ MFT Camp Create 2021 Day 5 Delightful Die Cutting

 Hello.  Gaylynn here.  I am participating in the camp projects.  For today, the theme is delightful die-cutting.  I decided to make a tropical box card using interactive dies and sea life icons.


Sentiment:  I love you deeply.

Here are tips for making this card.  To begin, die-cut and assemble the box card.  For added ocean elements, add pieces of wave die cuts for the inside section.  Stamp and place the sentiment label on the front.  Next, stamp, color and die-cut the sea life and background accents.  Finally, adhere all of the sea life and elements into the box card, to finish. 

I made a quick video tutorial of this box project, but MFT has other examples of options for assembling the box cards.  This card flattens to fit into an A2 size envelope.


Here is another look.


The full project video tutorial with included project reference guide is part of my card making class here:
12 Interactive & 3-D Cards Bundle 3.


Supplies:
My Favorite Things Outside The Box Level Up, Ocean Waves die-namics, Under The Sea die-namics, Sweet Safari stamps, Sweet Safari die-namics, Friends With Fins stamps, Friends With Fins die-namics, card stock in Prickly Pear, Fire Coral, Caribbean Sea, Summer Splash, Sno Cone; Extreme Black hybrid ink pad.
Also, Copic markers BG13, BG11, BG32, E57, Y17, BV23, C0, C4, C2, C8, BG72, C6, Y12, YG17, G43, YG61, YG0000.


MFT Camp Create ~ Day 5 Delightful Die Cutting


Please visit the My Favorite Things blog for more inspiration.

Thank you for visiting.

Gaylynn

6/02/2021

Scene building tutorial ~ nature card background

 Card scene building adds interest to stamping.  Today, on the Unity blog, I am sharing a way to make an outdoor nature background with mountains for this buffalo card.  This works as a masculine card or for anyone.


Sentiment:  Have a stompin' great birthday.

This buffalo stamp is amazing and so detailed.  I gave him a background using masking and ink blending to create card scene building.


Helpful tips:

Here are helpful tips for adding card scene building to stamping.  To begin, stamp the buffalo with Copic friendly ink and also, stamp the HB2U accent tag.  Then, stamp the sentiment near the bottom of the inside liner.  Next, make an A2 card base from color cardstock then trim away about one inch from the bottom of the top fold.  Also, trim a scene panel to fit the top portion of the card base.  Then, add color to the buffalo.  Fussy cut (cut out) the buffalo.  Next, trim or die-cut cardstock slopes or mountain pieces to use as masking for the background scene.  Place a mountain shaped mask piece in the center of the scene panel and add distress ink blending to the top and the bottom of that mask piece.  Aso, mask the top and bottom of the scene to blend color for the mountain section.  Finally, assemble the card pieces and the accents onto the inside and the front of the card, to finish.

Here is another look.


I made a quick video tutorial showing the process for this project.
{{Please subscribe to my video channel and like this video.  Many thanks.}}
YouTube:  Gaylynn NeatThingsBtq


 Supplies:
Unity Stamp Co. Aging Graze-Fully and Sentiment Tags. 
Also, Fiskars paper trimmer, scissors, Copic markers E29, E37, E44, E13, C1; original Misti, MFT extreme black hybrid ink pad and mountain die-namics (retired); flat and foam double-sided tape, Ranger plastic craft mat, distress oxide ink in broken china, walnut stain and peeled paint, archival ink in potting soil and Viridian; cardstock, cording, hole punch, purple tape.

Be sure to visit the Unity blog for the entire article and tutorial.

Also, you can find my other features at Unity's
Technique Time and
Watercolor Wednesday.

    Thank you for visiting.
   Gaylynn
         

5/26/2021

Slanted diagonal hand cut card tutorial + watercolor floral trim

 Hand cut card detail adds interest and a different look.  Today, I am sharing a way to hand cut a card front to be used as a dimensional card border.


Sentiment:  Hey girl!

This is a hand cut card with an added watercolor floral border.  It offers a clean and simple look plus a peek at the inside sentiment.


Helpful tips:

Here are helpful tips for making this slanted diagonal hand cut card.  To begin, cut and score an A2 card base.  Also, cut an inside panel using color cardstock.  Next, stamp the sentiment in the top right order of the inside panel.  Also, using waterproof ink, stamp the flowers and the leaves onto watercolor paper.  Then, watercolor the flowers and leaves.  Next, once dry, fussy cut (cut out) the flowers and the leaves and add foam tape to the back of each.  Now, using a paper trimmer or scissors, cut a diagonal from the card front, horizontally.  For this example, I cut at about 1" from the bottom right up to 1" from the top left score line.  Finally, assemble the floral border to the edge of the white diagonal flap and then add the inside panel to finish the card. 

Here is another look.


    Thank you for visiting.
   Gaylynn
         

Affiliate Supply List:


5/02/2021

Double fold floral card tutorial + Unity stamps, paper & dies

 For today, I am sharing an interactive double fold card tutorial.  This one features florals from stamping and from patterned paper.

Sentiment:  Let life unfold, Beautiful.


Helpful tips:

Here are helpful tips for making this interactive double fold card.  First, trim and score the card base, the inside fold and the patterned paper pieces.  Next, stamp and watercolor the flowers onto the smooth side of watercolor paper.  Then, fussy cut (cut out) the flower and the stamped front sentiment.  Also, stamp, die-cut and layer the inside beautiful sentiment onto the inside of the small fold piece.  Next, assemble the layers to make a left fold and a right fold.  Finally, layer the papers, the flower and the outer sentiment, to finish.
A2 card base cut 8 1/2" x 4 1/4, score 5 1/2".
Background paper cut 5 1/4" x 4".
Front trim cut 4" x 2 3/4".
Left fold mini card layer, cut 8" x 3", score 4".
 
Here is another look:


Also, cardstock, scissors, scoring board, Fiskars paper trimmer, Altenew watercolor, Ranger watercolor paper, My Favorite Things premium dye ink in poppin' pink.

Thank you for visiting.
Have a beautiful day.


1/29/2021

Flip-Up Card ~ MCT 48 Hour Flash Sale & Blog Hop

 Hi, it's Gaylynn here. Welcome to another My Creative Time "48 Hour Flash Sale" and blog hop. This sale is for 48 hours ONLY that is going on right NOW and will end on Sunday, January 31, 2021 at 7am PST. Use the code FLASH at checkout to get 20% off of your entire "in-stock" only purchase! Sale applies to in-stock items only! Start shopping HERE. For the blog hop, you may have arrived from Emily's blog.

Sentiment: Thank you.

Today's card is a thank you card that doubles as a gift card holder. there is a flip-up gift card holder on the card front. This is great for thanking someone and it is great for a man or a woman. It can be an easy masculine card also. For this one, I used kraft and navy blue papers along with amazing die-cuts by MCT.

In addition to our sale, we are ALSO showcasing a brand new die set! It is called “FANCY GIFT CARD HOLDER DIE”. This new set is available for purchase HERE.

GIVEAWAY!
Leave your comments for a chance to win a $25.00 Gift Card to the "My Creative Time" store! Don't forget to leave a way for us to contact you "just in case" YOU are the LUCKY winner! Good Luck!


Don't forget to use the code FLASH at checkout to get 20% off of your entire "in-stock" only purchase!

Supplies:  My Creative Time Fancy Gift Card Holder Die, Rectangle Frame Die Layers and Belly Band Dies; navy blue cardstock, TCWV kraft color cardstock, adhesive gems, cardstock, Ranger multi medium matte glue and flat clear double-sided tape.

Your next stop in the blog hop is Ginger's blog.


The entire hop lineup is on Emma's My Creative Time blog.

Remember to leave comments along the way on the blog hop for MCT prize chances.
Thanks for stopping by.

Gaylynn

12/16/2020

Butterfly Pop-Up Card Inside Panel ~ Tutorial

 Hello.  For Technique Time at Unity, I am showing an easy way to add a pop-up card panel inside of your handmade cards.


Sentiment:  
Don't be afraid, for I am with you.
Don't be discouraged, for I am your God.
I will strengthen you and help you.
Isaiah 41:10

For this butterfly pop-up card, I used a few different stamp kits along with a bit of coloring and cuts.

Helpful tips:
Here are helpful tips for creating this butterfly pop-up card with an inside surprise.  To begin, stamp the butterflies with Copic friendly ink.  Also, stamp the sentiment and background panels.  Next, trim an inside liner to cover the inside of the card.  Also, trim a matching front panel layer and the script background layer.  Then, color in the butterflies and fussy cut them (cut them out).  Next, add cuts across the score line of the inside liner panel.  I used a die-cut, but carefully cutting with a ruler works also.  Then, fold out that panel along score lines.  Also, adhere the third butterfly onto the bottom portion of the inside pop-up panel piece.  Finally, to finish, layer the card front and add the inside sentiment.


Here is another look.


Also, foam and flat double-sided tape, cardstock, MFT Pop-Up Elements Narrow and Wonky Stitched Rectangle STAX die-namics; Fiskars paper trimmer, Papertrey Ink vellum cardstock, Copic markers BG32, BG10, YR00.

Thank you for visiting.
Gaylynn

9/01/2020

Rosette 3-D Card ~ MCT Birthday Palooza

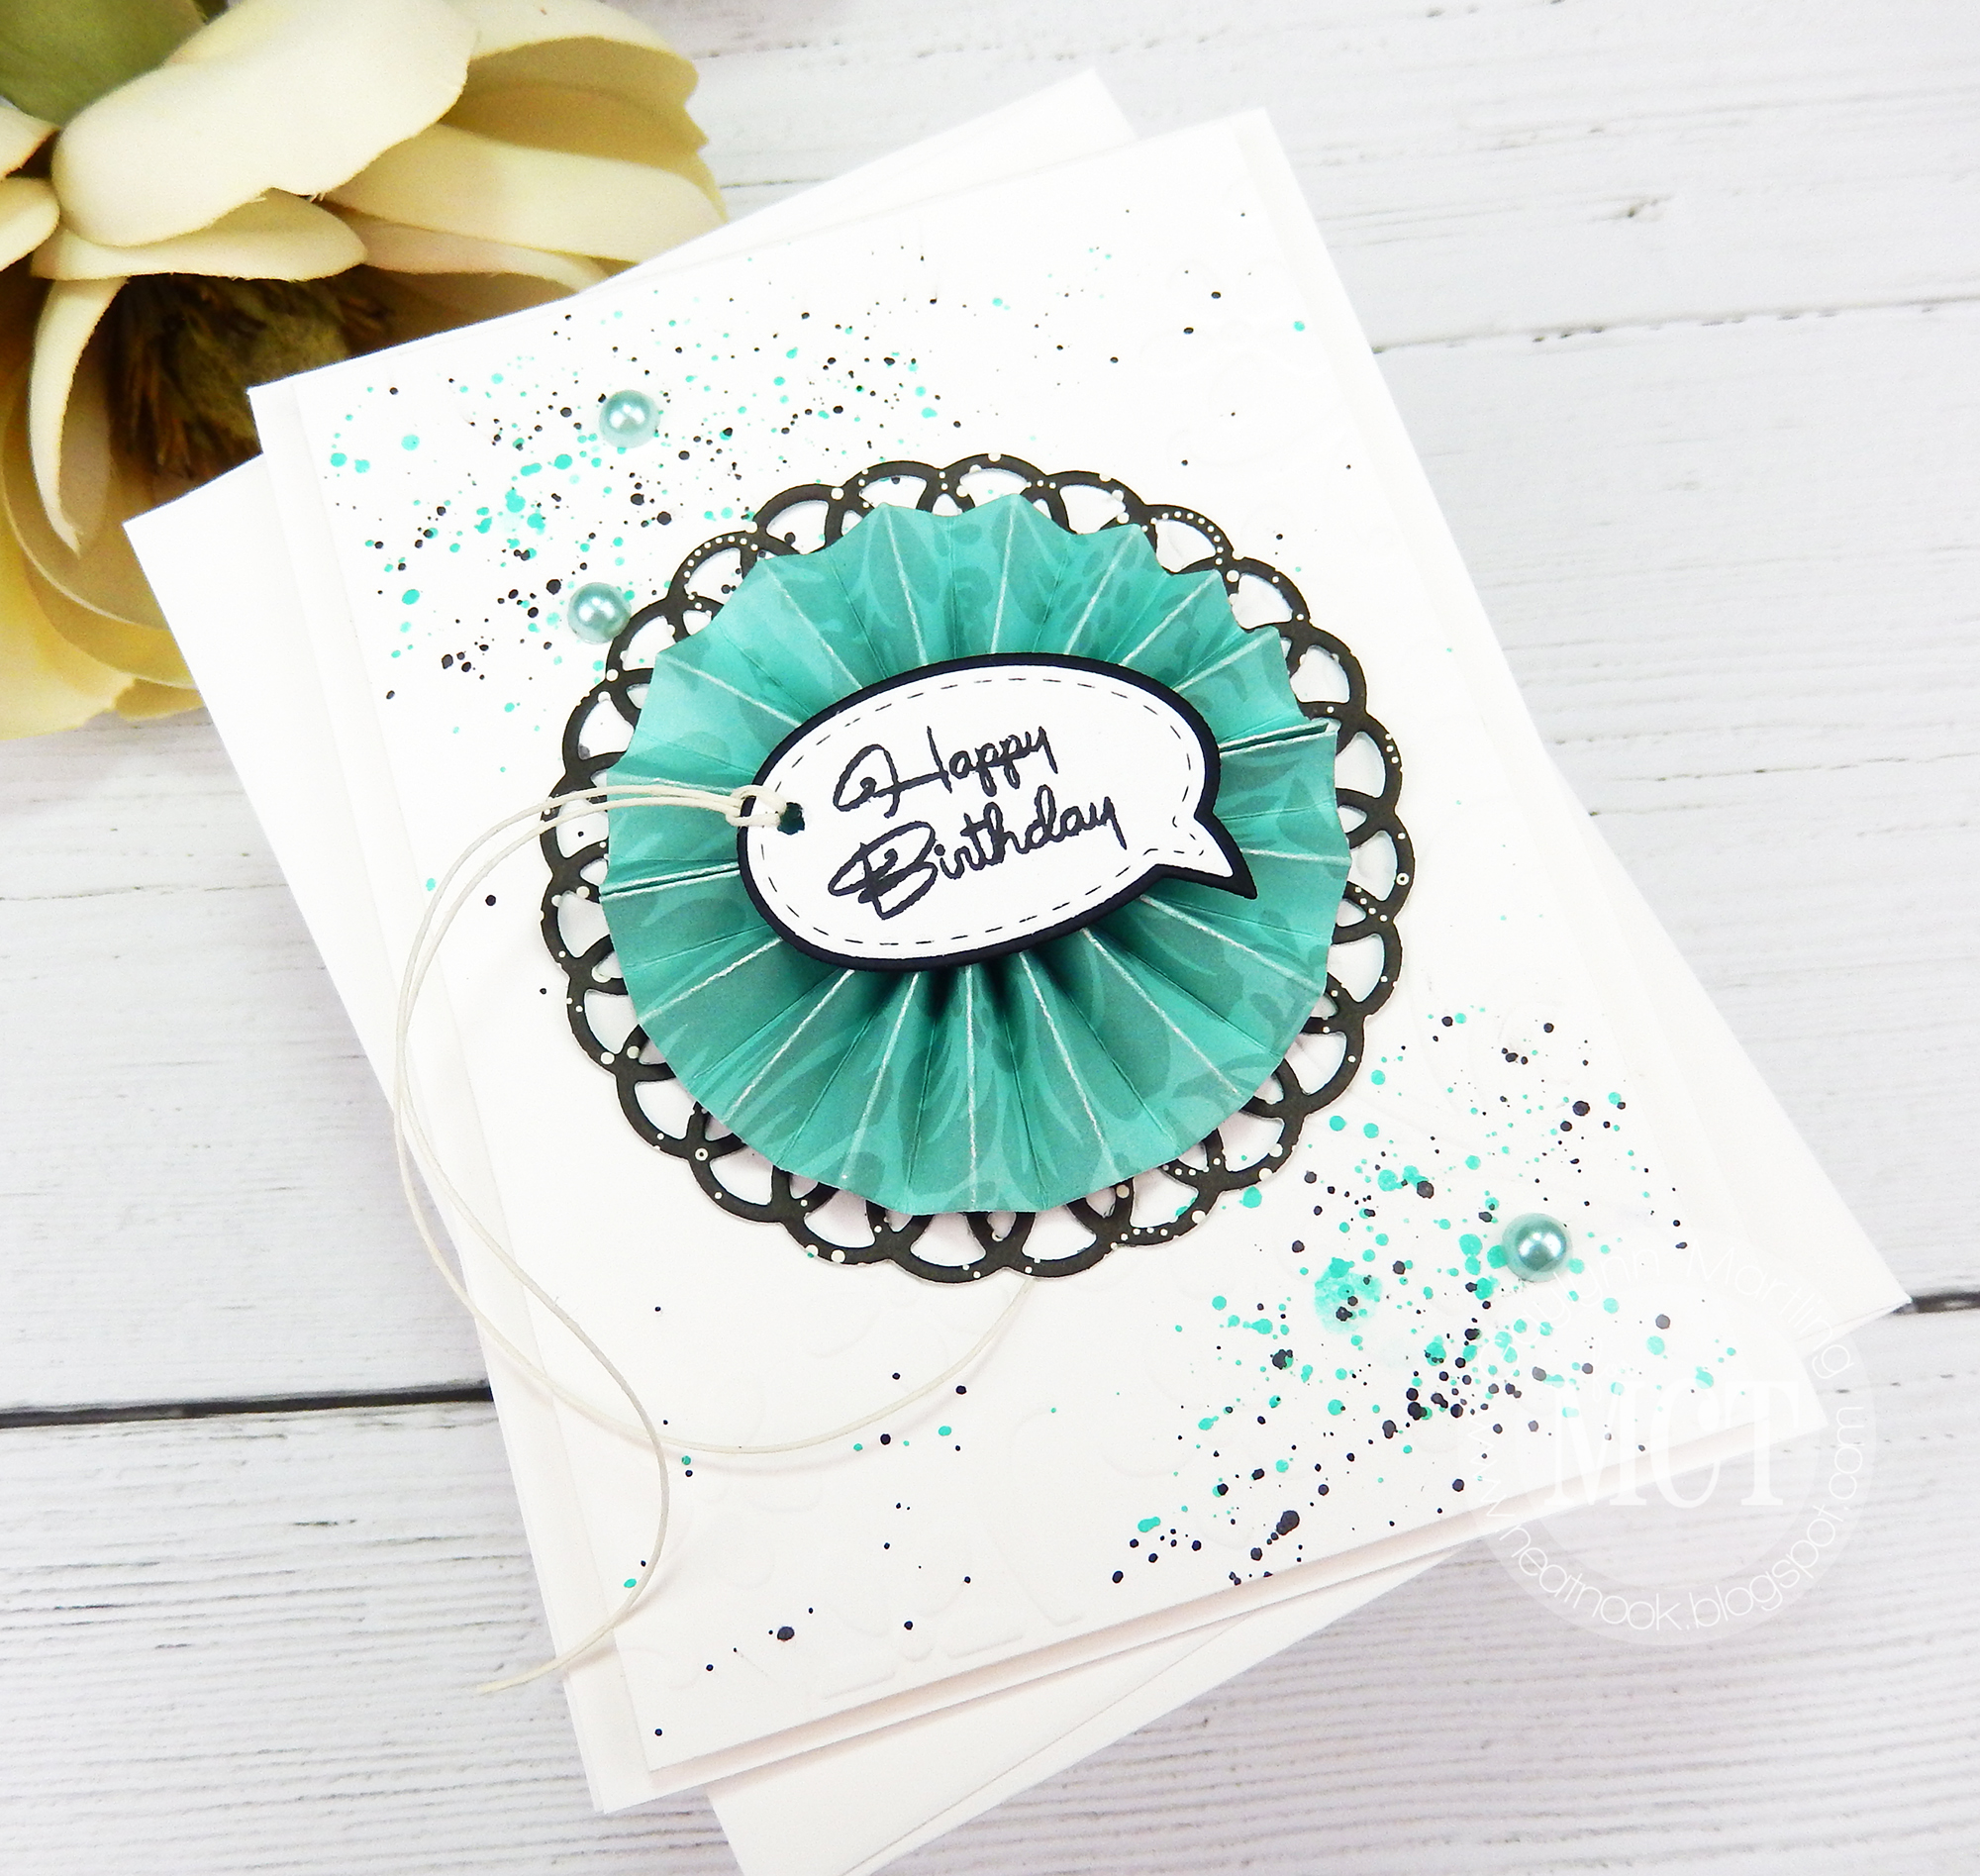
 Hello.  The My Creative Time design team is sharing birthday palooza themed projects.  Here is my 3-D rosette happy birthday card with watercolor splatter accents.

Sentiment:  Happy Birthday.

To make this card, first stamp and die-cut the sentiment bubbles.  Next, die-cut the doily once and the rosette twice onto patterned paper.  Then, fold the rosette at the score lines, all the way around, connecting the two die-cut pieces with extra tacky tape.  Fan out the rosette and adhere it to the doily layer using a hot glue gun.  Also, add the sentiment bubble tag using the glue gun.  For the background, dry emboss on white and then splatter with watercolor and a paint brush.  Once dry, trim the background panel to fit your card front.  Finally, adhere everything to the card base, to finish.


Here is another look and the 3-D detail of the rosette, once it is assembled.


Supplies:  My Creative Time Bunch of Doily Dies, Scallop Rosette Dies, Fun Bubble Dies, Lots of Greetings; assorted patterned paper, Altenew half pans watercolor, paint brush, adhesive gems, cording, glue gun, Ranger archival ink in jet black, Ranger Wonder tape, double-sided clear flat and foam tape.

Please visit Emma's  My Creative Time blog for more inspiration.

Enjoy your day.
Gaylynn

7/23/2020

Mailbox shaped card ~ MCT gift card giving

Hello.  Today, the My Creative Time team is sharing gift card giving themed projects.  Here is my mailbox shaped gift card holder.


Sentiment:  Celebrate

This was quick and easy to make with no coloring needed.  I just die-cut the pieces onto patterned and plain paper.  The sentiment was added with a stamp and die-cut as well.  I added the mini envelope onto the front for an added accent.

To get the shape card base with fun folds, just die-cut two of the largest dies, score the back panel's top edge at 1/4", fold that edge inward.  Position the mailbox evenly and the bottom portion with the two panels and then adhere the two layers together at the folded score section only.  The card should open, close and stand up easily.  This mini card or gift card holder measures approximately 4" x 3" assembled.  It fits into an A2 envelope with extra room.

Here is another look.


Supplies:  My Creative Time Mailbox Gift Card Holder Die, Mini Love Letter Dies and Best Day Ever; Pink Paislee paper, cardstock, score tape or extra tacky tape, double-sided clear flat tape, adhesive dots.

Please visit Emma's My Creative Time blog for more inspiration.

Enjoy your day.
Gaylynn

7/08/2020

Easel card with blue toile stamping tutorial.

Hello.  I am sharing an easel card tutorial with blue toile stamping.  This card brings back some oldies but goodies in my Unity treasure box.


Sentiment:
Everyone is fighting a battle you know nothing about.  Be kind.

Using toile accents really makes this easel card pop.


Helpful tips:
Here are tips for creating this toile easel card:  First, stamp the background toile and the sentiment onto cardstock using a stamp positioner like the Misti.  Next, trim or die-cut all of the cardstock stamped panels and layers.  Now, score the blue frame panel to make a front easel.  Then, begin assembling the top layers and add twine or cording to the tag accent.  Next, fold the blue scored easel panel and adhere the back section to the top fold card base.  Now, add the top accent sentiment section.  When finished, this is an A2 sized card with a front panel that folds out to make an easel card shape.
 
Card base:  A2 top fold. Cut 4 1/4" x 11", score 5 1/2"
Blue frame panel:  cut 4" x 10 1/4" and
score on the long end at 5 1/4" x 7 3/4".
Toile background:  5" x 3 3/4"
(Also, make an accent trim with leftover cuts.)
Front white bottom panel:  2 1/4" x 3 3/4"
Layered Tag:  3 1/2" x 2 1/2"

Here is another look.


Supplies:  Unity Stamp Co. Tea Time Toile and Everyone You Meet; Ranger archival manganese blue and cobalt ink, original Misti, cardstock, hole punch, gold cording, flat and foam double-sided clear tape, MCT rectangle frame dies, tag frame dies, tag frame die layers; Fiskars paper trimmer, scoring board, bone folder, gold paper, Prismacolor colored pencils in PC904 and PC906.  

Thanks for visiting.
Gaylynn

7/01/2020

Watercolor tri-fold slim card ~ diagonal cut tutorial

Hi there.  Today, I am sharing my tri-fold slim card made using watercolor and diagonal cut detail.


Sentiment:
This is us, our life, our story, our love
Through the ups and downs, I'd pick you again and again.
Happy Anniversary

This tri-fold slim card is interactive, with art on the front and on the inside.  It was easy and fun to make.


Here are the measurements that I used for this trifold slim card base & envelope.  Please reference the video for the process and details for this project.

This tri-fold slim card size folded is approximately 3 5/8" x 8 1/2".
First, use an envelope #10 size or a 4 1/8" x 9" size.
Also, use one sheet of 8 1/2" x 11" cardstock for the base.

Next, score on one end of the long side at 3 5/8".
Then, rotate the paper to score the other side of the long end at 3 5/8".
You should have two vertical score lines on a horizontal sheet of cardstock.

Next, using a paper trimmer, align the cutting from about 2" from the bottom left of the horizontal cardstock piece upwards to the top of the second fold line.  Then, cut a diagonal section from the cardstock, from those points.
Next, fold back the small cut section at the first fold line and fold inward at the second fold line.
Finally, decorate the front and the inside with stamping, watercolor and embellishments.

This card base and envelope example was made using an envelope that I happen to have on hand.

Please note, dies are not necessary.  A paper trimmer can be used to trim the desired card base and the layers.


Here is another look.


Supplies:  Unity Stamp Co. You Are My Always; Ranger archival jet black ink, cardstock, flat and foam double-sided clear tape, Pink Fresh Studio slim ornate banner dies; Altenew watercolor half pans and palette mat; watercolor brush, envelope, Fiskars paper trimmer, MSC scoring board, bone folder, Canson watercolor paper. 

Thanks for visiting.
Gaylynn

6/08/2020

Fun fold cards ~ double gate fold, double easel & double side folds

Today, I am sharing three fun fold cards made during a recent retreat at the Pink & Main store in Athens, GA.  I am have not dabbled in fun folds in a very long time, but this was refreshing to do with pretty papers, stamps and dies.


Sentiment:  Let your faith be bigger than your fear.

First up is a double easel card with pretty papers and a big sentiment, front and center.
This may be called a step card, but I believe it is also a double easel card style.  Both the background and the sentiment tag sit upright once the card front is opened out.  This is A2 size and the teal card base opens like a regular top fold card.  I LOVE this design and will certainly be using this more often.


Next up, a double side fold card.


Sentiment:  Hello friend.  You are loved.

This butterfly card includes two fun fold side folds which interchange and open to the sentiment.  Again, we have lovely floral papers and sweet stamping.


Sentiment:  Life is tough, but darling, so are you.

Next up is a booklet style card made from a double gate fold technique, gorgeous papers and stamps.
This makes a smaller card when flat, but it expands once opened into interesting inside panels.  This is great for notes, art or photos for a mini photo album.  The front ties the card closed with a pretty ribbon.


It is in my plans to incorporate these techniques into separate videos in the future.

These projects do not include a video tutorial for this post.
However, for my projects with video tutorials, please see my YouTube channel at
Gaylynn NeatThingsBtq
Also, to view my videos here on the blog, click
video.

The supplies are patterned paper, cardstock, clear stamps, ink, dies and embellishments by Pink & Main.

I want to give a shout out to Michelle Currie, owner of Pink & Main, and her staff for the fabulous card class, stamps, dies, inks and more.  Also thanks for hosting the 2020 Unstoppable Retreat in Athens, GA.  This lovely store and class space are located inside the local mall.  It was great meeting Michelle and learning how her business expands beyond the store and extends with classes, their online shop, social media and their booth presence at craft events, year-round and more.

Thanks for visiting.  I would love to hear from you.
Gaylynn