Today for Unity Stamp Company, I am sharing these festive and sweet sticky notepad holders. The stamping adds to the charm of these little holiday gifts, hostess gifts or stocking stuffers.
These holders for sticky notes were easy to make with the added trimmed stamping.
Hello. Today, I am sharing a holiday bird themed mini circle card & envelope set. This is great for stocking stuffers, little notes or gift card giving.
Sentiment: Happy Holidays
This coordinating mini card and envelope set was easy to make featuring the fun birdie.
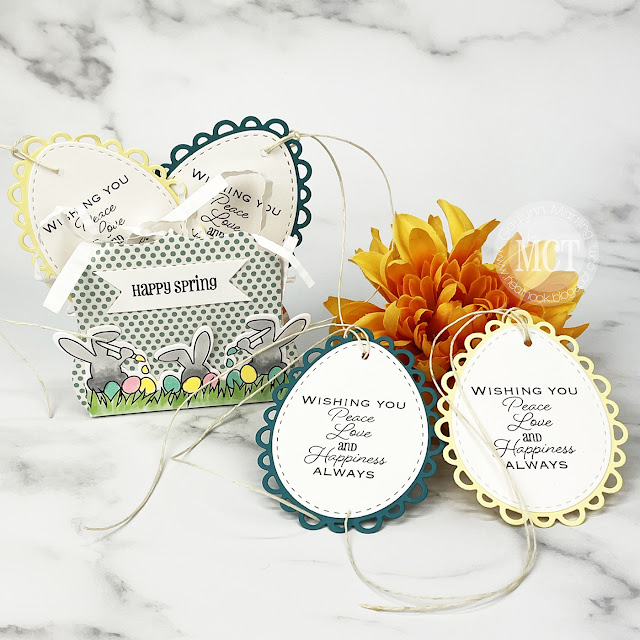
Hello, it's Gaylynn. The My Creative Time 118th Edition release and sale is live. For today, I am sharing a set of Spring gift tags in a gift box using a peek at some of the items available today. See what Emma has in store for you. For the blog hop, you may have arrived from Emily's blog.
Sentiments:
Happy Spring.
Wishing you peace, love and happiness always.
This can be used as a favor box or a little gift box, filled with a set of four tags. These can be given out as lunch box notes, as a thank you, added to cards and crafts, as teacher gifts or teacher appreciation, as package decoration and more. The sentiment on the tag is versatile for any time of the year. The little box is Spring inspired.
Hello, and welcome to the My Creative Time "5" Days of Christmas"! This week we will be sharing with you lots of last-minute Christmas ideas, such as cards, tags, treat holders, gift card holders and whatever else comes to mind that will help YOU get your creative juices flowing for the holiday! There will be a giveaway each day and all winners will be announced next week on the MCT blog! All you have to do is leave your comments on each of our blogs for a chance to win one of five $15 Gift Card to the My Creative Time store!
Today is Day 5 of our 5 Days of Christmas! We all will be showcasing some quick and EASY holiday projects of our choosing! I decided to make some holiday sticky note holders.
Here is one of the quick and easy gifts made as stocking stuffers this year. This one is in navy blue and holds a lighter blue Post It note pad. It is accented with gold shimmer ribbon and a gold shine tree die-cut. This holiday tree note holder measures approximately 3 1/4 x 3 1/4" assembled. It works perfectly for a guy or gal.
Hi, it's Gaylynn. The My Creative Time 112th Edition release, sale and blog hop has begun. The design team is sharing project inspiration on our blogs. Please visit each blog in the blog hop and leave a comment on each of the release posts. For the blog hop, you may have arrived from Emily's blog.
Sentiment: Hello. Happy Mail.
For this card, I chose pastels in lavender and purple hues. I made a note card and envelope from color cardstock and patterned paper using MCT dies. The sentiment and accents were added to decorate this mini shape card. I love that the envelope can be made to match the card. I can see so many uses for these new 4x4 sets.
*** BLOG HOP GIVEAWAY ***
Leave your comments on each blog for a chance to win a $25 Gift Card to the My Creative Time store. One lucky winner will be chosen and noted on the MCT blog! GOOD LUCK my friends! (Please don't forget to leave a way/email for MCT to contact you, if you were to be one of the lucky winners.)
Here is a peek at the 112th Edition MCT release items:
*** SALE ALERT ***
DON'T FORGET our sale starts RIGHT NOW HERE! Use the code:JULY2021 to receive a 15% discount off of your entire purchase! This sale applies to "IN-STOCK" items ONLY. This sale will end on Friday, August 6, 2021, at midnight PST.
Here is another look at today's project.
Here are my sneak peek blog projects from this release.
Hi there. For today, I am sharing a vintage bird faux shaker card. It also includes an inside message for a bonus gift. This is ready to be regifted or reused by the receiver.
Sentiment:
Thinking of you today.
Bonus Gift: Feel Free to remove this note and use this card for someone else.
Here are tips for making this card. First, die-cut or trim background layers and a frame. Next, stamp onto the top kraft color panel, with or without coloring it in. Then, adhere confetti or adhesive gems or dots around the bird and inside the frame area. This mimics a shaker card, but without movement of the gems. Finally, adhere and assemble the panels onto the card base, to finish.
I made a quick video tutorial showing the process for this project.
{{Please subscribe to my video channel and like this video. Many thanks.}}
Hi there. For Technique Time at Unity, I share how to make watercolor mini note cards and a matching gift box. Sets like this are great to give as a gift for teachers, friends, family or anyone.
Sentiments: Hello. Thanks.
Helpful tips:
Here are helpful tips for creating watercolor mini note cards and the gift box. First, trim or die-cut a box, mini notes and watercolor paper layers for each. I used a die-cut from a slim or tall die and folded that in half for each mini note. A paper trimmer works also. Also, assemble the box or use an existing mini gift bag. Next, stamp onto each of the watercolor panels and then heat emboss the stamping with white embossing powder. Then, apply three thick watercolor lines in different colors onto each of the stamped watercolor paper panels. Next, allow to dry completely or heat set the watercolor. Then, adhere the watercolor panels onto the folded 3x3" mini note card fronts and onto the gift box front and back sides. Optional, make handmade envelopes for each mini note or use existing 3x3" envelopes. Finally, place the envelopes and the mini note cards inside of the gift box with or without tissue paper.
Gift box: Die-cut or cut 2 box panels 5" x 4 1/2", score, fold & tape to assemble the box.
Mini note cards: Die-cut or trim 6 1/2" x 3" and score at 3 1/4".
I made a quick video tutorial showing the process for this project.
{{Please subscribe to my video channel and like this video. Many thanks.}}
Hello. Today, the My Creative Time team is sharing projects which can be made in minutes. Here is my decorated mini note, tag and envelope set with a pet theme. This one is great for a dog owner or as a thank you for pet sitting. This is a bit small for a gift card, but cash also can be tucked inside.
Sentiment: Just a note.
This was fun and simple to make. To create this, simply die-cut the envelope onto double-sided cardstock. Then score, fold and assemble the envelope. Next, stamp and then die-cut or trim the sentiment and the other elements. Now, add color to the stamping and layer the pieces. For closure, tie twine around the closed envelope flap. Also, tie a mini sentiment tag with the twine, to finish. This closed envelope measures 3" x 3".
Tip, to open the envelope, slide the twine up and off. The inside will hold the die-cut mini note panel.
Here is another look.
Supplies: My Creative Time3x3 Fancy Envelope Die, Fun Bubble Dies, Doggies and Kitties, Lots of Greetings; Prismacolor colored pencils PC924, PC1051, PC1054; cording, Ranger archival ink in jet black, Ranger multi medium matte glue; double-sided clear flat and foam tape, double-sided paper, gold foil paper, cardstock, mini Misti.
Hello. For Technique Time at Unity, I am sharing a way to make a pocket card, folded for use as a note holder or as a gift card holder.
Simple folds can make unique cards, like this pocket card.
Here are helpful tips for making this pocket card. To begin, pre-cut and score the card base. Cut cardstock to 4 1/4" x 11" Score at 5 1/2" and 9"
Next, add tacky adhesive like Wonder Tape or Score Tape to the inside fold at the edges and also to the outer flap, to fasten them down. Also, leave room for a trimmed note panel to fit inside. Next, stamp and trim the sentiment script background piece and trim a frame layer from patterned paper. Then, stamp the with love sentiment over the script panel. Next, trim a note panel to fit inside the pocket. Next, use repeat stamping on the note panel to add the pink flowers and green sprigs, for a top note border. Finally, layer the pocket card base and accent with twine to finish.
Here is another look.
Supplies: Unity Stamp Co. Large Amounts of Love and A Faithful Letter; My Creative Time scalloped stitched rectangular dies, Ranger archival ink in rose madder, viridian and jet black; Prismacolor colored pencils PC930 and PC929; BasicGrey paper, cardstock, paper trimmer, Wonder Tape, black twine, MSC scoring board, flat and foam double-sided clear tape.
Hi, it's Gaylynn. Here is Day 1 of the My Creative Time 101st Edition sneak peeks.
Sentiment: Make every day count.
For today, I am sharing a floral pocket card or gift card holder. This one has two die-cut flowers on a die-cut pocket sleeve as part of the card front. The flower and sentiment are part of the sneaks. And the treat sleeve die is a revised set coming soon. And it includes extra fun dies like this little tag and other accents. I love this sentiment, especially during these recent times.
*** Sneak Peek Giveaway ***
We will be giving away the sets we are showcasing each day to ONE lucky winner! For example, the set we are showcasing on Wednesday, Emma will announce the winner of that on Thursday and the sets we are showcasing on Thursday, Emma will announce that winner on Friday on the MCT blog! ALL you have to is leave a comment on each of our blogs! You are NOT required to comment on every single blog, but the more you comment on, the more chances you have for winning! VERY IMPORTANT, PLEASE leave a way for us to contact you with your comments just in case YOU are the lucky winner!
For EXTRA entries, you can spread the word about this release on Facebook, tweet about it OR even Instagram it.... #mycreativetime
Here is another look.
Supplies for today's project: My Creative Time Stay Beautiful and Treat Sleeve Die Revised; Ranger archival ink in cobalt and wonder tape; ivory cardstock, teal twine, mini misti, adhesive gems, Zig clean color real brush pens in 031, 036, 037.
Hi, it's Gaylynn. Here is Day 1 of the My Creative Time 100th Edition sneak peeks.
Sentiment: Happy Easter
For today, I am sharing a mini bunny note card and envelope for Easter time. This was die-cut from mint and ivory cardstock. The sentiment was stamped and a bit of Copic coloring was added to the bunny ears. This was quick and easy to make. It would be a sweet little greeting for someone or added to an Easter basket.
*** Sneak Peek Giveaway #1 ***
We will be giving away the sets we are showcasing each day to ONE lucky winner! For example, the set we are showcasing on Wednesday, Emma will announce the winner of that on Thursday and the sets we are showcasing on Thursday, Emma will announce that winner on Friday on my blog! ALL you have to is leave a comment on each of our blogs! You are NOT required to comment on every single blog, but the more you comment on, the more chances you have for winning! VERY IMPORTANT, PLEASE leave a way for us to contact you with your comments just in case YOU are the lucky winner!
For EXTRA entries, you can spread the word about this release on Facebook, tweet about it OR even Instagram it.... #mycreativetime *** Sneak Peek Giveaway #2 *** In addition to our regular sneaky peek giveaway, we will be doing a second giveaway to celebrate our 100th Edition Release! Again, all you have to do is leave comments on EVERY stop in this blog hop and then you will be entered to win a $20 gift card to the “My Creative Time Store”. Emma will announce all 9 winners for the $20 gift cards the My Creative Time blog on Monday, February 24, 2020! GOOD LUCK my friends!Also, don’t forget to leave a way for us to contact you if you were to be one of the winners!
Supplies for today's project: My Creative Time Eggstra Special, Bunny Note Card Die and Love Letter Die; mint and ivory cardstock, distress oxide ink in cracked pistachio, mini misti, wonder tape and Copic markers R20, BG10, BG32.
Hi there, it's Gaylynn here. Here is Day 2 of the My Creative Time 99th Edition sneak peeks.
Sentiment: Will you be my Valentine? My heart belongs to you.
For this card, I layered mini envelopes and notes along with an XOXO title and border. This makes a great Valentine's Day card for a guy or gal. I used patterned papers with a love theme and coordinating colors.
***Sneak Peek Giveaway***
We will be giving away the sets we are showcasing each day to ONE lucky winner! For example, the set we are showcasing on Wednesday, Emma will announce the winner of that on Thursday and the sets we are showcasing on Thursday, Emma will announce that winner on Friday on my blog! ALL you have to is leave a comment on each of our blogs! You are NOT required to comment on every single blog, but the more you comment on, the more chances you have for winning! VERY IMPORTANT, PLEASE leave a way for us to contact you with your comments just in case YOU are the lucky winner!
For EXTRA entries, you can spread the word about this release on Facebook, tweet about it OR even Instagram it.... #mycreativetime. GOOD LUCK EVERYONE and let's start spreading the word! Here is another look:
Supplies for today's project: My Creative Time Mini Love Letter Dies, Mini Valentines, Love Letter Dies and XOXO Border Dies; Pink Paislee Moonstruck paper, Ranger plum archival ink, cardstock and adhesive.
Hi there, it's Gaylynn here. The My Creative Time 98th Edition release, sale and blog hop has begun. You may have arrived from Emily's blog.
Sentiment: I love us.
For this mini note card and coordinating envelope, I used the colors of gray, white and black. I decided to use a black mini card insert with white heat embossing for the sentiment. The envelope and bow were cut from assorted patterned paper. I added layers to the mini note card and to the envelope for extra accents. This one is great for any love occasion, including Valentine's Day. But it could be for any occasion, just by changing up the papers and the sentiment.
*** BLOG HOP GIVEAWAY *** For our blog hop giveaway, Emma is giving away a $25 gift card to the "My Creative Time" store to ONE LUCKY winner! ALL you have to do is leave a comment on each of our blogs! You are NOT required to comment on EVERY SINGLE blog, but the more you comment on, the MORE chances you have for winning! VERY IMPORTANT, PLEASE leave a way for us to contact you w/your comment just in case "YOU" are the lucky winner!
*** FREEBIE *** Starting today, Friday, December 13th, 2019 at 8am PST, we will be giving away this new "Fun Sized Heart Bow Die ". This new die will be given to the FIRST 25 shoppers! If you are one of the first 25 shoppers, it will automatically be added to your package at the time of packing/shipping. Once 25 shoppers come through, this die set will be available for purchase! So, if it's available in the store, you are not one of the 25. No exceptions will be made. This freebie is not part of the "bundle" and will be sold separately. (Freebie has ended.)
Here are my sneak peek blog projects from this release.
Supplies for today's project: My Creative Time Love Letter Dies, Be Mine stamps and Fun Sized Heart Bow dies; VersaMark ink, white embossing powder, Score tape, assorted patterned paper, cardstock and foam tape.
Hop along with us.
Your next stop in the hop is Jessica's blog.
The entire blog hop lineup is on Emma's My Creative Time blog.
Thanks for visiting. I look forward to your comments.
Gaylynn
Today, the My Creative Time team is sharing 3-D projects. I wanted to make a holiday stocking stuffer using a mini note pad wrap.
Sentiment: Ho HO Ho This was super easy and quick to make. The note holder die was cut in just one pass. It wraps perfectly around a 2" x 2" sticky note holder pad. I used holiday patterned paper from my stash and topped it with the fun sentiment.
Supplies: My Creative Time 2 x 2 Note Holder Die and Ho Ho Ho die; BasicGrey Nordic Holiday (retired) paper and a 2x2 inch post-it note pad.
Hi. This is Gaylynn and I enjoy paper crafts, mostly card making. This is a place to document my hobby. I get to do what I love as a contributor on creative design teams. You will find card tutorial videos here as well. Thank you so much for visiting.