Hello! Welcome to the June 2024 Friends of Unity blog hop. The theme this month is celebrations. I chose the birthday occasion for this hop. Be sure to comment on our FOU blog posts during the month. You will find your next stop in the blog hop below.
Today for Unity Stamp Company, I made a set of six Halloween treat tags with stamping & ephemera. This made easy handmade decorations without coloring.
Add a little bit of spooky decorations to your Halloween candies or treats this year. The decorations are unexpected and always well received.
Hello and welcome to the My Creative Time "128th Edition MINI Release" & Retirement Sale! MCT is retiring some products to make room for LOTS of FUN new stuff coming in 2023! Use the code DEC2022 at checkout to get 15% off of your entire purchase HERE! Click on the "RETIRED PRODUCTS" category to shop the already marked down products that we are retiring! The 15% off discount will apply to EVERYTHING in the MCT store throughout the weekend!
Here is my first project, a winter holiday snowman card featuring sweet non-traditional holiday colors of purple and green.
Hello. The My Creative Time design team is sharing gift card giving projects. For today, I made a set of six winter holiday themed layered gift tags. These were super easy to make.
Sentiments:
Sweet holiday wishes. Wishing you a merry little Christmas. From our home to yours. Sending you Christmas hugs. Do not open until Christmas.
Sweet holiday wishes.
These tags were cut three at a time using a trio of dies along with holiday patterned paper. They were super simple and quick to make.
Hello, it's Gaylynn. The My Creative Time 123rd Edition release and sale are coming up on Friday. But for today, the team is sharing adorable Day 1 sneak peeks. I am featuring an innovative set of tag dies and a brand new paper pad by MCT.
Emma's new "FUN CHRISTMAS 6X6 PAPER PAD" will be given to the first "25" shoppers for FREE starting this Friday, 7/22/2022 at 8am PST! Once the 25th shopper comes through, this paper pad will be available for purchase! When you see this paper pad in the new release category, that means that you missed the window! This paper pad will NOT be included in the bundle. It will be sold separately!
Hello. The My Creative Time design team is sharing tag projects today. I decided to layer up a circle shaped gift tag with an added teddy bear to bring smiles for almost any occasion.
Sentiment: Smile
This is a little gift tag to surely bring smiles. It would be added to gift packages, bags, party favors or as a wine tag.
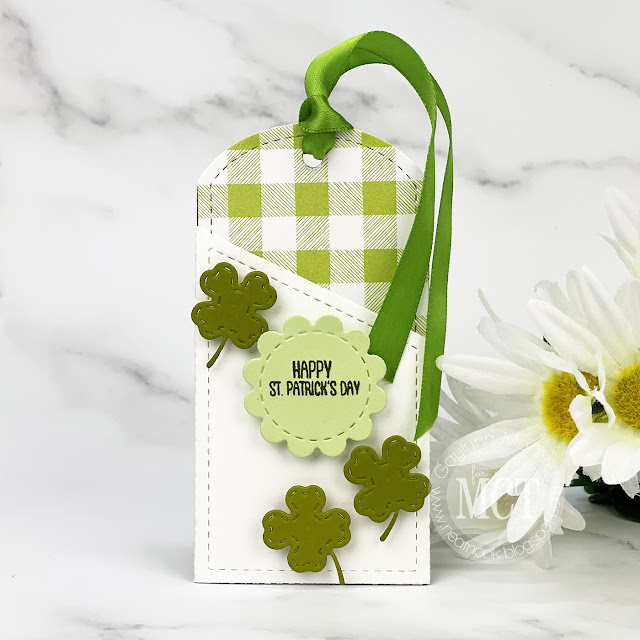
Hello. The My Creative Time design team is sharing gift card giving projects. Today, I am sharing a St. Patrick's Day inspired gift card holder, money holder or wine tag.
Sentiment: Happy St. Patrick's Day
This is a gift card holder and/or a gift tag with little green 4 leaf clover accents. It is perfect for St. Patrick's Day gift giving as party favors, a gift card holder or as a money holder or wine tag.
Today, I am sharing a Halloween gift tag featuring a witch girl in costume. I see this for grown up hostess gifts or as a wine tag.
Sentiment: Happy Halloween brew-tiful.
Tags like this are a fun addition for Halloween parties, friendship gatherings and more.
Helpful tips:
To create this, begin by stamping the witch onto white cardstock. Next, trim or die-cut the girl out. Then, add the color of choice to make the tag pop. I chose bright green and black. Finally, layer it all with added embellishments and green cording, to finish.
Hello. The My Creative Time design team is sharing gift tag projects. This cute little treat or favor tag features a ghost for Halloween.
To create this, begin by die-cutting tag layers in different colors. I chose purple and white. Next, die-cut the ghost and the eyes. Then, to finish, assemble the layers using flat and foam double-sided tape and twine. Use the tags to dress up treat bags.
These tags can also be used as Halloween favors, gift tags, treat wraps, Hostess gifts or wine tags.
Hello. The My Creative Time design team is sharing gift card giving projects today. I decided to make a gift card holder tag with a holiday theme.
Sentiment: Merry Christmas
This holiday gift card holder tag was made quickly using the tag & icon dies. I used a mix of solid and patterned paper for the pieces. The sentiment was stamped, die-cut and added to the tag front along with the stocking piece.
This works as a stocking stuffer, a gift package tag, a wine tag or inside of an envelope.
Today, I am sharing a cute holiday gift tag set featuring traditional Christmas icons. I made an assortment to go with different gift bags, gift packages, wine gifts and stocking stuffers.
Helpful tips:
To create this, begin by stamping onto cardstock using Copic friendly ink or ink for use with your color medium. Next, color in the holiday icons. Then, trim or die-cut the stamping. Also, trim or die-cut a background layer for each icon layer. Use cardstock in a color to match the coloring. I used different colors to go with whatever holiday packaging that I gift during the holidays. Finally, add cording and adhere each of the gift tag layers, to finish.
For Technique Time on the Unity Stamp Company blog, I am sharing a friendship themed card and wine tag gift set. These coordinate perfectly.
Sentiment: Peace, love, wine.
This matching friendship card and wine tag set is great as a hostess gift set. However, the gift tag can be placed on most any other gift
Helpful tips:
Here are helpful tips for creating this card and wine tag set. To begin, stamp a background panel, the girl and two sentiment tags. Also, for the girl stamping, use Copic friendly ink. Next, trim or die-cut tag layers and the background panel. Then, add color to the girl. Next, add twine cording to the tags. Then, layer the background, the girl and one of the tags onto the card base. Also, to finish, add the extra tag to a gift or a wine bottle for gift giving.
I made a quick video tutorial showing the process for this project.
{{Please subscribe to my video channel and like this video. Many thanks.}}
Also, foam and flat double-sided tape, cardstock, heat tool, Original Misti, adhesive gems, cording, My Creative Time rectangle frame die layers and tag frame dies (retired), MFT extreme black ink, Ranger ink in rose madder, black soot distress ink pad; Copic markers C1, C3, C5, W7, W5, E00, E71, E33, E13, E11, R02, RV29.
Be sure to visit the Unity blog for the entire article and tutorial.
Hello, and welcome to the My Creative Time "5" Days of Christmas"! This week we will be sharing with you. The design team has LOTS of last-minute Christmas ideas, such as cards, tags, treat holders, gift card holders and whatever else comes to mind that will help YOU get your creative juices flowing for the holiday! There will be a giveaway each day and all winners will be announced next week on the MCT blog! All you have to do is leave your comments on each stop for a chance to win a $15 Gift Card to the My Creative Time store!
Today is the first day of our 5 Days of Christmas! We all will be showcasing some quick and EASY Tags!
Sentiment: Just for you.
Here is my easy set of Christmas gift tags to easily use for gift giving. These tags were made in minutes with die-cuts, patterned paper and an added sentiment for the front. They can easily be mass-produced in assorted papers for the holidays.
***GIVEAWAY***Don’t forget to leave your comments on all of our blogs for a chance to win a $15 gift card to the My Creative Time store!
Hello. The My Creative Time design team is sharing projects with tags. I decided to chip away at more Christmas and Holiday gift tags. This is one made using a sweet wreath stamp and die set.
Sentiment: Happy Holidays
This is one of my favorite stamp and die sets, because of the whimsical wreath. I made it in Christmas colors and then added a Holiday sentiment. I like it because it can be used year-round. For color, I added a touch of Copic markers on the wreath in a few coordinating colors. To finish, I stamped and layered the wreath over the chunky tag die-cut panel.
Hi there. For today, I am sharing two gift tag ideas. One is a wine tag and the other is a favor tag or for other gift-giving.
Sentiment:
Life update: Still a mess.
Here are tips for wine and gift tag ideas. First, die-cut or trim the background and stamp layers. Next, stamp onto the top panels. Then, color in the stamping to coordinate with the packaging or gift colors. Also, adhere the coordinating panels for each tag. Next, score the longer panel for wine bottle placement. Also, hole punch or die-cut a circle on one end of the long panel. Then, for the favor tag, tie the smaller tag in place with twine or ribbon. Use the wine tag when you are ready for a hostess gift or party event.
I made a quick video tutorial showing the process for this project.
{{Please subscribe to my video channel and like this video. Many thanks.}}
Hi there. Today, the My Creative Time team is sharing tag projects. Here is my set of thank you tags with watercolor and heat embossing.
Sentiment: Thank you.
I needed some thank you tags, so I made a set using ink smooshing watercolor in two colors. These are great to include with a package or used as a wine tag on a hostess gift. To make them, begin by die-cutting all of the tag layers on watercolor paper and on colored cardstock. Next, stamp and heat emboss the flower onto each of the watercolor paper pieces. Next, mix watercolor with water and dab color onto a plastic craft mat or a piece of acetate. Then, when you get the two colors placed around the mat, gently smoosh the watercolor mat with the watercolor paper. Now, repeat as needed to get the color look that you want. Next, heat set or allow the panels to dry. Finally, add twine to the yellow cardstock and then layer the tag panels togetherto finish the tags.
Supplies: My Creative TimeStay Beautiful, Eggstra Special, Tag Frame Dies and Tag Frame Die Layers; Archival cobalt ink, mini Misti, VersaMark ink, Sakura Koi watercolor, watercolor brush, white embossing powder, heat tool, hemp twine, foam tape, cardstock.
Hello. Today, the My Creative Time team is sharing Tag It Tuesday projects. Here is my gift tag with watercolor florals for Valentine's Day.
Sentiment: Happy Valentine's Day. This is a sweet gift tag, ready to be given as a Valentine or attached to a Valentine gift, flowers or treats. For this gift tag, first, stamp a die-cut tag panel in pink and then stamp the flowers onto watercolor paper in black waterproof ink. Then, add watercolor of choice to the florals. Next, die-cut the flowers with the scalloped heart die. Then, add cording to the tag panel. Finally, to finish, adhere the floral heart piece with foam tape, over the top portion of the gift tag. Here is another look.
Supplies: My Creative TimeYou Are Cherished, Scallop Heart Tag Dies and Be Mine; Ranger watercolor paper and archival ink in jet black and rose madder; Zig Clean Color Real Brush pens in 025, 021, 026, 040, 045; foam tape, mini Misti, watercolor brush, pink cording, hole punch.
For today, I am showing a way to make multiple-layer gift tags using stamping and patterned paper. Tags like these can be made for most occasions, using many sentiment stamps.
These funny sentiments were fun to work with. The process involves assembling the tags in layers with stamping and papers of choice. This can be used as a gift tag, a card accent or as a wine tag. See below for details and a video tutorial.
Here are helpful tips for creating these multiple layer gift tags. To begin, pre-stamp your sentiments of choice, leaving room for trimming and die-cutting. Also, pre-cut all of the tag layers and the cording. Next, adhere glitter paper accents and the sentiment pieces. Then position the patterned paper layers. If you want to keep the layers offset, add a bit of double-sided adhesive on layers. Finally, add twine, cording or ribbon to the top of each tag to finish. The assembly process is made easier by stamping, cutting and adhering in multiples.
Hi. This is Gaylynn and I enjoy paper crafts, mostly card making. This is a place to document my hobby. I get to do what I love as a contributor on creative design teams. You will find card tutorial videos here as well. Thank you so much for visiting.