Today for the Unity blog, I am sharing a money holder card idea that works for gift celebrations occasions, friends, teachers or just a thank you. This one includes an interactive money loop along with creative stamping.
Sentiment: You deserve a treat.
No coloring is involved in the making of this card. I used a bit of paper piecing for the mug and colorful stamping for the background.
Hello. How about a card and gift card in one? This is a watercolor coffee themed interactive gift card holder. These always make a great presentation for the receiver.
Sentiment: Take a little coffee break.
This would work for coffee or tea, just by changing out the sentiment. It is a perfect gift for many occasions like thank you, birthdays, teacher appreciation, friendship and more.
Hello and welcome. For today, I am sharing a winter holiday project for the Friends of Unity blog hop. This social media hop inspiration is coffee, tea or cocoa inspired. I hope you will join in on the fun and inspiration. Simply comment on each stop in the hop.
Sentiment: Joy, peace & comfort
I am a tea drinker myself, but I truly respect all caffeine lovers. So, I envision this being a tea mug for wintertime and the holidays.
Hello, it's Gaylynn. The My Creative Time 122nd Edition release and sale are coming up on Friday. But for today, the team is sharing adorable Day 4 sneak peeks. Here is the newest MCT gift card holder die.
I think that the best part about this gift card holder is that no tape or glue was necessary to assemble the holder container portion.
Hello, it's Gaylynn. The My Creative Time 122nd Edition release and sale are coming up on Friday. But for today, the team is sharing adorable Day 3 sneak peeks. This card features two different sets of loopy frame dies by MCT.
Sentiment: Sending you a whole latte love.
Not only are the whimsical frames fantastic but the sentiments have awesome puns included.
Hello, it's Gaylynn. The My Creative Time 122nd Edition release and sale are coming up on Friday. But for today, the team is sharing adorable Day 1 sneak peeks. This card features a coffee or tea theme with the newest MCT patterned paper.
Sentiment:
Perk up, I'm here for you.
This is a great card for the coffee or tea lover. I love the wonderful new paper & fun stamps for this one.
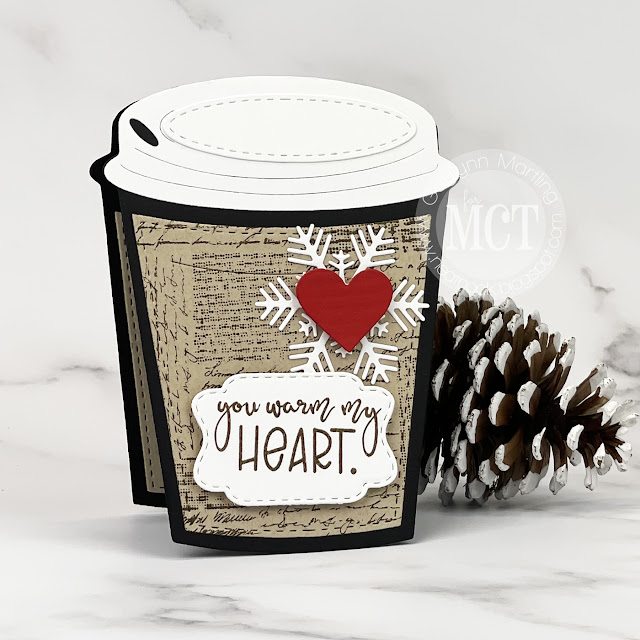
Hello. The My Creative Time design team is sharing masculine projects that work for winter as well. Today, I am sharing a coffee or tea cup shaped card that is perfect for a guy or a gal.
This cup was cut using a versatile gift card die that is shaped like a cup. But for this card, I am not using it for a gift card. Instead, this is a shaped card without using the gift card opening.
The shaped card measures approximately 4" x 5" and fits into an A2 size envelope.
Hi, it's Gaylynn. The My Creative Time 115th Edition release, sale and blog hop has begun. The design team is sharing project inspiration on our blogs. Please visit each blog in the blog hop and leave a comment on each of the release posts for prize chances. See the "Buy More, Save More" sale, below!
For the blog hop, you may have arrived from Emily's blog.
Sentiment: Sending you a flurry of warm winter wishes.
For this holiday card, I chose the colors of blue and white. I see those as winter colors that go with the sentiment. I love the mug, which can be for coffee or tea lovers, especially. It would also be great paired with a gift card.
Hello, it's Gaylynn. The My Creative Time 115th Edition release and the "Buy More Save More" sale is coming up on Wednesday. But for today, the team is sharing Day 2 sneak peeks.
These are shape cards that are so cute in person. One is an elf stocking and the other is a latte mug, all dressed for holiday cards.
Today, I am sharing a Halloween gift tag featuring a witch girl in costume. I see this for grown up hostess gifts or as a wine tag.
Sentiment: Happy Halloween brew-tiful.
Tags like this are a fun addition for Halloween parties, friendship gatherings and more.
Helpful tips:
To create this, begin by stamping the witch onto white cardstock. Next, trim or die-cut the girl out. Then, add the color of choice to make the tag pop. I chose bright green and black. Finally, layer it all with added embellishments and green cording, to finish.
Today, I am sharing a clean and simple card featuring adorable owls. This card is easy to make. I used stamping, masking, ink blending and a bit of Copic coloring.
Sentiment: Cheers!
Helpful tips:
To create this, begin by stamping the owls onto smooth white cardstock. Then, die-cut or trim the stamped panel and a frame layer in green. Next, using masking tape or Post-It tape, create a mask above and below the ows. Then, add ink blending on the edge of the mask bottom in green and above the mask in yellow. I used ink pads for ink blending but distress ink works also. Next, add color to the owls. Finally, layer everything with added pearl gems, to finish.
One way to accent a coffee or tea card is by using the paper piecing technique. Today, on the Unity blog, I am sharing a coffee or tea themed mug card using this technique.
Sentiment: Thank you, friend.
Adding color to stamping using the paper piecing technique makes for easy card making. I used it for the coffee or tag mug along with pretty patterned paper.
Helpful tips:
Here are helpful tips for making this card. To begin, stamp the background onto color cardstock and then trim or die-cut it to fit your card front section. Next, stamp and trim a sentiment accent plus a die-cut thank you sentiment. Then, stamp the mug once onto patterned paper and then stamp the lid onto white cardstock. Next, fussy cut (cut out) the mug and lid and adhere the lid to the mug. Also, stamp and fussy cut two bees to match the yellow and black card colors. Finally, layer it all onto the card base, to finish.
Here is another look.
I made a quick video tutorial showing the process for this project.
{{Please subscribe to my video channel and like this video. Many thanks.}} YouTube: Gaylynn NeatThingsBtq
Ink pad blending is another way to add shades of color and it is an alternative to distress ink blending. Today, on the Unity blog, I am sharing a colorful card using shades of two dye ink pads that are masked onto the background.
Sentiment:
Feel better. May today be a bit better than yesterday.
This background looks extra nice with masked ink pad blending for color. Using shades of dye inks made for vibrant ink blending.
Helpful tips:
Here are helpful tips for making this card. To begin, stamp and trim the background to fit an A2 sized card front. Next, stamp and trim the sentiment. Also, stamp, color and trim the tea bag. Next, mask the background edges to leave a rectangle for ink blending. I used a stencil but masking tape works also. Then, use two colors of dye ink and blending brushes to add color to the background panel. Once dry, layer the sentiment, the tea bag and the dots, to finish.
Here is another look.
I made a quick video tutorial showing the process for this project.
{{Please subscribe to my video channel and like this video. Many thanks.}} YouTube: Gaylynn NeatThingsBtq
Also, ink blending brushes, flat and foam double-sided tape, Post-It tape, My Favorite Things premium dye ink in fire coral and Caribbean sea also stitched mini scallop STAX die-namics and rectangle extraordinaire stencil.
Be sure to visit the Unity blog for the entire article and tutorial.
Today, I am sharing a sweet tea themed slimline card. It features teapots all in a row. I share a technique to soften the edges using ink blending.
Sentiment:
Let's catch up over a cuppa tea.
Helpful tips:
To create this card, first cut and score a card base. Next, die-cut or trim slimline or tall card layers in different colors of card stock. Then, stamp and trim the teapot panel with Copic friendly ink. For color, add Copics in layers or your markers of choice. To soften the edges, add a bit of ink blending in white pigment ink around the edges of each color cardstock layer. Use a disposable foam blending applicator if using pigment ink. This adds a softer look to the finished card. Finally, layer everything with flat and foam double-sided tape, to finish.
Note: Slimline dies vary by brand in size. For this card, I trimmed the card base a bit larger than the largest card layer. For this card base: cut at 7 1/2" x 7 1/2", score at 3 3/4".
I made a quick video tutorial showing the process for this project.
{{Please subscribe to my video channel and like this video. Many thanks.}} YouTube: Gaylynn NeatThingsBtq
Supplies:
Unity Stamp Co. stamp set called Tea & Besties (Initially, this was free with qualifying purchase but it may be in the store at a later time.)
Also, flat double-sided tape, My Creative Time tall frame die layers and tall fancy frame dies; Simon Says Stamp fog cardstock, My Favorite Things card stock in fire coral and Caribbean sea; paper trimmer, scoring board, white pigment ink pad, disposable foam ink blending tool, Copic markers 0, R35, R02, BG13, BG32, E43, C0, C4, C2, E31.
Hello. The My Creative Time design team is sharing masculine projects for Manly Monday on our blogs. I decided to make a mug card that works for love, Father's Day, birthday and more.
Sentiment: Love you lots. Take a moment to appreciate how awesome you are.
For this card, I wanted a masculine look so I chose black, white and kraft colors. Then, I die-cut the pieces of the mug using a mix of papers. Stamped sentiments were added. I used a kraft color card base to finish assembling all of the layers.
Here is another look at the card.
Supplies: My Creative Heart Mug Die, Love You Lots and Big Word Sentiments. Also, flat and foam double-sided tape, Gina K. Designs connect glue, paper trimmer, scoring board, mini Misti, cardstock, Unity paper pack, black ink.
Hello. The My Creative Time design team is sharing masculine projects for Manly Monday on the MCT blog. Here is my coffee shop mug shape card for today.
The MCT Flash Sale has been extended until tonight, April 5, 2021 at midnight. Use code FLASH at checkout for 20% off in stock purchases in the MCT store. ENDED.
Sentiment: Thanks for being you.
For this card, I chose a mug shaped design for this gift card holder. I adhered two mug die-cuts and scored one end to make this mug shaped card. Since it was manly Monday at MCT, I used neutral colors. I wanted it to have a similar look to a coffee shop mug. Though, I think it would work for most anyone. I mixed solid, clear and patterned papers with sentiment stamping. There is a pocket on the front of the card that fits a gift card. This card also fits perfectly into an A2 size envelope.
Here is another look.
Supplies: My Creative Frap Gift Card Holder Die and Not A Decaf Day; cardstock, flat and foam double-sided tape, Unity Farmhouse Plaid 6x6 paper pack, score tape, Ranger coffee ink pad, paper trimmer, scoring board, Papertrey Ink clear cardstock. (Gift card not included).
For today, I am sharing my coffee or tea themed mug gift card holder, an interactive card that doubles as a gift surprise. This also has touches of gold watercolor added.
Sentiment: It's a mug hug.
This is a great way to send a card to someone with a surprise inside. The card front flips open to reveal a gift card or money tucked inside. Added gold watercolor provides shimmer to the card.
Helpful tips:
Here are helpful tips for creating this gift card holder greeting card. To begin, stamp the mug and the sentiment onto watercolor paper. I decided to stamp with embossing ink and heat emboss in gold, but stamping alone works also. Next, trim or die-cut the card layers and a container for the gift card or money. Then, add watercolor to the mug and to the top portion of the holder section. Once dry, adhere the mug to the front flap of the gift card holder. Then, layer everything onto the card front with extra accents added.
Hi. This is Gaylynn and I enjoy paper crafts, mostly card making. This is a place to document my hobby. I get to do what I love as a contributor on creative design teams. You will find card tutorial videos here as well. Thank you so much for visiting.