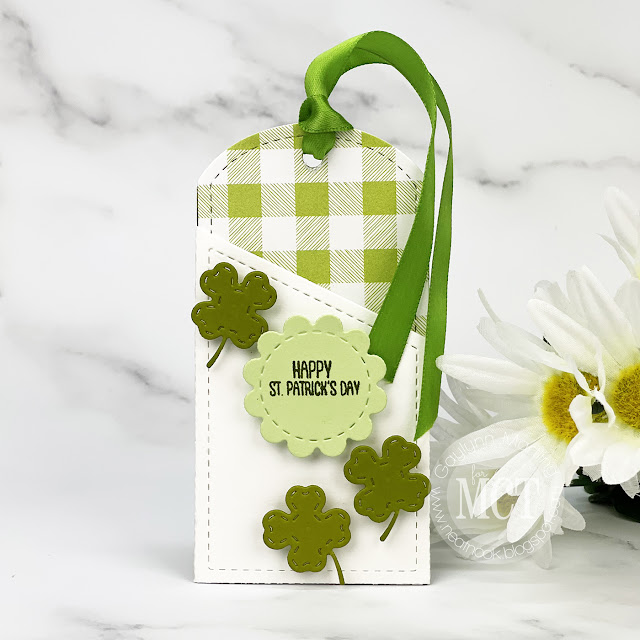
Hello. The My Creative Time design team is sharing gift card giving projects. Today, I am sharing a St. Patrick's Day inspired gift card holder, money holder or wine tag.
Sentiment: Happy St. Patrick's Day
This is a gift card holder and/or a gift tag with little green 4 leaf clover accents. It is perfect for St. Patrick's Day gift giving as party favors, a gift card holder or as a money holder or wine tag.
Hello. Gaylynn here. Today's card was inspired by the My Favorite Things sketch challenge 574.
Sentiment:
Wishing you every happiness.
This is a nice card for new neighbors, a house warming, new home, moving, going away and more. I used a mix of dies and a stamp for my interpretation of the sketch. A neighborhood scene was what I was going for. Little trees were made from patterned paper and the houses were paired over a grassy area. The sky was stenciled with clouds.
Hello. Gaylynn here. Today's card was inspired by the My Favorite Things sketch challenge 573.
Sentiment:
Not older. Just better.
This is a fun card with a little humor in there. I used stamps and dies from MFT along with coordinating cardstock and Copic markers. This is a clean and simple design with the car and friends as the focus. Fun sentiments were used along the gray strip. My vision was for the gray strip to be a roadway. I hope you enjoyed this sweet card. It sure was fun to make.
Hello. Gaylynn here. Today's card was made exclusively for the My Favorite Things 2021 Card Design Superstar Challenge in the category of Coloring Virtuoso. For the coloring, I chose to use watercolor paints, one of my favorite techniques.
Sentiment:
Your friendship is the cherry on top.
For this card, I first prepared the background using watercolor paper. Using a few different colors and types of watercolor, I added color, one section at a time. I allowed the colors to blend together. For the pink shade, I used ink from an MFT cube, picked up the color from a mat, added water and then began to watercolor parts of the background. Also, I added gold shimmer watercolor to fill in the blank areas. For the mice and elements, I heat embossed the stamping onto watercolor paper. I used the same shades as the background plus a few more shades from my stash. Once everything was dry, I die-cut the background, the mice and all of the elements. Finally, I assembled the card pieces along with the sentiment, to finish.
Hello. Gaylynn here. Today's card was made exclusively for the My Favorite Things 2021 Card Design Superstar Challenge in the category of Innovative Master.
Sentiment:
I will always be here for you.
This sweet slimline card was made using the wonderful slimline die-namics, including the Slide In coordinating dies. This allows for a fun slider tag card with a pull tab. It makes a great tag element, slimline style. For this card, I used the sweet elephants on the front and on the inside. For the front, I used Copic markers in soft colors. And for the background gray panel, I heat embossed an elephant, balloon and butterflies in white. For a hint of color, I added touches of color pencils in blue and gray shades for the inside. These two panels were placed over the slimline card base.
This white card base was cut at 8 1/2" x 7" and scored at 3 1/2".
Here is another look when the slider panel was pulled upward.
{FTC: Some links include affiliate links. I may receive a small commission for the referral but at no cost to you. Also, I am a participant in the Amazon Services, LLC Associates Program, an affiliate advertising program designed to provide a means for me to earn fees by linking to Amazon.com and affiliate sites. If you want to learn more about a product that I used here or to purchase it, the link is available to click on. It would make my day if you would do so.}
Featuring MFT Stamps:
Adorable Elephants StampsAdorable Elephants Die-namicsSlimline Starter die-namics
Slimline Slide In die-namics
Interactive Labels
Card stock in cement grayand sno coneExtreme black hybrid ink
Also,
Copic markersC1, N1, N3, B14, B00, R20, Y08, YG0000White embossing powderPrismacolor color pencilsPC1060, PC938, PC1051, PC1063, PC904, PC1023 Misti
Hello. Gaylynn here. Today's card was made exclusively for the My Favorite Things 2021 Card Design Superstar Challenge in the category of Clean & Simple Genius.
Sentiment:
There's gnome one I love to spoil more than you.
This winter card incorporates ink blending with stenciling, coordinating colors, the rule of thirds, movement and lots of white space. The star was made directly onto the card base. It was fun making it using the star stencil plus adding snow using the white embossed paint splatters background. The only layers are the gnome, the sentiment and some pearl embellishments. I used a bit of foam tape for dimension. This is going to be used as a holiday card but is suitable for most any winter occasion.
Hello. Gaylynn here. Today's card has an Autumn seasonal theme. I am participating in the MFT Stamps slimline challenge with the theme "Feeling Fall". Here is my contribution using stamps and dies that I have been wanting to use.
Sentiment:
Sending sunshine and happiness.
Here are tips for making this card. To begin, die-cut a slimline card base and two background layers using Copic friendly ink. Next, add ink blending using ink pads and blending brushes onto the white background panel. Also, stamp layered trees onto the background panel, using Autumn ink colors. Then, stamp the sentiment, girl and elements. Next, color in the girl, fence and birds and then die-cut those. Finally, layered it all onto the slimline card base, to finish.
The slimline card base for this project: Cut 7" x 8 1/2" and score at 3 1/2"
One way to accent a coffee or tea card is by using the paper piecing technique. Today, on the Unity blog, I am sharing a coffee or tea themed mug card using this technique.
Sentiment: Thank you, friend.
Adding color to stamping using the paper piecing technique makes for easy card making. I used it for the coffee or tag mug along with pretty patterned paper.
Helpful tips:
Here are helpful tips for making this card. To begin, stamp the background onto color cardstock and then trim or die-cut it to fit your card front section. Next, stamp and trim a sentiment accent plus a die-cut thank you sentiment. Then, stamp the mug once onto patterned paper and then stamp the lid onto white cardstock. Next, fussy cut (cut out) the mug and lid and adhere the lid to the mug. Also, stamp and fussy cut two bees to match the yellow and black card colors. Finally, layer it all onto the card base, to finish.
Here is another look.
I made a quick video tutorial showing the process for this project.
{{Please subscribe to my video channel and like this video. Many thanks.}} YouTube: Gaylynn NeatThingsBtq
Hello. Gaylynn here. Today's card has a tropical beach theme. I am participating in the MFT Stamps slimline challenge with the theme "Feeling Beachy".
Sentiment:
In high tide or low tide, I'm here for you.
Here are tips for making this card. To begin, stamp the sentiment plus all of the animals and accessories. Then, color them in. I used Copic markers. Next, die-cut all of them or fussy cut. Also, die-cut the background layers, the waves and a shoreline. On the scene layer, stencil using ink blending to make a sky with clouds. Finally, adhere all of the sea life and elements into the slimline card front.
The slimline card base for this project: Cut 7" x 8 1/2" and score at 3 1/2"
Hello. Gaylynn here. Today is Day 4 of the MFT Camp Create 2021 and I am participating in the camp projects. For today, the theme background bonanza. This was easy to do but it was a little time consuming cutting and placing all of the tiny houses. The best part is that this card requires no coloring. I love how it turned out.
Sentiment: Congratulations on your new home.
Here are tips for making this card. To begin, die-cut the slimline card base and all of the slimline layers. Next, using different color cardstock and patterned paper, die-cut little houses and trees. Then, stamp and trim the sentiment. Next, layer the green grass slopes over the blue background layer, staggering them. Finally, to finish, adhere with glue all assorted tiny houses along the slopes.
Here is another look.
I made a video tutorial showing the process for this project.
{{Please subscribe to my video channel and like this video. Many thanks.}} YouTube: Gaylynn NeatThingsBtq
Hello. Gaylynn here. Today is Day 3 of the MFT Camp Create 2021 and I am participating in the camp projects. For today, the theme is emboss resist. Along with other techniques, this is one of my favorite ways to watercolor. Here is my watercolor trees card using emboss resist.
Sentiment: Thinking of you.
Here are tips for making this card. To begin, stamp onto the smooth side of watercolor paper using embossing ink. Then, heat emboss the trees in white or your choice of color. Also, heat emboss the sentiment in black. Next, add watercolor in two shades over the tree panel. This technique uses the emboss resist, showing the trees on a slope. Heat set the watercolor. Finally, add the layers to assemble the card.
Here is another look.
I made a video tutorial showing the process for this project.
{{Please subscribe to my video channel and like this video. Many thanks.}} YouTube: Gaylynn NeatThingsBtq
Hello. Gaylynn here. I am participating in the camp projects. For today, the theme is wonderful watercolor. Here is my poppy flower-themed watercolor card.
Sentiment: Hey
For this card, I used a wet on wet watercolor technique over the gold embossed poppy flowers. This was a joy to make because I love to watercolor the look of loose watercolor. For the background, I used a flag die-cut and I used red for the card base. To lighten it up, I choose gold accents.
Hello. Gaylynn here. For today, the theme is shaker projects. Here is my Summer themed mermaid shaker card.
Sentiment:
Sending you oceans of love.
This card was made in a clean and simple style or CAS. I wanted the mermaid to be the focus over the circle shaker element on the card. I love the tropical icons in the stamps and dies. I chose blue and clear sparkle sequins inside of the shaker to mimic the ocean.
For added card dimension, layer it up. Today, on the Unity blog, I am sharing a way to add texture and layers to this rose and gold embossed card.
Sentiment: Have a beautiful day.
I used a bit of gold wet embossing for the background stenciling. Layer it up with a background panel, embossing, a sentiment panel and added rose sections.
Helpful tips:
Here are helpful tips for making this card and to layer it up. To begin, make a background panel by adding gold wet embossing using a stencil. Next, stamp the flower sections, the sentiment frame and the sentiment onto white cardstock. Then, color the rose flower and the leaves. I used Copic markers with Copic friendly ink. Once, colored in, fussy cut (cut out) the flower pieces and the sentiment panel. Once dry, adhere the embossed panel over the teal card base. Finally, using double-sided foam tape, layer the sentiment panel and the flower sections over the embossed layer, to finish.
Here is another look.
I made a quick video tutorial showing the process for this project.
{{Please subscribe to my video channel and like this video. Many thanks.}} YouTube: Gaylynn NeatThingsBtq
This project is included in the Simon Says Wednesday Challenge ~ Out With the Old and In With The New (old embossing paste ~ new stencil and rose stamps)
Hi. This is Gaylynn and I enjoy paper crafts, mostly card making. This is a place to document my hobby. I get to do what I love as a contributor on creative design teams. You will find card tutorial videos here as well. Thank you so much for visiting.