9/25/2019

No coloring stamping with matching paper ~ Thanksgiving.

Today for Technique Time for Unity, I am sharing a quick and simple card using no coloring stamping along with matching pattern paper.


Sentiment:  Happy Thanksgiving.  Sending warm thoughts and wishes.

To begin, I trimmed the paper panels to fit the card base.  Then, I used no coloring stamping and embossed the flowers and the sentiment panel in white.  Finally, all of the paper was layered and twine was added to finish.


I made a quick video tutorial showing the process for this project.

{{Please subscribe to my video channel and like this video.  Many thanks.}}
YouTube:  Gaylynn NeatThingsBtq


Here is a closer look.


Linked up to 
Simon Says Stamp Wednesday Challenge ~ Anything Goes

Supplies:  Unity Stamp Co. Autumn Dream stamps and Autumn Dream {paper pack}; Neenah solar white 110 lb cover, VersaMark ink, white embossing powder, heat tool, foam tape, MFT dies, twine, EK powder tool, paintbrush, Fiskars paper trimmer, Mini Misti and kraft color paper.

Be sure to visit the Unity blog for the entire article and tutorial.
Also, you can find my other features at Unity's
Technique Time and
Watercolor Wednesday.


Have a great day.
Gaylynn

Party or Wedding Favor Box ~ My Creative Time

Today, the My Creative Time team is sharing party favor projects.  I wanted something a little more elegant which would work for a birthday, wedding or bridal shower.


Sentiment:  For you!

For this little gift box, I die-cut all of the elements using assorted papers in blue, gray and white.  I combined something from two different sets.
For the bow, I added a little foam tape to make it pop up.
With the detail in the dies, this is easily made with just the right elements.  It is ready for a small gift, treats or even a gift card.
The box measures approximately 3 1/8 wide, 1" deep and 3 9/16 tall.


Supplies:  My Creative Time Present Box Die and Holiday Envelope die set; Wonder Tape, adhesive pearl, foam tape, ribbon and double-sided tape.

Please visit Miss Emma's My Creative Time blog for more inspiration.

Thanks for visiting.  Have a great day.
Gaylynn

9/22/2019

Wine bottle tag from scratch ~ Thanksgiving.

Today, I am sharing a fun way to decorate a wine bottle for Thanksgiving.  Here is a wine bottle or doorknob tag, made from scratch.


Sentiment:  Happy Thanksgiving.  (Eat the ham.)

For this wine tag, I first trimmed a rectangle cardstock panel.
Wine tag base 8" x 3 1/4"
The panel was scored at 3 1/2"
A 1 3/4" circle was punched on the scored end.
Insert panel 4 1/4" x 2 3/4"

For the background color, I added ink blending with a herringbone stencil and a small makeup brush.  And on the insert, the turkey was stamped and colored in with Copic markers.
This makes a fun hostess gift and also a great party or table decoration.


I made a quick video tutorial showing the process for this project.
{{Please subscribe to my video channel and like this video.  Many thanks.}}
YouTube:  Gaylynn NeatThingsBtq


Here is another look.


Supplies:  Unity Stamp Co. Cuddlebug Turkey, Simon Says Stamp intense black ink, Copic markers C7, C5, C1, C3, 0, W1, W3, Y26, R02, R27; Fiskars paper trimmer, Tim Holtz herringbone stencil, small makeup or blending brush, MSC scoring board, distress oxide ink in vintage photo and spiced marmalade; MFT photo corners die-namics, painter's tape, circle punch 1 3/4" and foam tape.

Have a wonderful day.
Gaylynn

9/20/2019

My Creative Time 95th Edition Release, Sale and Blog Hop

Hello, it's Gaylynn here.  The My Creative Time 95th Edition release, sale and blog hop has begun.
You may have arrived from Emily's blog.


Sentiment:  For you!

For this envelope holder, I die-cut all of the elements.  I used a patterned paper accent for the center.  For the accents, I used white cardstock to make them pop against the darker colors.  I love all of the accent options in this die set.  For the bow, I used the small holiday bow die along with one adhesive rhinestone.  This is great for small notes, a gift card, a cash gift or small treats.  It is perfect as a favor wrap or gift card holder.

 *** BLOG HOP GIVEAWAY ***
For our blog hop giveaway, Emma is giving away a $25 gift card to the "My Creative Time" store to ONE LUCKY winner! ALL you have to do is leave a comment on each of our blogs! You are NOT required to comment on EVERY SINGLE blog, but the more you comment on, the MORE chances you have for winning! VERY IMPORTANT, PLEASE leave a way for us to contact you w/your comment just in case "YOU" are the lucky winner!

*** SALE ALERT ***
ALSO, DON'T FORGET our sale starts RIGHT NOW HERE! Use the code: SEPT2019 to receive a 15% discount off your entire purchase! This sale applies to "IN-STOCK" items ONLY. This sale will end on Friday, September 27, 2019, at midnight PST.


“GIVE BACK”
In lieu of a freebie this month, we are excited to GIVE BACK by donating 100% of the proceeds from the “Fun Size Holiday Bow Die”. For the next 24 hours, your purchase of this adorable die will not only sweeten your die collection but also make a difference. 100% of the proceeds are being donated to help hurricane relief in the Bahamas! Starting now, Friday, September 20, 2019, at 8am PST for 24 hours only, 100% of the proceeds to the Fun Size Holiday Bow Die” will be donated to the “YachtAid Global to help provide relief from Hurricane Dorian in the Bahamas. You can pick up yours here!


Here are my sneak peek blog projects from this release.
Day 1

Day 2


Here is another look at today's project.


Supplies: My Creative Time Holiday Envelope Die and Small Holiday Bow Die; BasicGrey Nordic Holiday paper, cardstock, Pop Dots, adhesive gem and Ranger multi medium matte glue.

Hop along with us.
Your next stop in the hop is Jessica's blog. The entire blog hop lineup is on Emma's My Creative Time blog. Thanks for visiting. I look forward to your comments. Gaylynn


9/19/2019

Gift Box ~ Day 4 MCT 95th Edition Sneak Peeks

Hello, it's Gaylynn.  Here is a sneak peek of the My Creative Time 95th Edition release.


Here is a small holiday gift box in red and white.  It is approximately 3" x 3 1/2" in size and holds a small gift or wrapped treats.  It would be perfect as a favor box also.  I love that this die set includes a special layering bow and ribbon.  This can easily be made for any occasion by changing out the colors or paper.

***Sneak Peek Giveaway!***
 We will be giving away the sets we are showcasing each day to ONE lucky winner! For example, the set we are showcasing on Wednesday, Emma will announce the winner of that on Thursday, and the sets we are showcasing on Thursday, Emma will announce that winner on Friday on the MCT blog! ALL you have to do is leave a comment on each of our blogs! You are NOT required to comment on EVERY SINGLE blog, but the more you comment on, the more chances you have for winning! VERY IMPORTANT, PLEASE leave a way for us to contact you w/your comment just in case "YOU" are the lucky winner! For EXTRA entries, you can spread the word about this release on Facebook, tweet about it OR even Instagram it! #mycreativetime! GOOD LUCK EVERYONE, and let's start spreading the word!

“GIVE BACK”
Instead of a FREEBIE this month, we are offering a new die with 100% of the proceeds to help hurricane relief in the Bahamas! Starting this Friday, September 20, 2019, at 8am PST, for 24 hours only, 100% of the proceeds to the “Fun Size Holiday Bow Die” will be donated to the “YachtAid Global to help provide relief from Hurricane Dorian in the Bahamas.


Supplies: My Creative Time Present Box Die; BoBunny paper, twine, adhesive pearl, cardstock.

More sneak peeks are on Emma's My Creative Time blog. Thanks for visiting. I look forward to your comments. Gaylynn


9/18/2019

One layer card masking, ink blending and embossing.

Today for Technique Time for Unity, I am sharing a one layer card with masking, ink blending and embossing.


Sentiment:  Search always for those magical moments.

To begin, I masked with Post-It tape and then added three colors of distress oxide ink blending.  Once dried, I stamped and heat embossed the trees in silver.  Finally, the masking tape was removed and the card was assembled onto the card base.


I made a quick video tutorial showing the process for this project.

{{Please subscribe to my video channel and like this video.  Many thanks.}}
YouTube:  Gaylynn NeatThingsBtq


Here is a closer look.


Supplies:  Unity Stamp Co. Search For Those Moments; Neenah solar white 110 lb cover, adhesive pearls, VersaMark ink, silver embossing powder, heat tool, foam tape, distress oxide ink in faded jeans, spiced marmalade and peeled paint; MFT dies, Post-It tape.

Be sure to visit the Unity blog for the entire article and tutorial.
Also, you can find my other features at Unity's
Technique Time and
Watercolor Wednesday.


Have a great day.
Gaylynn

Pretty Bow Card ~ Day 3 MCT 95th Edition Sneak Peeks

Hello, it's Gaylynn.  Here is a sneak peek of the My Creative Time 95th Edition release.


Sentiment:  Have yourself a merry little Christmas.

This is a watercolor card, featuring the Medium Holiday Bow along with a sentiment from the Dec 25th stamp kit.  I love this big bow.  I decided to use the colors of blue and silver.  For an added accent, I included a white layer strip from Stitched Belly Band dies.

***Sneak Peek Giveaway!***
 We will be giving away the sets we are showcasing each day to ONE lucky winner! For example, the set we are showcasing on Wednesday, Emma will announce the winner of that on Thursday, and the sets we are showcasing on Thursday, Emma will announce that winner on Friday on the MCT blog! ALL you have to do is leave a comment on each of our blogs! You are NOT required to comment on EVERY SINGLE blog, but the more you comment on, the more chances you have for winning! VERY IMPORTANT, PLEASE leave a way for us to contact you w/your comment just in case "YOU" are the lucky winner! For EXTRA entries, you can spread the word about this release on Facebook, tweet about it OR even Instagram it! #mycreativetime! GOOD LUCK EVERYONE, and let's start spreading the word!

“GIVE BACK”
Instead of a FREEBIE this month, we are offering a new die with 100% of the proceeds to help hurricane relief in the Bahamas! Starting this Friday, September 20, 2019, at 8am PST, for 24 hours only, 100% of the proceeds to the “Fun Size Holiday Bow Die” will be donated to the “YachtAid Global to help provide relief from Hurricane Dorian in the Bahamas.


Here is another look at today's card.


Supplies: My Creative Time Medium Holiday Bow die, Dec 25th stamp set, More Stitched Rectangular dies and Stitched Belly Band dies; silver paper, silver embossing powder, VersaMark ink, vellum, Brusho crystal colors powder; foam tape and a heat tool.

More sneak peeks are on Emma's My Creative Time blog. Thanks for visiting. I look forward to your comments. Gaylynn


9/17/2019

Surprise! ~ Day 2 MCT 95th Edition Sneak Peeks

Hello, it's Gaylynn.  Here is a sneak peek of the My Creative Time 95th Edition release.


Sentiment:  Surprise!

This gift envelope was quick and easy to put together.  It is perfect for adding a mini note card, gift card or small treat.
I adhered the envelope together with extra tacky tape and then added the sentiment, heart and twine.  The paper is from an older planner of mine.  I love repurposing things, especially pretty pages like this one.

***Sneak Peek Giveaway!***
 We will be giving away the sets we are showcasing each day to ONE lucky winner! For example, the set we are showcasing on Wednesday, Emma will announce the winner of that on Thursday, and the sets we are showcasing on Thursday, Emma will announce that winner on Friday on the MCT blog! ALL you have to do is leave a comment on each of our blogs! You are NOT required to comment on EVERY SINGLE blog, but the more you comment on, the more chances you have for winning! VERY IMPORTANT, PLEASE leave a way for us to contact you w/your comment just in case "YOU" are the lucky winner! For EXTRA entries, you can spread the word about this release on Facebook, tweet about it OR even Instagram it! #mycreativetime! GOOD LUCK EVERYONE, and let's start spreading the word!

Supplies: My Creative Time Holiday Envelope Die; The Happy Planner, gold glitter paper, Wonder tape and gold cording.
More sneak peeks are on Emma's My Creative Time blog. Thanks for visiting. I look forward to your comments. Gaylynn


9/16/2019

Holiday mailbox ~ Day 1 MCT 95th Edition Sneak Peeks

Hello, it's Gaylynn.  Here is a sneak peek of the My Creative Time 95th Edition release.


Sentiment:  May your season be merry and bright.

This is a mailbox shaped card, made from the mailbox gift card holder die by My Creative Time.  I love that it can be used as a card as well as a gift card holder.  I just die-cut the mailbox twice and adhered the panels together with a small score line.  For this design, I chose to add tiny letter envelopes to accent the mailbox.  I love how it turned out.
This card measures approximately 4 1/4" x 3".

***Sneak Peek Giveaway!***
 We will be giving away the sets we are showcasing each day to ONE lucky winner! For example, the set we are showcasing on Wednesday, Emma will announce the winner of that on Thursday, and the sets we are showcasing on Thursday, Emma will announce that winner on Friday on the MCT blog! ALL you have to do is leave a comment on each of our blogs! You are NOT required to comment on EVERY SINGLE blog, but the more you comment on, the more chances you have for winning! VERY IMPORTANT, PLEASE leave a way for us to contact you w/your comment just in case "YOU" are the lucky winner! For EXTRA entries, you can spread the word about this release on Facebook, tweet about it OR even Instagram it! #mycreativetime! GOOD LUCK EVERYONE, and let's start spreading the word!

Here is another look.


Supplies: My Creative Time Mailbox Gift Card Holder Die, Dec 25th stamps and Signed, Sealed and Delivered; Ranger archival ink, cardstock, foam tape and adhesive gems.
More sneak peeks are on Emma's My Creative Time blog. Thanks for visiting. I look forward to your comments. Gaylynn


9/11/2019

Autumn foliage cards with a stamped card overlay.

Today for Technique Time for Unity, I am sharing a way to make your own card overlay with stamping and heat embossing.


Sentiment:  Thanks

To begin, I stamped using the Misti stamping tool and a VersaMark ink pad.  Then, I added copper color embossing powder over the VersaMark ink and heat set.  I also stamped and heat embossed a copper sentiment onto vellum.  A second card overlay was stamped with shades of ColorBox ink and then clear embossing powder was used.  The card overlay strips are approximately 1″ wide by 4 1/4″ long.  Finally, to finish, I layered everything and added tiny adhesive gems.


I made a quick video tutorial showing the process for this project.

{{Please subscribe to my video channel and give this video a like.  Many thanks.}}
YouTube:  Gaylynn NeatThingsBtq


Supplies:  Unity Stamp Co. Obsessively Grateful and Autumn Dream {paper pack}; Neenah solar white 110 lb cover, adhesive gems, PTI vellum cardstock, Clearsnap ColorBox ink, VersaMark ink, Ranger clear and copper embossing powder, heat tool, foam tape, Fiskars paper trimmer.


Be sure to visit the Unity blog for the entire article and tutorial.
Also, you can find my other features at Unity's
Technique Time and
Watercolor Wednesday.


Have a great day.
Gaylynn

9/10/2019

Vintage holly jolly holiday girl card with letter tiles.

This is a vintage and distressed style holiday girl card with letter game tiles.


Sentiment:  Holly jolly.

How fun is it to have game tile stamps to create with?  I decided to make a holiday card with them along with the new distressed paper and a vintage girl.  Kraft color cardstock and neutral colors were used throughout.

I made a quick video tutorial showing the process for this project.

{{Please subscribe to my video channel and give this video a like.  Many thanks.}}
YouTube:  Gaylynn NeatThingsBtq


Here is another look.


Supplies:  Unity Stamp Co. Be Very Merry 9/2019 SMAK, Tiled Letters and Rustic Winter Wishes {paper pack}; kraft color cardstock, Simon Says Stamp intense black ink, Copic markers BG10, YR00, E33, E13, E11, E37, E18, G21, R27; Clearsnap Colorbox ink, foam tape, Fiskars paper trimmer and foam ink blender.

Have a lovely day.
Gaylynn

9/09/2019

Birthday cupcake gift tag ~ MCT made in minutes

Today, the My Creative Time team is sharing projects made in minutes.  I needed a birthday gift tag, and so this cupcake tag was born.


This was quick and easy to do.  I used regular white cardstock for all of the die-cuts except for the brown cake section.  On the white cupcake areas, I added a touch of distress ink blending in green and orange shades.  With the added gold cording and ribbon, it was finished in about ten minutes.


Supplies:  My Creative Time Cute Cupcake Tag Die; Ranger distress oxide ink in peeled paint and spiced marmalade; makeup brush, gold cording, ribbon and double-sided tape.

Please visit Miss Emma's My Creative Time blog for more inspiration.

Thanks for stopping by.
Gaylynn

9/05/2019

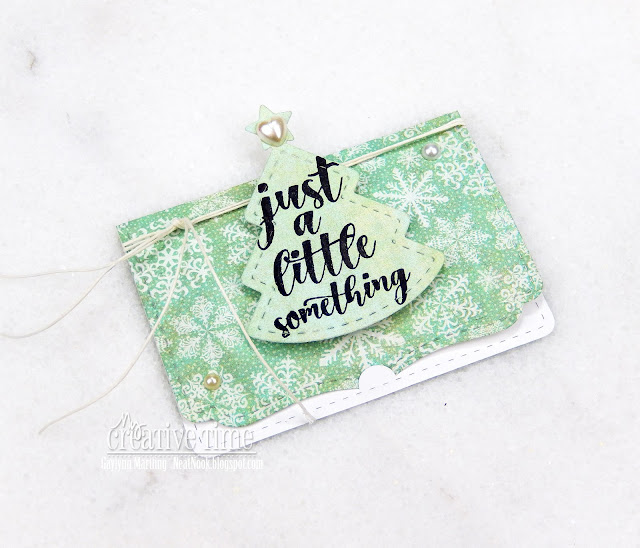
Just a little somethings holiday gift card holder.

Today, the My Creative Time team is sharing gift card giving projects.  I wanted to chip away at holiday projects.  So, I made a gift card holder for Christmas.


Sentiment:  Just a little something.

This was quick and easy to put together.  I used patterned paper and the gift card holder die-cut.  For the sentiment, I stamped onto the Christmas tree die-cut.  To finish, I added some adhesive pearls and twine.  This is all ready for gift card holiday gift-giving.  This would be great to tuck inside a cash gift as well.

Supplies:  My Creative Time Pretty Gift Card Holder Die and Just A Little Something; Ranger archival ink in jet black, BasicGrey Aspen Frost paper, foam tape, adhesive pearls and twine.

Please visit Miss Emma's My Creative Time blog for more inspiration.

Thanks for stopping by.
Gaylynn

9/04/2019

Torn vellum card layers + embossed stamping.

Today for Unity's Technique Time, I will show one way to incorporate vellum into card making.  I also include gold heat embossing.


Sentiment:  Shimmer and shine, Beautiful.

To begin, I stamped flowers onto vellum using the Misti stamping tool and a VersaMark watermark ink pad.  Then, I heat embossed the stamping in gold.  Then the sentiment was stamped onto the side fold card base.  To finish, I tore and inked some of the vellum edges, overlapping the layers.


The full article and tutorial are up on the Unity blog.
I also made a quick video tutorial showing the process for this project.

{{Please subscribe to my video channel and give this video a like.  Many thanks.}}
YouTube:  Gaylynn NeatThingsBtq


Here is another look.


Supplies:  Unity Stamp Co. Shimmer & Shine; heat tool, Ranger gold embossing powder, EK powder tool, PTI vellum cardstock, Neenah classic crest solar white 110lb cover, original misti, VersaMark ink pad, adhesive gems and Copic markers E49, YR04, YR23, G99.

Be sure to visit the Unity blog for the entire article and tutorial.
Also, you can find my other features at Unity's
Technique Time and
Watercolor Wednesday.

Thanks so much.  Have a great day.
Gaylynn