3/31/2021

French rose vintage card stamping tutorial

 Vintage card stamping is easy with pretty stamps and layers.  Today, on the Unity blog, I am showing one way to turn paper into a vintage French style rose card.


Sentiment:
Love you just the way you are.
French kiss life.

For this card, I used vintage card stamping in layers and with coordinating colors.  This gives a soft and aged look with no coloring necessary.

Helpful tips:

Here are helpful tips for using vintage card stamping.  To begin, choose vintage style stamps and a simple background stamp and then two or three soft ink colors.  Next, stamp onto white cardstock with the background in kraft ink, then the rose in pink and the brown sentiment.  Also, stamp a sentiment tag of choice.  Then, trim or die-cut the rose, the pink and the sentiment panels.  Next, add distress oxide ink blending around the edges of the panel layers.  Finally, layer the panels, add the sentiment tag and the hearts, to finish.


Here is another look.


I made a quick video tutorial showing the process for this project.
{{Please subscribe to my video channel and like this video.  Many thanks.}}
YouTube:  Gaylynn NeatThingsBtq


 Supplies:
Also, foam and flat double-sided tape, cardstock, original Misti, Ranger archival ink pads in potting soil and rose madder, My Favorite Things kraft hybrid ink pad; My Creative Time etched edge frame dies, ink blending brush, hearts, cording, distress oxide ink pad in vintage photo.

Be sure to visit the Unity blog for the entire article and tutorial.
Also, you can find my other features at Unity's
Technique Time and
Watercolor Wednesday.

    Thank you for visiting.
   Gaylynn


3/29/2021

Think happy thoughts butterflies dimensional card

Hello.  The My Creative Time design team is sharing project ideas that can be made in minutes.  Today, I am sharing my butterfly card.  It was easy to put together in less than twenty minutes.


Sentiment:  Think happy thoughts.

For this uplifting card, I chose 3-D butterflies and an inlay background, all made from die-cuts.  The sentiment was stamped and placed on a label die-cut.  No coloring is needed for this, but I used patterned paper instead.

Here is another look.


Supplies:  My Creative Time Amazing Things, Mermaid Background Die and Heart Label Dies; cardstock, flat and foam double-sided tape, BasicGrey Picadilly paper, Gina K. Designs connect glue, Ranger jet black ink, adhesive dots, envelope.

Please visit Emma's My Creative Time blog for more inspiration.

Thank you for visiting.

Gaylynn 

3/27/2021

Easy wet on wet watercolor tag card tutorial

 Hello.  For today, I am sharing an inspirational card, perfect for Easter or any time.  I show easy watercoloring for this tag card.


Helpful tips:
Here are helpful tips for creating this card.  To begin, trim or die-cut a tag layer.  Next, stamp the sentiment onto the tag.  Then, stamp the flowers onto the smooth side of watercolor paper.  Next, for color, add water with a brush over the stamped flowers.  Then, add prepared watercolor to the brush and dab color onto the wet watercolor panel in a few areas.  Also, allow the color to move around.  This is one way to use wet on wet watercolor.  Next, blot puddles and heat set.  If preferred, repeat watercolor layers until you get the look and color that you want.  Also, trim the flower panel to fit the tag, using a leftover piece to make a flag card accent.  Then, add watercolor splatters onto the card front.  Once everything is dry, layer it all, to finish.


I made a video tutorial showing the process for this project.
{{Please subscribe to my video channel and like this video.  Many thanks.}}


Here is another look:


Supplies:  Unity Stamp Co. By His Wounds.
Also, Prima watercolor tubes, watercolor brush, envelope, cording, cardstock, Staedtler triplus fineliner pen, Ranger jet black archival ink pad, My Favorite Things stitched traditional tag STAX die-namics, flat and foam double-sided tape, cardstock.

Thank you for visiting.
Enjoy your day.


3/26/2021

Stenciling and ink blending mini slimline cross card tutorial

 Hi there.  Today, I am sharing a quick way to add a bit of color over stamping.  I used a stencil with distress ink blending for a mini slimline card and envelope inspirational set.


Helpful tips:
Here are helpful tips for creating this card.  To begin, stamp the cross onto cardstock.  Also, trim or die-cut all of the card layers and the card base.  I also made a handmade envelope that fits this mini slimline card using die-cuts.  I smaller white office-style envelope should work just fine.  Next, using a stencil and distress ink, blend dots of color in two shades.  No other coloring is needed.  Optional, samp dots or a simple background to accent the stamping.  Finally, layer it all to finish.

The card size assembled is approximately 3 1/4" x 5 1/2"

I made a video tutorial showing the process for this project.
{{Please subscribe to my video channel and like this video.  Many thanks.}}


Here is another look:


Supplies:  Unity Stamp Co. By His Wounds.
Also, My Creative Time cute card dies and cute envelope die; Ranger distress ink pads in squeezed lemonade and dried marigold plus jet black archival ink pad; ink blending brush, BasicGrey picadilly paper (retired), My Favorite Things card-sized confetti stencil, flat and foam double-sided tape, cardstock.

Thank you for visiting.
Enjoy your day.


Distress ink watercolor pastel floral card tutorial

  Hello.  Today, I am sharing a way to use stamping with distress ink watercolor.  This is a way to stretch your water-based ink pads.

Sentiment:  This too shall pass.

Helpful tips:
Here are helpful tips for creating this card.  To begin, stamp the flowers and the sentiment onto the smooth side of watercolor paper with waterproof ink.  Next, trim or die-cut the stamped panel and all card layers.  Then, prepare a palette mat with ink from distress ink pads.  For watercolor, with a damp brush, dab color from the mat and apply in small sections of the stamping.  Then, blend out the color sections.  Optional, add multiple colors on different sections for interest.  Also, heat set between color layers.  Note, distress or water-based ink looks lighter once dry.  Finally, layer it all and embellish, to finish.

I made a video tutorial showing the process for this project.
{{Please subscribe to my video channel and like this video.  Many thanks.}}

Here is another look:


Supplies:  Unity Stamp Co. Fear Not.
Also, Ranger distress ink pads in spun sugar, victorian velvet and speckled egg plus jet black archival ink pad and plastic craft mat; Pretty Pink Posh droplets, paint brush, Altenew palette mat, envelope, My Favorite Things elegant rectangle STAX die-namics, flat and foam double-sided tape, cardstock, Fiskars paper trimmer.

Thank you for visiting.
Enjoy your day.

3/24/2021

Cross in metallic gold stenciling prayers card tutorial

 Adding a bit of gold stenciling gives a card a pretty shimmer accent.  Today, on the Unity blog, I am showing one way to add stenciling using a wet embossing technique in metallic gold.


Sentiment:  Prayers

For this card, I added gold stenciling over the stamped floral background.  It adds the perfect touch along with added flower accents.


Helpful tips:

Here are helpful tips for creating this metallic gold cross inspirational card.  To begin, trim or die-cut the stamped layer and accents.  Next, stamp the floral background and extra flowers.  Also, fussy cut (cut out) the extra flowers.  Then, prepare a craft space for wet embossing using a plastic craft mat, a stencil, spatula and embossing paste.  Next, using embossing tools, spread an even layer of gold stenciling paste over the cross.  Once finished, clean off the paste from all tools immediately.  Then, allow the embossing to dry for at least one hour.  Once set, layer the card front.  To finish, accent with added flowers and a sentiment.

Here is another look.


I made a quick video tutorial showing the process for this project.
{{Please subscribe to my video channel and like this video.  Many thanks.}}
YouTube:  Gaylynn NeatThingsBtq


 Supplies:
Also, foam and flat double-sided tape, cardstock, mini Misti, Ranger archival ink in Viridian, My Favorite Things stitched scallop basic edges die-namics; My Creative Time more stitched rectangular dies, Dreamweaver metallic gold embossing paste, Simon Says Stamp prayers die, spatula, plastic craft mat.

Be sure to visit the Unity blog for the entire article and tutorial.
Also, you can find my other features at Unity's
Technique Time and
Watercolor Wednesday.

    Thank you for visiting.
   Gaylynn


3/19/2021

MCT 109th Edition Release & Blog Hop ~ Plants

 Hello, it's Gaylynn.  The My Creative Time 109th Edition release, sale and blog hop has begun.  For the blog hop, you may have arrived from Emily's blog.


Sentiment: 
Can't wait to hang out again!

This shaker card was fun to make.  I layered a few cuts from the tag dies and stacked them with sequins inside to make an interactive shaker card.  A frame of gold glitter was added.  The layered potted plant was placed on the top layer along with the sentiment.  To finish, I added marker dots in coordinating colors of blue and yellow to accent the card colors.

 *** BLOG HOP GIVEAWAY ***
Leave your comments on each blog for a chance to win a $25 Gift Card to the My Creative Time store. One lucky winner will be chosen and noted on the MCT blog! GOOD LUCK my friends! (Please don't forget to leave a way/email for MCT to contact you, if you were to be one of the lucky winners.) 

Here is a closer look at my card.


*** SALE ALERT ***
DON'T FORGET our sale starts RIGHT NOW HERE! Use the code: MAR2021 to receive a 15% discount off of your entire purchase! This sale applies to "IN-STOCK" items ONLY. This sale will end on Friday, March 26, 2021, at midnight PST.

Here are my sneak peek blog projects from this release.

Supplies for today's project: My Creative Time I'm Rooting For You, Plant Dies, Tall Tag Frame Dies and Tall Tag Frame Die Layers; gold glitter paper, cardstock, Papertrey Ink clear cardstock, Ranger multi medium matte glue, flat and foam double-sided tape, sequins and Ranger jet black ink pad, Copic markers B05 and Y23.

Hop along with us.

Your next stop in the hop is Ginger's blog. The entire blog hop lineup is on the My Creative Time blog.

Thanks for visiting and hopping along. I look forward to your comments.

Gaylynn

3/18/2021

Rainbow Tag Card ~ MCT 109th Edition Day 4 Sneak Peeks

 Hi, it's Gaylynn.  The My Creative Time 109th Edition release is coming up on Friday.  But for today, the team is sharing Day 4 sneak peeks.

This little rainbow scene is layered in pastels onto a tall tag.  The background is filled with pastel clouds.

Sentiment:
I have faith in you.

This sweet tag can stand along on a gift, but I decided to add it to the card as the focal point.  It includes a rainbow, a cute little bow and clouds.  For the background, I used a cut-out cloud die piece to stencil the clouds in light shaded.  I love the sweetness of it all.

***Sneak Peek Giveaway!***
We will be giving away the sets we are showcasing each day to ONE lucky winner! ALL winners will be announced on Emma’s blog on Friday during the blog hop! ALL you have to do is leave a comment on each of our blogs! You are NOT required to comment on EVERY SINGLE blog, but the more you comment on, the more chances you have for winning! VERY IMPORTANT, PLEASE leave a way for us to contact you with your comment just in case "YOU" are the lucky winner! For EXTRA entries, you can spread the word about this release on Facebook OR even Instagram! #mycreativetime! GOOD LUCK EVERYONE and let's start spreading the word!

Here is another look.


Supplies for today's project: My Creative Time Tall Tag Frame Dies, Tall Tag Frame Die Layers, Rainbow Sentiments, Happy Rainbow Dies, Mini Bow Dies, Tall Floating Edge Dies; cardstock, Ranger archival ink in jet black, foam and flat double-sided tape, Ranger multi medium matte glue, ink blending brush, Ranger distress oxide ink pads in spiced marmalade and cracked pistachio, cording, adhesive pearl, assorted decorative scrap paper.

See more inspiration on the My Creative Time blog.

Thanks for stopping by. I look forward to your comments.

Gaylynn

3/17/2021

Hand painted watercolor + silhouette stamping ~ card tutorial

Slimline cards are even better with hand painted watercolor accents.  Today, on the Unity blog, I am showing one way to make painted watercolor accents paired with stamping.


Sentiment:  Hello

Adding background detail with hand painted watercolor accents looks pretty along with silhouette stamping.  This one incorporates large florals.


Helpful tips:

Here are helpful tips for creating this hand painted watercolor card.  To begin, cut and trim a card base and card layers.  Then add hand painted watercolor rectangles in two shades of blue onto the top watercolor paper panel.  Next, once dry, stamp the silhouette flowers over the dried watercolor.  I used a stamp positioner.  Then, for added accents, add paint splatters over the card front.  Also, layer everything onto the prepared card base.  Finally, add the sentiment, embellishments and accents, to finish.  

Card base:  Cut 7" x 8 1/2" and score at 3 1/2".
Assembled card:  8 1/2" x 3 1/2".
Envelope #10.

Here is another look.


I made a quick video tutorial showing the process for this project.
{{Please subscribe to my video channel and like this video.  Many thanks.}}
YouTube:  Gaylynn NeatThingsBtq


 Supplies
:
Also, foam and flat double-sided tape, cardstock, original Misti, Ranger Archival ink in jet black, scoring board, Altenew watercolor half pans, paint brushes, My Favorite Things Slimline Starter and Slimline Slide In die-namics; Canson watercolor paper, Liquitex Basics white acrylic paint, Pretty Pink Posh droplets.

Be sure to visit the Unity blog for the entire article and tutorial.
Also, you can find my other features at Unity's
Technique Time and
Watercolor Wednesday.

    Thank you for visiting.
   Gaylynn


Potted Plants Card ~ MCT 109th Edition Day 3 Sneak Peeks

 Hi there, it's Gaylynn.  The My Creative Time 109th Edition release is coming up on Friday.  But for today, the team is sharing Day 3 sneak peeks.

This card features potted plants on a window sill scene.

Sentiment:
I'm rooting for you!

Here is a cute window pun card featuring two potted plants and a little sky scene.  These fun plants have added pieces and accents that make them come to life for paper crafts.  The background incorporates ink blending.  Everything else was trimmed, die-cut and layered to make the little scene.

***Sneak Peek Giveaway!***
We will be giving away the sets we are showcasing each day to ONE lucky winner! ALL winners will be announced on Emma’s blog on Friday during the blog hop! ALL you have to do is leave a comment on each of our blogs! You are NOT required to comment on EVERY SINGLE blog, but the more you comment on, the more chances you have for winning! VERY IMPORTANT, PLEASE leave a way for us to contact you with your comment just in case "YOU" are the lucky winner! For EXTRA entries, you can spread the word about this release on Facebook OR even Instagram! #mycreativetime! GOOD LUCK EVERYONE and let's start spreading the word!

Here is another look.


Supplies for today's project: My Creative Time I'm Rooting For You, Plant Dies, Heart Label Dies, Square Tag Dies; cardstock, Ranger archival ink in jet black, foam and flat double-sided tape, Ranger multi medium matte glue, ink blending brush, distress oxide ink pads in fossilized amber and broken china, cording, Fiskars paper trimmer.

See more inspiration on the My Creative Time blog.

Thanks for stopping by. I look forward to your comments.

Gaylynn

3/16/2021

Rainbow Support Card ~ MCT 109th Edition Day 2 Sneak Peeks

 Hi there, it's Gaylynn.  The My Creative Time 109th Edition release is coming up on Friday.  But for today, the team is sharing Day 2 sneak peeks.

These sweet rainbows and sentiment are the focus of this simple card.


Sentiment:
Remember... After the rain comes the rainbow.
I am here for you.

This is a darling set of rainbow dies used to make this pastel rainbow. Various scrap paper in my stash was used in mint, gold, ivory and pink. I love that the sentiments wrap around the rainbow pieces. And, those clouds add the perfect finish.
***Sneak Peek Giveaway!***
We will be giving away the sets we are showcasing each day to ONE lucky winner! ALL winners will be announced on Emma’s blog on Friday during the blog hop! ALL you have to do is leave a comment on each of our blogs! You are NOT required to comment on EVERY SINGLE blog, but the more you comment on, the more chances you have for winning! VERY IMPORTANT, PLEASE leave a way for us to contact you with your comment just in case "YOU" are the lucky winner! For EXTRA entries, you can spread the word about this release on Facebook OR even Instagram! #mycreativetime! GOOD LUCK EVERYONE and let's start spreading the word!

Here is another look.


Supplies for today's project: My Creative Time Happy Rainbow Dies, Rainbow Sentiments and Rectangle Frame Die Layers; cardstock, Ranger archival ink in rose madder and Viridian, adhesive gem, foam and flat double-sided tape, Ranger multi medium matte glue and scrap decorative paper.

See more inspiration on the My Creative Time blog.

Thanks for stopping by. I look forward to your comments.
Gaylynn

3/15/2021

Pet Mini Slimline Card ~ MCT 109th Edition Day 1 Sneak Peeks

  Hello, it's Gaylynn.  The My Creative Time 109th Edition release is coming up on Friday.  But for today, the team is sharing Day 1 sneak peeks.

For today, I am sharing a sweet pet sympathy mini slimline or tall card and coordinating handmade envelope.


Sentiment:
So sorry for your loss.
Your furbaby will always be with you in spirit.

This heartfelt card was made using the cute coordinating card and envelope dies by MCT. I used pet stamping and die-cuts and add the sweet mini bow dies for the little bowtie.
***Sneak Peek Giveaway!***
We will be giving away the sets we are showcasing each day to ONE lucky winner! ALL winners will be announced on Emma’s blog on Friday during the blog hop! ALL you have to do is leave a comment on each of our blogs! You are NOT required to comment on EVERY SINGLE blog, but the more you comment on, the more chances you have for winning! VERY IMPORTANT, PLEASE leave a way for us to contact you with your comment just in case "YOU" are the lucky winner! For EXTRA entries, you can spread the word about this release on Facebook OR even Instagram! #mycreativetime! GOOD LUCK EVERYONE and let's start spreading the word!

Here is another look.


Supplies for today's project: My Creative Time Mini Bow Dies, Cute Card Dies, Cute Card Envelope Die, Doggies and Kitties; cardstock, Ranger archival ink in coffee, Copic markers E33, YR00, YR0000, R02.

See more inspiration on the My Creative Time blog.

Thanks for visiting. I look forward to your comments.

Gaylynn

3/10/2021

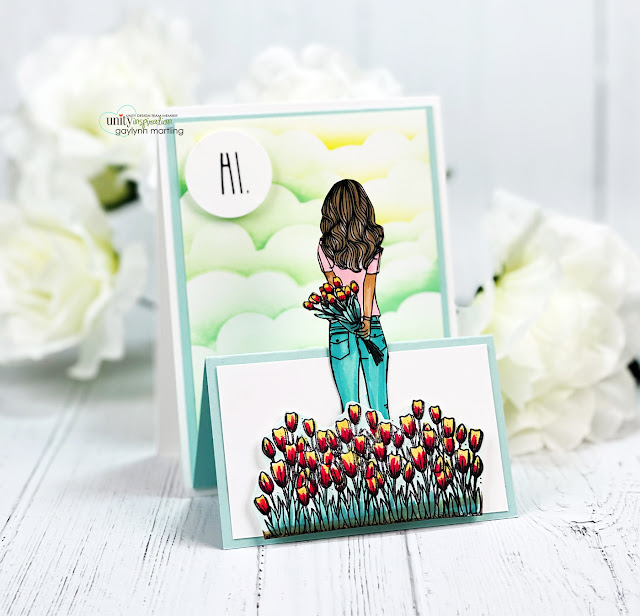
Tulip Flowers Scene Girl ~ Easel Card Tutorial

 For Technique Time, I am showing a way to make an easel card that includes an outdoor scene.  In this tutorial, no dies are used.


Sentiment:  Hi.

An easel card technique is a great way to add interest and dimension to a handmade card.  It is interactive and is includes pretty scene building.


Helpful tips:

Here are helpful tips for creating this easel card scene.  To begin, stamp the girl, the flowers and the sentiment.  Next, trim and score a card base and a mint color frame panel.  Then, trim a cloud panel and a bottom trim.  Also, add color to the girl and flowers and then fussy cut (cut out) the girl and the flowers.  I used a circle punch for the sentiment.  Next, add light ink blending in two colors onto the cloud panel using a cloud stencil.  Finally, adhere the scored green panel onto the card base and add the accent layers to finish the easel card.

A2 card base:  Cut 11" x 4 1/4" and score at 5 1/2".
Mint frame layer:  Cut 10 1/4" x 4" and score at 5 1/2" and 7 3/4".
Cloud layer:  Cut 5" x 3 3/4".
White front strip:  Cut 3 3/4" x 2 1/4".


Here is another look.


Supplies
:
Also, foam and flat double-sided tape, cardstock, Misti, Simon Says Stamp intense black ink, distress oxide ink in cracked pistachio and fossilized amber; 1 1/4" paper punch, scoring board, bone folder, Copic markers E44, E33, E71, E11, Y21, RV29, RV11, BG18, BG15, BG32, BG10.

    Thank you for visiting.
   Gaylynn