8/26/2020

Mixed media scrapbook layout pages ~ handmade elements

 Hi there.  For Technique Time at Unity, I share four coordinating scrapbook layout pages using handmade elements as accents.  These pages incorporate a variety of techniques and mediums which work together beautifully.


Helpful tips:
Here are helpful tips for scrapbook layout pages.  Please note, refer to the video for the detailed steps and the tutorial.  To begin, have a theme or coordinating colors in mind and have those supplies for the project on hand.  Next, make your own handmade accents and elements by stamping, embossing and adding watercolor to those accent pieces.  Then, once dry, trim or fussy cut (cut out) the handmade elements.  Next, create a stenciled corner background onto each of the cardstock scrapbook layout pages.  Finally, add accent frame stamping and then adhere the handmade elements, to finish.


I made a quick video tutorial showing the process for this project.
{{Please subscribe to my video channel and like this video.  Many thanks.}}
YouTube:  Gaylynn NeatThingsBtq


Here are two more pages:


Included in these challenges:

Simon Says: Anything Goes

Simon Says:  Beautiful Botanicals

Also, original Misti, flat and foam double-sided clear tape, Ranger products gold embossing powder, jet black archival ink, distress oxide ink pads in fossilized amber, worn lipstick, wilted violet, walnut stain, mini mister, plastic craft mat, and watercolor paper; Versamark ink, heat tool, blending brush, TCW Rebekah Meier Designs 6x6" mini rosetta stencil, Ken Oliver Crafts color burst powders in grape jelly and razzle berry; painter's tape, Fiskars paper trimmer.

Be sure to visit the Unity blog for the entire article and tutorial.
Also, you can find my other features at Unity's
Technique Time and
Watercolor Wednesday.


Thank you for stopping by.
Gaylynn

8/24/2020

Mini note card & envelope ~ MCT Made In Minutes

 Hello.  Today, the My Creative Time team is sharing projects which can be made in minutes.  Here is my decorated mini note, tag and envelope set with a pet theme.  This one is great for a dog owner or as a thank you for pet sitting.  This is a bit small for a gift card, but cash also can be tucked inside.


Sentiment:  Just a note.

This was fun and simple to make.  To create this, simply die-cut the envelope onto double-sided cardstock.  Then score, fold and assemble the envelope.  Next, stamp and then die-cut or trim the sentiment and the other elements.  Now, add color to the stamping and layer the pieces.  For closure, tie twine around the closed envelope flap.  Also, tie a mini sentiment tag with the twine, to finish.  This closed envelope measures 3" x 3".
Tip, to open the envelope, slide the twine up and off.  The inside will hold the die-cut mini note panel.

Here is another look.


Supplies:  My Creative Time 3x3 Fancy Envelope Die, Fun Bubble Dies, Doggies and Kitties, Lots of Greetings; Prismacolor colored pencils PC924, PC1051, PC1054; cording, Ranger archival ink in jet black, Ranger multi medium matte glue; double-sided clear flat and foam tape, double-sided paper, gold foil paper, cardstock, mini Misti.

Please visit Emma's My Creative Time blog for more inspiration.

Enjoy your day.
Gaylynn

8/21/2020

MCT 103rd Edition Release, Blog Hop & Sale

 Hello, it's Gaylynn.  Great news, the My Creative Time 103rd Edition release, sale and blog hop has begun.

For the blog hop, you may have arrived from Emily's blog.


Sentiment:
To the world's best cat + dog Mom.

This was super fun and easy to make.  To create this card, simply stamp a sentiment and die-cut it with the adorable oval paw die.  Note, I used a fine liner pen to add a + sign for the owner of a cat and dogs.  Next, using cardstock and patterned paper, die-cut the background frames and the dog bone pieces.  Trim and score a card base to fit a little larger than the card front panel.  Finally, add ribbon and layer everything to finish.

I have other examples of tall or slim card sizes and coordinating envelopes.
See slim card.

 *** BLOG HOP GIVEAWAY ***
Leave your comments on each blog for a chance to win a $25 Gift Card to the My Creative Time store. One lucky winner will be chosen and noted August 26, 2020 on the MCT blog! GOOD LUCK my friends!
(Please don't forget to leave a way/email for MCT to contact you, if you were to be one of the lucky winners.) 

Here is another look at today's project.


*** SALE ALERT ***
DON'T FORGET our sale starts RIGHT NOW HERE! Use the code: AUG2020 to receive a 15% discount off your entire purchase! This sale applies to "IN-STOCK" items ONLY. This sale will end on Friday, August 28, 2020, at midnight PST. Here are my sneak peek blog projects from this release.


Day 2

Day 3
Supplies for today's project: My Creative Time Doggies and Kitties, Tall Paw Frame Dies and Tall Frame Die Layers; cardstock, BasicGrey 6x6 paper, Ranger potting soil archival ink, flat and foam double-sided tape, fine liner pen, paper trimmer, scoring board, ribbon.

Hop along with us.

Your next stop in the hop is Ginger's blog. The entire blog hop lineup is on Emma's My Creative Time blog.

Thanks for visiting. I look forward to your comments.
Gaylynn


8/20/2020

Day 3 MCT 103rd Edition Sneak Peeks ~ Pet Sympathy

 Hi, it's Gaylynn.  Here is Day 3 of the My Creative Time 103rd Edition sneak peeks.


Sentiment:  Your furbaby will always be with you in spirit.

For today's sneak peeks, I used the newest MCT tall or slim style paw print dies along with a heartfelt sentiment and pet-themed accents.  To make this, layer assorted tall dies and also stamp onto the top layer.  Add die-cut or stamped accents and a sentiment.  For the base, trim and score a folded base a little larger than the size of the largest tall die that you are using in your project.

I have other examples of tall or slim card sizes and coordinating envelopes.
See slim card.

*** Sneak Peek Giveaway ***
We will be giving away the sets we are showcasing each day to ONE lucky winner!  For example, the set we are showcasing on Wednesday, Emma will announce the winner of that on Thursday and the sets we are showcasing on Thursday, Emma will announce that winner on Friday on the MCT blog!  ALL you have to is leave a comment on each of our blogs!  You are NOT required to comment on every single blog, but the more you comment on, the more chances you have for winning!  VERY IMPORTANT, PLEASE leave a way for us to contact you with your comments just in case YOU are the lucky winner!  
For EXTRA entries, you can spread the word about this release on Facebook, tweet about it OR even Instagram it.... #mycreativetime


Supplies for today's project: My Creative Time Tall Paw Frame Dies, Doggies and Kitties stamps and dies, Tall Kraft Envelopes, Tall Frame Die Layers; clear flat double-sided and foam tape, cardstock, Ranger archival ink in jet black.

For more sneak peek inspiration, visit Emma's My Creative Time blog.
I hope to see you here all week for sneak peek projects. And check back this Friday for the blog hop.

Thanks for visiting. I look forward to your comments. Gaylynn


8/19/2020

Stamp, watercolor then emboss ~ Peonies tutorial

Hello.  For Technique Time at Unity, I share a way to stamp, watercolor then emboss using peony flowers.  This technique works for other coloring options as well.


Sentiment:  Sending all my love & support.

Helpful tips:
Here are helpful tips to stamp, watercolor then emboss for card making.  To begin, stamp and pre-trim or die-cut a background layer.  Then, using a stamp positioning tool like the Misti, place and stamp peonies with waterproof ink onto the smooth side of watercolor paper.  Next, add watercolor of choice or use another coloring alternative like markers.  Then, once dried completely, place and stamp the peonies in the same position in the Misti, but using VersaMark ink.  Next, add enchanted gold embossing powder and heat set the embossing.  Then, fussy cut (cut out) the peony flower.  Finally, assemble the card and the embellishments, to finish.


I made a quick video tutorial showing the process for this project.
{{Please subscribe to my video channel and like this video.  Many thanks.}}
YouTube:  Gaylynn NeatThingsBtq


Here is another look.


Supplies:  Unity Stamp Co. Peony Hugs and Flourish Wonder {background}; original Misti, flat and foam double-sided clear tape, My Creative Time Rectangle Frame Die Layers, Ranger enchanted gold embossing powder and archival ink in jet black, sap green and pale ochre; Versamark ink, adhesive gems, Altenew watercolor half pans and palette mat; watercolor brush, heat tool.

Be sure to visit the Unity blog for the entire article and tutorial.
Also, you can find my other features at Unity's
Technique Time and
Watercolor Wednesday.


Thanks for visiting.
Gaylynn

Day 2 MCT 103rd Edition Sneak Peeks ~ Mermaid

 Hi, it's Gaylynn.  Here is Day 2 of the My Creative Time 103rd Edition sneak peeks.


Sentiment:  Sending you oceans of love.

For today's sneak peeks, I combine dies, stamping and ink blending.  The background was die-cut into a rectangle and then ink blending was added.  Then, the sentiment was stamped and die-cut.  The overlay and elements were die-cut.  Everything was layered to finish.  

I love the tropical theme and the scene.  This could be for almost any occasion, simply by changing out the sentiment.  

*** Sneak Peek Giveaway ***
We will be giving away the sets we are showcasing each day to ONE lucky winner!  For example, the set we are showcasing on Wednesday, Emma will announce the winner of that on Thursday and the sets we are showcasing on Thursday, Emma will announce that winner on Friday on the MCT blog!  ALL you have to is leave a comment on each of our blogs!  You are NOT required to comment on every single blog, but the more you comment on, the more chances you have for winning!  VERY IMPORTANT, PLEASE leave a way for us to contact you with your comments just in case YOU are the lucky winner!  
For EXTRA entries, you can spread the word about this release on Facebook, tweet about it OR even Instagram it.... #mycreativetime


Supplies for today's project: My Creative Time Mermaid Kisses, Mermaid Background Die, Fun Bubble Dies, Rectangle Frame Die Layers; clear flat and foam double-sided tape, cardstock, Ranger archival ink in jet black, Ranger distress oxide ink in spiced marmalade and broken china and also multi medium matte glue; blending brush, cardstock.

For more sneak peek inspiration, visit Emma's My Creative Time blog.
I hope to see you here all week for all of the sneak peek projects. And check back this Friday for the blog hop.

Thanks for visiting. I look forward to your comments. Gaylynn


8/18/2020

Day 1 My Creative Time 103rd Edition Sneak Peeks

 Hi, it's Gaylynn.  Here is Day 1 of the My Creative Time 103rd Edition sneak peeks.


For today's sneak peeks, I am sharing little sentiment speech bubble tags.  These are great for adding to cards, gifts, favors or most any papercraft project.  I stamped then layered them and also added twine to an easy accent for future projects.  I love having these on hand to use as sentiments.

There are even more sentiments to choose from, covering most occasions like birthday, thank you, sorry, get well, support, get well and more.

*** Sneak Peek Giveaway ***
We will be giving away the sets we are showcasing each day to ONE lucky winner!  For example, the set we are showcasing on Wednesday, Emma will announce the winner of that on Thursday and the sets we are showcasing on Thursday, Emma will announce that winner on Friday on the MCT blog!  ALL you have to is leave a comment on each of our blogs!  You are NOT required to comment on every single blog, but the more you comment on, the more chances you have for winning!  VERY IMPORTANT, PLEASE leave a way for us to contact you with your comments just in case YOU are the lucky winner!  
For EXTRA entries, you can spread the word about this release on Facebook, tweet about it OR even Instagram it.... #mycreativetime


Supplies for today's project: My Creative Time Lots of Greetings and Fun Bubble Dies; clear flat double-sided tape, cardstock, Ranger archival ink in jet black, cording, Silhouette printable gold foil.

For more sneak peek inspiration, visit Emma's My Creative Time blog.
I hope to see you here all week for sneak peek projects. And check back this Friday for the blog hop.

Thanks for visiting. I look forward to your comments. Gaylynn


8/12/2020

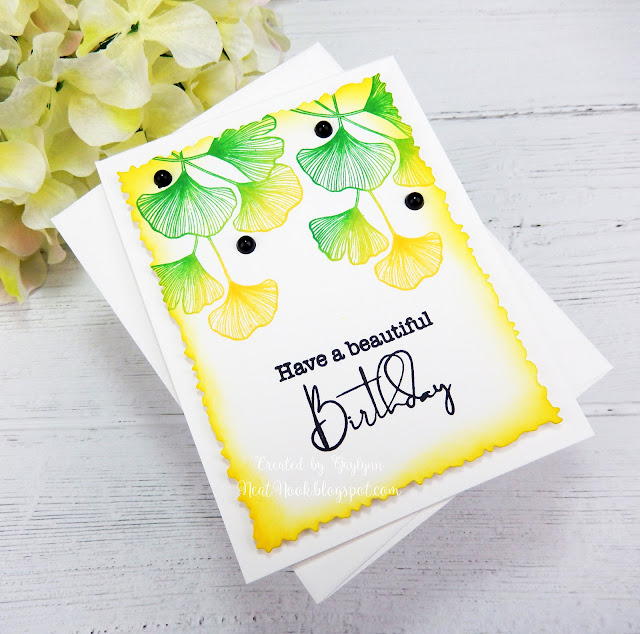
Two tone stamping ~ Gingko leaves card tutorial.

Hello.  For Technique Time at Unity, I show a way to incorporate two tone stamping for this gingko leaves card.  There is no coloring necessary for this technique.


Sentiment:  Have a beautiful birthday.


Helpful tips:
Here are helpful tips to create using two tone stamping.  To begin, trim or die-cut a panel for stamping and choose two ink colors.  Next, use a stamp positioning tool like the Misti.  Then, ink then stamp half of the stamping with one color.  Also, ink then stamp the other part of the panel with another ink color.   Next, add another section of leaf stamping by carefully moving the stamp to another section of the stamped panel.  Then, repeat the stamped colors and also stamp the sentiment.  As an optional accent, add ink blending around the panel edges.  Finally, to finish, assemble and embellish the card.


I made a quick video tutorial showing the process for this project.
{{Please subscribe to my video channel and like this video.  Many thanks.}}
YouTube:  Gaylynn NeatThingsBtq


Here is another look.


Supplies:  Unity Stamp Co. Gingko Greetings; distress oxide ink in fossilized amber, blending brush, original Misti, flat and foam double-sided clear tape, My Creative Time Etched Edge Frame Dies, Ranger plastic craft mat and archival ink in jet black, emerald green and chrome yellow; Pebbles adhesive dots.

Be sure to visit the Unity blog for the entire article and tutorial.
Also, you can find my other features at Unity's
Technique Time and
Watercolor Wednesday.


Thanks for visiting.
Gaylynn

8/07/2020

Teach love inspire sunflower jars ~ soft colors tutorial

 Hello.  This is a card to acknowledge and show appreciation for teachers and families, in the classroom, online or at home.  This has certainly been a challenging time for teaching and learning, as the navigation continues through it all.

Sentiment:  Teach.  Love.  Inspire.

This card was simple to make.  To begin, simply stamp onto a pre-trimmed piece of cardstock, using alcohol friendly ink or ink for use with your particular markers.  Next, add color in light shades.  I used light Copic marker shades first, then accented with darker tones.  Then, trim a background accent panel.  Finally, layer and assemble the card to finish.

I made a quick video tutorial showing the process for this project.
{{Please subscribe to my video channel and like this video.  Many thanks.}}
YouTube:  Gaylynn NeatThingsBtq


Here is another look.

Supplies:  Unity Stamp Co. Beautiful Like That; digital teacher sentiment by Lea Keisling, My Creative Time Thank You And Frame Dies, Simon Says Stamp smoke cardstock and intense black ink, Copic markers BG10, G0000, BG32, G21, B0000, C1, Y15, Y11, YR14, YR04, 0; double-sided flat and foam clear tape, cardstock.

Thank you for visiting.  Enjoy your day.
Gaylynn

8/05/2020

Watercolor succulents bouquet birthday card & tutorial

Hello.  Here is my watercolor succulent bouquet birthday card in blue for today.  This one was relaxing to make, adding the soft colors.


Sentiment:  Wishing you a happy birthday!  And many more!

Today, for this big succulent bouquet, I added layers of watercolor to the stamping.  It took a while to add the details in watercolor, but that is the relaxing part.  Also, I used colors inspired by my daughter's upcoming wedding.  She wants succulents with a blue hue to be part of it.  So, I used stamps from three different kits for the outside and for the inside of the card.

Helpful tips:
Here are helpful tips for creating this.  To begin, stamp the succulents onto watercolor paper with waterproof ink.  Also, stamp and trim the sentiment and the inside sentiment.  Next, trim or die-cut the succulent panel to fit the card base.  Then, make a watercolor palette by mixing color and water together in different hues.  Next, using a damp watercolor brush or a water brush, add color to the inner petals or creases in the darkest hues.  Then, pull out the color from that hue outward to the petal tips, for each color and section.  Finally, once dried, assemble the card and accents, to finish.

I made a quick video tutorial showing the process for this project.
{{Please subscribe to my video channel and like this video.  Many thanks.}}
Here is another look.


Supplies: Unity Stamp Co. Succ-y Without You {August 2020 Whit Kit}, Aging Gorgeously {July 2020 Sentiment Kit} and Flutter Away (inside sentiment); Altenew watercolor half pans and palette mat; clear double-sided flat and foam tape, My Creative Time Rectangle Frame Die Layers, Pink Fresh Studio slim ornate banner dies, Ranger watercolor paper and jet black archival ink; watercolor brush, adhesive gems and craft tweezers.


Be sure to visit the Unity blog for the entire article and tutorial.
Also, you can find my other features at Unity's
Technique Time and
Watercolor Wednesday.

Thanks for visiting.  Have a fabulous day.
Gaylynn

8/04/2020

Floral Tag Card ~ MCT Tag It Tuesday

Hello.  Today, the My Creative Time team is sharing tag projects.  Here is my floral all occasion card using a tag as the card accent.


Sentiment:  Hi

This was quick and easy to make.  I first stamped the florals directly onto the card base using two ink shades for the stamping.  Next, I die-cut the tag, bow and letter layers using different colors of cardstock.  I used the smaller parts of the tall frame dies to create the main tag layers, which fit nicely onto the A2 sized card base.  For color, I added colored pencils to the flowers, the bow and to the letters.  Then, I punched a hole into the tag and added twine plus adhesive gems for the flowers.  Finally, everything as layered and assembled, to finish.

Here is another look.


Supplies:  My Creative Time ABC DiesTall Frame DiesTall Frame Die LayersHearts & Flowers, and Fun Size Holiday Bow Die; Prismacolor colored pencils PC906, PC1006, PC992, PC928; twine cording, Ranger archival ink in aquamarine and cobalt, Ranger multi medium matte glue; double-sided clear flat and foam tape.

Please visit Emma's My Creative Time blog for more inspiration.

Enjoy your day.
Gaylynn