7/29/2020

Glitz glitter & ink blending slimline succulent card.

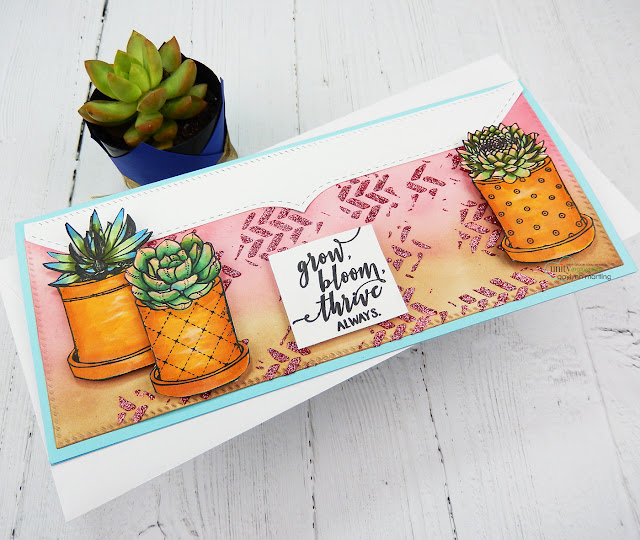
Hello.  For Technique Time at Unity, I share a glitz glitter slim card with succulents using stamping, stenciling and different color mediums. 


Sentiment:  Grow, bloom, thrive always.

Making a glitz glitter slim card background with sparkle pairs nicely with the succulent stamping.

Helpful tips:
Here are helpful tips to create this glitz glitter slim card.  To begin, pre-trim the card base and all of the card layers.  Die-cuts were used here, but are not necessary.  Next, stamp, color and cut out (fussy cut) the succulent potted plants and the sentiment.  Then, add ink blending of choice to the bottom front panel.  Next, add a thin layer of glitz glitter gel along with a stencil and a spatula in random sections where you want background interest.  Then, allow the gel to dry at least 30 minutes.  Finally, assemble the card front, to finish.

Card base cut approximately 9" x 7 1/2"
Card front approximately 9" x 3 3/4"
Envelope #9 or #10


I made a quick video tutorial showing the process for this project.
{{Please subscribe to my video channel and like this video.  Many thanks.}}
YouTube:  Gaylynn NeatThingsBtq


Here is another look.


This project is included in the 

Supplies:  Unity Stamp Co. Thrive Always; distress oxide ink in walnut stain and worn lipstick, blending brush, Gina K. Designs bubblegum glitz glitter gel, Simon Says Stamp intense black ink, Faber-Castell spatula, Tim Holtz herringbone stencil, original Misti, flat and foam double-sided clear tape, Fiskars paper trimmer, scoring board, Pink Fresh Studio slim ornate edges and slim diagonal stitched rectangles, Copic markers R02, R20, E33, E13, YR24, B34, B01, G21, G28, G99.

Be sure to visit the Unity blog for the entire article and tutorial.
Also, you can find my other features at Unity's
Technique Time and
Watercolor Wednesday.


Thanks for visiting.
Gaylynn

7/27/2020

Masculine Tall or Slim Watercolor Card ~ MCT Manly Monday

Hello.  Today, the My Creative Time team is sharing masculine themed projects.  Here is my tall or slim style card for Pop.


Sentiment:  You'll always be my hero!

For this tall or slim style card, I die-cut the layers from the tall dies using mint cardstock and watercolor paper.  I then trimmed and scored my card base to fit, slightly larger than the inner layers.  Using the original Misti stamp positioning tool, I stamped the sentiment onto the watercolor panel then stamped the newspaper print onto the tag.  The letters were die-cut and placed over the tag.  Watercolor was added to the watercolor paper layer and then heat set.  Everything was assembled and layered onto the trimmed card base, to finish.

Here is another look.


Supplies:  My Creative Time ABC Dies, Tall Frame Dies, Tall Frame Die Layers, Tag Dies, Tag Die Layers, Newspaper Background, Have A Super DayTall Kraft Envelope; Prima Art Philosophy watercolor tubes, cording, Ranger archival ink and multi medium matte glue; Canson watercolor paper, water brush, heat tool, PTI cardstock, paper trimmer, tweezers, original Misti, score tape or extra tacky tape, double-sided clear flat tape.

Please visit Emma's My Creative Time blog for more inspiration.

Enjoy your day.
Gaylynn

7/26/2020

Rustic masculine beard card & video tutorial.

Hi there.  This is a masculine style card featuring rustic accents with beard stamping.  With a bit of ink blending and patterned paper, this card came to life.  It makes a great birthday or celebration card for the guys.


Sentiment:  Man of the moment.

This card was simple to make.  To begin, I simply added the stamping over patterned paper and then die-cut the accent layers.  Then, for rustic accents, I added brown ink blending to the paper and to the stamping with two different blending tools.  The imperfect distressed look was what I was going for.  Finally, all of the layers were added to the card base, to finish.

I made a quick video tutorial showing the process for this project.
{{Please subscribe to my video channel and like this video.  Many thanks.}}
YouTube:  Gaylynn NeatThingsBtq


Here is another look.


Supplies:  Unity Stamp Co. The Fan{tache}tic Bearded Man and Krafty Season {paper pack}; My Creative Time Etched Edge Frame Dies, ink blending brush, Imagine Crafts sponge dauber, Ranger walnut stain distress oxide ink and jet black archival ink; double-sided flat and foam clear tape, cardstock.

Thank you for visiting.  Enjoy your day.
Gaylynn

7/25/2020

Flamingo tropical card ~ foiling without a laminator.

Hello.  Here is a bright and cheerful tropical themed card with confetti foil accents.  I use a mix of stamping, patterned paper, Copics and foiling for this flamingo card.


Sentiment:
Stand tall, stand out, stay balanced, dream big.

This card was fun to make.  To begin, I simply die-cut the background from Unity paper.  Then, I stamped the sentiment and the flamingo with Copic friendly ink and added color to the flamingo.  Next, foil accents were added using a stencil along with deco foil transfer gel duo, without using a laminator.  Finally, everything was attached to the card base, to finish.

I made a quick video tutorial showing the process for this project.
{{Please subscribe to my video channel and like this video.  Many thanks.}}
YouTube:  Gaylynn NeatThingsBtq


Here is another look.


Supplies:  Unity Stamp Co. Be A Flamingo, Heart Confetti Stencil and Island Bliss {paper pack}; Deco Foil transfer gel duo, gold Deco Foil, My Creative Time Thank You & Frame Dies, Simon Says Stamp intense black ink pad, painter's tape, Ranger plastic craft mat, spatula, double-sided flat and foam clear tape, Copic markers R20, R02, YR14, C7.

Thank you for stopping by.  Enjoy your day.
Gaylynn

7/23/2020

Mailbox shaped card ~ MCT gift card giving

Hello.  Today, the My Creative Time team is sharing gift card giving themed projects.  Here is my mailbox shaped gift card holder.


Sentiment:  Celebrate

This was quick and easy to make with no coloring needed.  I just die-cut the pieces onto patterned and plain paper.  The sentiment was added with a stamp and die-cut as well.  I added the mini envelope onto the front for an added accent.

To get the shape card base with fun folds, just die-cut two of the largest dies, score the back panel's top edge at 1/4", fold that edge inward.  Position the mailbox evenly and the bottom portion with the two panels and then adhere the two layers together at the folded score section only.  The card should open, close and stand up easily.  This mini card or gift card holder measures approximately 4" x 3" assembled.  It fits into an A2 envelope with extra room.

Here is another look.


Supplies:  My Creative Time Mailbox Gift Card Holder Die, Mini Love Letter Dies and Best Day Ever; Pink Paislee paper, cardstock, score tape or extra tacky tape, double-sided clear flat tape, adhesive dots.

Please visit Emma's My Creative Time blog for more inspiration.

Enjoy your day.
Gaylynn

7/22/2020

Watercolor poppy flowers + patterned paper card overlay

Hello.  For Technique Time at Unity, I show a way to combine watercolor poppy flowers with patterned paper background detail.


Sentiment:  Best wishes.

Watercolor poppy flowers added over patterned paper looks beautiful in card making.

Helpful tips:
Here are helpful tips to create this card with watercolor poppy flowers and patterned paper.  First, stamp onto the smooth side of watercolor paper with waterproof ink.  Then, add watercolor of choice.  I used Prima Art Philosophy watercolor for these poppies.  Next, heat set and cut out the flowers (fussy cutting).  Then, trim or die-cut the background panel from patterned paper of choice to fit the card base.  Finally, layer the background and then pop up the flower and sentiment, to finish.


I made a quick video tutorial showing the process for this project.
{{Please subscribe to my video channel and like this video.  Many thanks.}}
YouTube:  Gaylynn NeatThingsBtq


Here is another look.


Supplies:  Unity Stamp Co. Aging Gorgeously {July 2020 sentiment kit}, Pink & Blue Watercolored {paper pack}; original Misti, flat and foam double-sided clear tape, MCT Zig Zag Background Die; Fiskars paper trimmer, Prima Art Philosophy watercolor tubes, Ranger watercolor paper, archival ink in jet black, distress marker in black soot and multi medium matte glue; watercolor brush.

Be sure to visit the Unity blog for the entire article and tutorial.
Also, you can find my other features at Unity's
Technique Time and
Watercolor Wednesday.


Thanks for visiting.
Gaylynn

7/17/2020

Frames & Fowers ~ MCT Mini Release, Blog Hop & Sale

Hello, it's Gaylynn.  Great news, Emma at My Creative Time is having a mini-release, sale and blog hop.  Read to the end to see the deals.
For the blog hop, you may have arrived from Emily's blog.

Today, we are having a special “Mini Release” for you! We are releasing two new products. The first one is a new die set: “ETCHED EDGE FRAME DIES” plus a new stamp and die set: “HEARTS & FLOWERS”. Both of these sets are available now for purchase here: https://shop.my-creative-time.com/New-Release_c40.htm


Sentiment:  Just a note.

This framed floral card was made using watercolor and die-cuts.  To make this, begin by adding watercolor onto wet watercolor paper.  Sprinkle a bit of Brusho crystal colors powder or other watercolor medium onto the wet paper.   Allow the colors to move.  Heat set and then stamp the flowers and hearts onto the watercolor panel, using waterproof black ink.  Next, die-cut the flowers and hearts.  Also, die-cut the two etched frame dies.  Then, stamp the sentiment.  Next, arrange the floral layout.  Finally, layer everything onto the card base with added adhesive pearls.


 *** BLOG HOP GIVEAWAY ***
Leave your comments on all of our blogs in this hop for a chance to win a $25 gift card to my store! Don’t forget to leave a way for us to contact you if YOU are the lucky winner!

*** SALE ALERT ***
Use the code: MINI20 to get 10% off of your entire purchase! This sale applies to “in-stock” items only! The sale starts now, Friday, July 17, 2020, and ends on Sunday, July 19, 2020, at midnight PST!

Here are the new MCT products. 


Here is another look at today's project.


Supplies for today's project:
My Creative Time Etched Frame Dies and Hearts & Flowers; double-sided clear flat and foam tape, Brusho Crystal Colors powder, Ranger watercolor paper, mini mister, archival ink in jet black and plastic craft mat; heat tool, cardstock, adhesive pearls, original Misti.

Hop along with us.

Your next stop in the hop is Ginger's blog. The entire blog hop lineup is on Emma's My Creative Time blog.

Thanks for visiting. I always look forward to your comments.
Gaylynn

7/15/2020

Watermark & repeat stamping ~ no coloring card tutorial

Hello.  For Technique Time at Unity, I am sharing watermark and repeat stamping together with no coloring needed for this card.


Sentiment:
You matter.  You are enough.  You are loved.

Using repeat stamping and watermark stamping looks great together with no coloring needed.


Helpful tips:
Here are tips for creating this card:  First, trim or die-cut cardstock panels to fit your card base layers.  Next, stamp the flowers onto colored cardstock with watermark ink, all over the panel.  Then, stamp the sentiment and more flowers onto the ivory top panel.  Next, add an accent layer on the top and the bottom of the card. (optional)  I decided to add a gold trim and an ivory trim.  Finally, layer all of the panels and cording onto the card base, to finish.

Here is another look.


Supplies:  Unity Stamp Co. Sending Hugs; Ranger archival cobalt ink, original Misti, cardstock in white, ivory and blue; gold cording, flat and foam double-sided clear tape, MCT Rectangle Frame Die Layers and More Stitched Edges; Fiskars paper trimmer, Silhouette printable gold foil paper.

Be sure to visit the Unity blog for the entire article and tutorial.
Also, you can find my other features at Unity's
Technique Time and
Watercolor Wednesday.


Thanks for visiting.
Gaylynn

7/09/2020

Wreath style frame card ~ orchids and Copics

Hello there.  Today, I am sharing a floral card that was made circular for a wreath look.  I used orchids Copic markers and a layered background.


Sentiment:  
All works of love are works of peace. ~ Mother Teresa

For this floral wreath card, I first stamped the sentiment onto a larger piece of cardstock.  Then, I stamped the row of orchids twice, one on the top of the sentiment and once under the sentiment.  Next, I added color using Copic markers.  Finally, the layers were die-cut and layered onto the card base, to finish.

I made a quick video tutorial showing the process for this project.
{{Please subscribe to my video channel and like this video.  Many thanks.}}
Here is another look.


Supplies:  Unity Stamp Co. Words Of HopeMy Creative TimePretty Scallop Circle dies and Pretty Circle Layer dies; Simon Says Stamp intense black ink, double-sided flat and foam clear tape, clear adhesive gems, cardstock, Copic markers BG32, BG49, G21, G99, Y02, YR23.

Thanks for visiting.  Have a happy day.
Gaylynn

7/08/2020

Easel card with blue toile stamping tutorial.

HelloI am sharing an easel card tutorial with blue toile stamping.  This card brings back some oldies but goodies in my Unity treasure box.


Sentiment:
Everyone is fighting a battle you know nothing about.  Be kind.

Using toile accents really makes this easel card pop.


Helpful tips:
Here are tips for creating this toile easel card:  First, stamp the background toile and the sentiment onto cardstock using a stamp positioner like the Misti.  Next, trim or die-cut all of the cardstock stamped panels and layers.  Now, score the blue frame panel to make a front easel.  Then, begin assembling the top layers and add twine or cording to the tag accent.  Next, fold the blue scored easel panel and adhere the back section to the top fold card base.  Now, add the top accent sentiment section.  When finished, this is an A2 sized card with a front panel that folds out to make an easel card shape.
 
Card base:  A2 top fold. Cut 4 1/4" x 11", score 5 1/2"
Blue frame panel:  cut 4" x 10 1/4" and
score on the long end at 5 1/4" x 7 3/4".
Toile background:  5" x 3 3/4"
(Also, make an accent trim with leftover cuts.)
Front white bottom panel:  2 1/4" x 3 3/4"
Layered Tag:  3 1/2" x 2 1/2"

Here is another look.


Supplies:  Unity Stamp Co. Tea Time Toile and Everyone You Meet; Ranger archival manganese blue and cobalt ink, original Misti, cardstock, hole punch, gold cording, flat and foam double-sided clear tape, MCT rectangle frame dies, tag frame dies, tag frame die layers; Fiskars paper trimmer, scoring board, bone folder, gold paper, Prismacolor colored pencils in PC904 and PC906.  

Thanks for visiting.
Gaylynn

With love treat wrap or party favor for MCT.

Hello.  Today, the My Creative Time team is sharing favor or treat container project ideas.  Here is my treat wrap container, perfect for party favors or thank you tokens.


Sentiment:  With love.

This 3" x 3" treat wrap was made using a tri-fold die set.  First, I added stencil bars to the blue cardstock with distress oxide ink blending and a blending brush.  Then, I die-cut the tri-fold panel and tag layers.  Also, the sentiment was added to the top tag layer.  Next, I scored and folded the wrap panel around a box of Tic Tac mints.  Finally, the favor wrap was tied closed and a tag added with twine.

Here is another look.


Supplies:  My Creative Time 3x3 Trifold Card Die (revised), Little Gift Tag Dies, Mini Valentines; mini Misti, tan cording, Ranger archival ink in jet black & distress oxide ink pad in broken china; cardstock, MFT scattered bars stencil, blending brush.

Please visit Emma's My Creative Time blog for more inspiration.

Enjoy your day.
Gaylynn

7/02/2020

Watercolor hello slim or tall card ~ MCT Just Cards

Hello.  Today, the My Creative Time team is sharing card project ideas.  Here is my tall or slim style hello card with watercolor and silver embossing.


Sentiment:  Hello

This card is versatile to be used as a greeting card or money holder card.  It is great for many occasions or just because.  For this card, I die-cut the tall slim panels.  Then, I used silver heat embossing onto watercolor paper for the stamping.  Next, I added water and a touch of green Prima watercolor to the top layer.  Finally, everything was layered and silver cording was added, to finish.  

Supplies:  My Creative Time tall frame dies, tall frame die layers, fun notes and just because; original Misti, silver cording, Canson watercolor paper, brush, Prima Art Philosophy watercolor, VersaMark ink, silver embossing powder, heat tool, cardstock, clear flat and foam double-sided tape.

Please visit Emma's My Creative Time blog for more inspiration.

Enjoy your day.
Gaylynn

7/01/2020

Watercolor tri-fold slim card ~ diagonal cut tutorial

Hi there.  Today, I am sharing my tri-fold slim card made using watercolor and diagonal cut detail.


Sentiment:
This is us, our life, our story, our love
Through the ups and downs, I'd pick you again and again.
Happy Anniversary

This tri-fold slim card is interactive, with art on the front and on the inside.  It was easy and fun to make.


Here are the measurements that I used for this trifold slim card base & envelope.  Please reference the video for the process and details for this project.

This tri-fold slim card size folded is approximately 3 5/8" x 8 1/2".
First, use an envelope #10 size or a 4 1/8" x 9" size.
Also, use one sheet of 8 1/2" x 11" cardstock for the base.

Next, score on one end of the long side at 3 5/8".
Then, rotate the paper to score the other side of the long end at 3 5/8".
You should have two vertical score lines on a horizontal sheet of cardstock.

Next, using a paper trimmer, align the cutting from about 2" from the bottom left of the horizontal cardstock piece upwards to the top of the second fold line.  Then, cut a diagonal section from the cardstock, from those points.
Next, fold back the small cut section at the first fold line and fold inward at the second fold line.
Finally, decorate the front and the inside with stamping, watercolor and embellishments.

This card base and envelope example was made using an envelope that I happen to have on hand.

Please note, dies are not necessary.  A paper trimmer can be used to trim the desired card base and the layers.


Here is another look.


Supplies:  Unity Stamp Co. You Are My Always; Ranger archival jet black ink, cardstock, flat and foam double-sided clear tape, Pink Fresh Studio slim ornate banner dies; Altenew watercolor half pans and palette mat; watercolor brush, envelope, Fiskars paper trimmer, MSC scoring board, bone folder, Canson watercolor paper. 

Thanks for visiting.
Gaylynn