6/24/2020

3 Slim Card Base & Envelope Size Examples + Flamingo Process

Hello.  For Technique Time at Unity, I am showing three slim card base & envelope size examples.  Plus I show the full flamingo card process.


Sentiment:  I'm tickled pink that we are friends.

Creating slim style cards can be made in different sizes and with different envelopes.


Here are the sizes that I use most often for slimline card bases & envelopes.  Please reference the video for the process and details for this project.

First, largest:

Envelope #10 size 4 1/8″ x 9 1/2″

Card base cut 9 1/4″ x 8″, Score on short end at 4″

Card size 9 1/4″ x 4″
—————————————————

Second, medium:

Envelope size 4 1/8″ x 9″

Card base cut 7 1/2″ x 7 1/2″, Score at 3 3/4″

Card size 7 1/2″ x 3 3/4″

————————————————–

Third, smallest

Envelope size 3 7/8″ x 7 1/2″

Card base cut 7 1/4″ x 7 1/4″, Score at 3 5/8″

Card size 7 1/4″ x 3 5/8″

The card base and envelope examples were made using envelopes that I happen to have on hand.  For card base sizes, I like to begin with the envelope size first.  Then, I cut the card base a bit smaller than the envelope size.  Next, I choose dies that fit best onto the trimmed card front.  Finally, dies are not necessary.  A paper trimmer can be used to trim the desired card base and the layers.

I made a quick video tutorial showing the process for this project.
{{Please subscribe to my video channel and like this video.  Many thanks.}}
YouTube:  Gaylynn NeatThingsBtq


Here is another look.


Included in the 
Simon Says Stamp Wednesday Challenge ~ Anything Goes

Supplies include Unity Stamp Co. Fabulous Flamingo.
Also, Simon Says Stamp intense black ink, cardstock, hole punch, twine, flat and foam double-sided clear tape, Misti, My Creative Time tall frame dies, tall frame die layers and tall kraft envelope; Pink Fresh Studio slim fancy diagonal stripes and slim ornate banner dies; Copic markers RV29, R32, R20, B0000, B01, C3, C7; Sakura Koi watercolor, paint brush, adhesive gems, Fiskars paper trimmer, MSC scoring board, bone folder.

Be sure to visit the Unity blog for the entire article and tutorial.
Also, you can find my other features at Unity's
Technique Time and
Watercolor Wednesday.


Thanks for visiting.
Gaylynn

Sweet treat 3-D box ~ MCT I Need A Favor

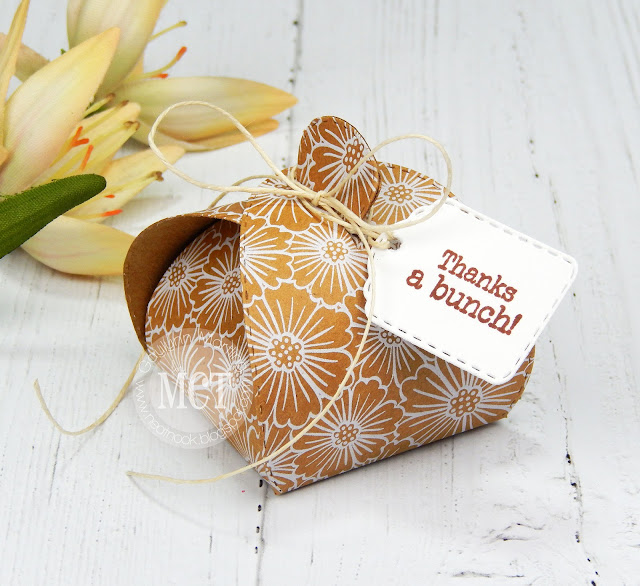
Hello.  Today, the My Creative Time team is sharing favor or treat container project ideas.  Here is my sweet stitched favor box, perfect for party favors or thank you tokens.


Sentiment:  Thanks a bunch.

This little box measures approximately 2" x 2" x 2 1/2" assembled.  It is made with one box die and one mini tag, both included in the same die set.  This is a favorite to use because it fits into the Big Shot die-cutting machine with just one pass, plus the box die cuts perfectly onto a 6" x 6" patterned paper piece.  Also, this tag die is now part of the sweet die set.  All I did was die-cut and assemble the kraft and white patterned paper, stamp and punch a hole into the tag and then tie it together with twine cording.  This is ready to give as a party favor or thank you gift.

Supplies:  My Creative Time Stitched Favor Box Die (Revised), Mini Spring Greetings; mini Misti, tan cording, Ranger archival ink in coffee, DCWV cardstock.

Please visit Emma's My Creative Time blog for more inspiration.

Enjoy your day.
Gaylynn

6/19/2020

Distress oxide ink + masking ~ scene card.

Hello.  Here is a bright and cheerful birthday card with scene building.  I use a mix of distress oxide inks and masking to create this scene strip.


Sentiment:  Enjoy your birthday.

Here are helpful tips for creating this.  To begin, stamp the sentiment and also the same images onto a trimmed cardstock panel and again onto masking paper.  Next, color in the cardstock stamping.  Now, cut out the masking paper stamping and peel away the film backing.  Then, place the masking paper over the cardstock stamping.  Using colors of distress oxide ink, blend the ink over the cardstock strip.  Optional, add water splatters.  Next, remove the masking pieces and fill in any extra color sections.  Heat set the panel.  Finally, layer the panels and add the tag and accents over the card base, to finish.

I made a quick video tutorial showing the process for this project.
{{Please subscribe to my video channel and like this video.  Many thanks.}}
Here is another look.


Supplies:  Unity Stamp Co. So Mushroom; Simon Says Stamp intense black ink, Gina K. Designs masking magic, My Creative Time dies, black lace, double-sided flat and foam clear tape, Ranger mini mister and distress oxide ink in peeled paint, spiced marmalade and broken china; blending brush, twine, cardstock, Copic markers Y11, C1, C3, R02.

Thanks for visiting.  Have a happy day.
Gaylynn

New Frame Dies ~ MCT 102nd Edition release, sale and blog hop

Hello, it's Gaylynn.  Great news, the My Creative Time 102nd Edition release, sale and blog hop has begun.
We are celebrating Emma's My Creative Time 10th anniversary.  Check out the great sale and release.  Also, visit the design team blog links for inspiration along the way in the blog hop.
For the blog hop, you may have arrived from Emily's blog.


Sentiment:  Can't wait to hug you again.

This card was simple to make.  It is filled with different sizes of the new frame dies and die layers.  I used both stitched and unstitched die-cuts for this.  Two of the layers were made from a stamped newspaper background and then die-cut.  For added shine, I added gold paper layers.  The sentiment was stamped and trimmed to place on top of the heart.  To finish, everything was layered with flat and foam clear adhesive tape.

 *** BLOG HOP GIVEAWAY ***
Leave your comments on each blog for a chance to win a $25 Gift Card to the My Creative Time store. One lucky winner will be chosen and noted on June 24th on the MCT blog! GOOD LUCK my friends!
(Please don't forget to leave a way/email for MCT to contact you, if you were to be one of the lucky winners.) 

*** SALE ALERT ***
DON'T FORGET our sale starts RIGHT NOW HERE! Use the code: JUNE2020 to receive a 15% discount off your entire purchase! This sale applies to "IN-STOCK" items ONLY. This sale will end on Friday, June 26, 2020, at midnight PST. Here are my sneak peek blog projects from this release.


Day 2


Day 3


Day 4


** FREEBIE *** (expired but now for purchase in the shop)
Starting Friday June 19, 2020 at 8am PST, Emma will be giving away this new "Little Gift Tag Dies" set. To celebrate My Creative Time’s “10 Year Anniversary”. This new die set will be given to the FIRST 40 shoppers! If you are one of the first 40 shoppers, it will automatically be added to your package at the time of packing/shipping. Once 40 shoppers come through, this die set will be available for purchase! So, if it's available in the store, you are not one of the 40. No exceptions will be made. This freebie is not part of the "bundle" and will be sold separately.

Here is another look at today's project.

Supplies for today's project
My Creative Time Rectangle Frame Dies, Rectangle Frame Die Layers, Newspaper Background and Stay Safe; double-sided clear flat and foam tape, gold foil paper, mini Misti, Ranger archival ink in jet black and saffron, paper trimmer.

Hop along with us.

Your next stop in the hop is Ginger's blog. The entire blog hop lineup is on Emma's My Creative Time blog.

Thanks for visiting. I look forward to your comments.
Gaylynn


6/18/2020

Tall Slim Dies ~ MCT 102nd Edition Sneak Peek Day 4

Hi, it's Gaylynn.  Here is Day 4 of the My Creative Time 102nd Edition sneak peeks.
MCT is celebrating their 10 year anniversary.  Tune in Friday for the full release, blog hop and sale.


Sentiment:  Happy birthday.

This card was made using layers from two different tall or slim sets, tall frame dies and tall frame die layers.  These dies are slim style, tall or long depending on how you create with them.  They are placed on this card, alternating from unstitched and stitched panels. These will fit into an #9 business size envelope or ones a little smaller, like #9 or others.
The envelope that I used for this card measures 4 1/8" x 9".

For this card, I first trimmed a card base a little wider than the largest die.
The card base was cut approximately 7 1/2" x 7 1/2" and scored at approx. 3 3/4".
Then, I die-cut patterned paper and cardstock in different colors from largest to the smallest.  Next, I die-cut the sentiment and four dragonflies.  For added color on each dragonfly, I used distress oxide ink blending and stacked the dragonflies a little offset.  Finally, I layered everything onto the card base, to finish.


*** Sneak Peek Giveaway ***
We will be giving away the sets we are showcasing each day to ONE lucky winner!  For example, the set we are showcasing on Wednesday, Emma will announce the winner of that on Thursday and the sets we are showcasing on Thursday, Emma will announce that winner on Friday on the MCT blog!  ALL you have to is leave a comment on each of our blogs!  You are NOT required to comment on every single blog, but the more you comment on, the more chances you have for winning!  VERY IMPORTANT, PLEASE leave a way for us to contact you with your comments just in case YOU are the lucky winner!  
For EXTRA entries, you can spread the word about this release on Facebook, tweet about it OR even Instagram it.... #mycreativetime

Here is another look.


Supplies for today's project: My Creative Time Tall Frame Dies, Tall Frame Die Layers, Money Envelope Die and Pretty Butterflies & Dragonfly Dies; Ranger distress oxide ink in peacock feathers and worn lipstick, multi medium matte glue; mini Misti, cardstock, K & Company patterned paper, ink blending brush, adhesive gems, flat and foam clear double-sided tape.

For more sneak peek inspiration, visit Emma's My Creative Time blog.
Thanks for visiting. I look forward to your comments. Gaylynn

6/17/2020

Second generation stamping tropical card tutorial

Hello.  For Technique Time at Unity, I am using second generation stamping for my tropical Summer cocktails card.


Sentiment:  Say hello to Summer.

Second generation stamping creates beautiful and simple backgrounds and card accents.

Helpful tips using the second generation stamping technique:  First, pre-cut or trim a background stamping panel, an accent top panel and sentiment layer.  Next, stamp the focal layer with Copic friendly ink and stamp the sentiment panel.  Also, add color to the stamping.  Then, for the background, use an acrylic stamp block to ink your leaf stamp.  Next, stamp once along the border and then, without reinking, stamp again near the first leaf.  You will see a muted color the second time.  Then, repeat this process around the borders.  Next, embellish the card with twine and leaf cuts.  Finally, layer everything onto the card base, to finish.


I made a quick video tutorial showing the process for this project.
{{Please subscribe to my video channel and like this video.  Many thanks.}}
YouTube:  Gaylynn NeatThingsBtq


Here is another look.


Supplies:  Unity Stamp Co. Hello Summer and Hello Lovely; dies by MCT and Avery Elle; Simon Says Stamp intense black ink, Ranger archival ink in olive, distress oxide ink in fossilized amber and multi medium matte glue; blending brush, an acrylic stamp block, mini Misti, cardstock, hole punch, twine, flat and foam double-sided clear tape. 

Be sure to visit the Unity blog for the entire article and tutorial.
Also, you can find my other features at Unity's
Technique Time and
Watercolor Wednesday.


Thanks for visiting.
Gaylynn

Note Layers ~ MCT 102nd Edition Sneak Peek Day 3

Hi, it's Gaylynn.  Here is Day 3 of the My Creative Time 102nd Edition sneak peeks.
MCT is celebrating their 10 year anniversary.  Tune in Friday for the full release, blog hop and sale.


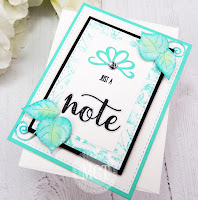
Sentiment:  Just a note.

This card was made using lots of layers from two different sets, rectangle frame dies and rectangle frame die layers.  These dies fit perfectly onto an A2 sized card base from the edge, full card size to narrow sections.  They are placed on this card, alternating from stitched and unstitched panels.

For this card, I first die-cut solid cardstock in different colors from largest to the smallest.  The top teal layer was cut from an embossed panel.  Next, I stamped the sentiment and die-cut the "note" word.  I also die-cut the ribbon trim and the leaves.  For added color, I used distress oxide ink blending on the leaves.  Finally, I layered everything onto the card base, to finish.

*** Sneak Peek Giveaway ***
We will be giving away the sets we are showcasing each day to ONE lucky winner!  For example, the set we are showcasing on Wednesday, Emma will announce the winner of that on Thursday and the sets we are showcasing on Thursday, Emma will announce that winner on Friday on the MCT blog!  ALL you have to is leave a comment on each of our blogs!  You are NOT required to comment on every single blog, but the more you comment on, the more chances you have for winning!  VERY IMPORTANT, PLEASE leave a way for us to contact you with your comments just in case YOU are the lucky winner!  
For EXTRA entries, you can spread the word about this release on Facebook, tweet about it OR even Instagram it.... #mycreativetime

Here is another look.


Supplies for today's project: My Creative Time Rectangle Frame Dies, Rectangle Frame Die Layers, Fun Notes, Cute Bow Dies and Little Stitched Leaves; Ranger jet black archival ink and distress oxide ink in cracked pistachio and peacock feathers, multi medium matte glue; mini Misti, cardstock, adhesive gem, flat and foam clear double-sided tape.

For more sneak peek inspiration, visit Emma's My Creative Time blog.
Thanks for visiting. I look forward to your comments. Gaylynn

6/16/2020

Missing You ~ MCT 102nd Edition Sneak Peek Day 2

Hi, it's Gaylynn.  Here is Day 2 of the My Creative Time 102nd Edition sneak peeks.
MCT is celebrating their 10 year anniversary.  Hooray!  Tune in Friday for the full release, blog hop and sale.


Sentiment:  Missing you.

I am sharing a card that is fitting for a guy or gal.  It is made in kraft, white and black with an embossed newspaper print background style.  It is also perfect as a masculine style card.

For this card, I first stamped, heat embossed and trimmed the newspaper print background panel and the sentiment.  Then, I added a die-cut trim to the edge and to the sentiment tag.  Next, I added a bit of hemp twine to the tag section.  Finally, I layered everything onto the card base, to finish.

*** Sneak Peek Giveaway ***
We will be giving away the sets we are showcasing each day to ONE lucky winner!  For example, the set we are showcasing on Wednesday, Emma will announce the winner of that on Thursday and the sets we are showcasing on Thursday, Emma will announce that winner on Friday on the MCT blog!  ALL you have to is leave a comment on each of our blogs!  You are NOT required to comment on every single blog, but the more you comment on, the more chances you have for winning!  VERY IMPORTANT, PLEASE leave a way for us to contact you with your comments just in case YOU are the lucky winner!  
For EXTRA entries, you can spread the word about this release on Facebook, tweet about it OR even Instagram it.... #mycreativetime

Here is another look.


Supplies for today's project: My Creative Time Stay Safe, Newspaper Background, Little Gift Tag Dies, Fun Stitched Edges and More Stitched Rectangular Dies; VersaMark ink, white embossing powder, heat tool, mini Misti, cardstock, flat and foam clear double-sided tape, hole punch.

For more sneak peek inspiration, visit Emma's My Creative Time blog.
Thanks for visiting. I look forward to your comments. Gaylynn

6/15/2020

You are loved ~ MCT 102nd Edition Sneak Peek Day 1

Hi, it's Gaylynn.  Here is Day 1 of the My Creative Time 102nd Edition sneak peeks.
MCT is celebrating their 10 year anniversary.  Hooray!  Tune in Friday for the full release, blog hop and sale.


Sentiment:  You are loved.

I am sharing a watercolor card with embossed stamping.  This one includes some positive vibes to spread love and kindness.

For this watercolor stamped card, I first stamped, heat embossed and trimmed the watercolor paper background panel.  Then, I added watercolor in two shades, one yellow and one purple.  I also added watercolor to a scrap piece of watercolor paper.  Next, I die-cut two hearts from that scrap paper.  Once dry, I layered everything onto the card base, to finish.

*** Sneak Peek Giveaway ***
We will be giving away the sets we are showcasing each day to ONE lucky winner!  For example, the set we are showcasing on Wednesday, Emma will announce the winner of that on Thursday and the sets we are showcasing on Thursday, Emma will announce that winner on Friday on the MCT blog!  ALL you have to is leave a comment on each of our blogs!  You are NOT required to comment on every single blog, but the more you comment on, the more chances you have for winning!  VERY IMPORTANT, PLEASE leave a way for us to contact you with your comments just in case YOU are the lucky winner!  
For EXTRA entries, you can spread the word about this release on Facebook, tweet about it OR even Instagram it.... #mycreativetime

Here is another look.


Supplies for today's project: My Creative Time Stay Safe and More Stitched Rectangular Dies; VersaMark ink, black embossing powder, heat tool, mini Misti, Altenew watercolor half pans and Ranger watercolor paper.

For more sneak peek inspiration, visit Emma's My Creative Time blog.
Thanks for visiting. I look forward to your comments. Gaylynn

6/11/2020

Friendship flower card ~ vellum + ink blending ~ MCT Just Cards

Hello.  Today, the My Creative Time team is sharing card project ideas.  Here is my friendship flower card.


Sentiment:  Hi friend...  You make the world a better place.

Tips for making this card:  First, trim a background panel and a vellum panel to fit your card front and centerpiece.  Next, blend distress oxide ink in yellow shades along the edges of the background panel.  Then add a blue shade on the outer edges to show a bit of contrast.  I used makeup brushes for blending, but most any ink blending tool works.  Next, stamp onto vellum cardstock with a pigment ink like ColorBox or use a watermark ink for the flower and sentiment stamping.  Then add either clear embossing powder with pigment ink or an embossing powder with color over watermark ink.  Heat set and then layer everything to finish.


Supplies:  My Creative Time You Are Cherished stamps and dies; mini Misti, Colorbox ink in blue, clear embossing powder, blending brush (makeup brush for crafting), Ranger distress oxide ink in broken china and fossilized amber; cardstock, double-sided clear flat and foam tape, adhesive gems, PTI vellum cardstock.

Please visit Emma's My Creative Time blog for more inspiration.

Enjoy your day.
Gaylynn

6/10/2020

Pocket fold card ~ note or gift card holder tutorial.

Hello.  For Technique Time at Unity, I am sharing a way to make a pocket card, folded for use as a note holder or as a gift card holder.


Simple folds can make unique cards, like this pocket card.

Here are helpful tips for making this pocket card.  To begin, pre-cut and score the card base.
Cut cardstock to 4 1/4" x 11"
Score at 5 1/2" and 9"
Next, add tacky adhesive like Wonder Tape or Score Tape to the inside fold at the edges and also to the outer flap, to fasten them down.  Also, leave room for a trimmed note panel to fit inside.  Next, stamp and trim the sentiment script background piece and trim a frame layer from patterned paper.  Then, stamp the with love sentiment over the script panel.  Next, trim a note panel to fit inside the pocket.  Next, use repeat stamping on the note panel to add the pink flowers and green sprigs, for a top note border.  Finally, layer the pocket card base and accent with twine to finish.

Here is another look.


Supplies:  Unity Stamp Co. Large Amounts of Love and A Faithful Letter; My Creative Time scalloped stitched rectangular dies, Ranger archival ink in rose madder, viridian and jet black; Prismacolor colored pencils PC930 and PC929; BasicGrey paper, cardstock, paper trimmer, Wonder Tape, black twine, MSC scoring board, flat and foam double-sided clear tape. 

Thanks for visiting.
Gaylynn

6/09/2020

Thank you card ~ alcohol ink background

Hello.  Today, I am sharing a card made at a recent card class.  This involves an alcohol ink technique for the background layer.


Sentiment:  Thank you.  Thank you for simply being there.

For this card, I used paper for use with alcohol ink.  I first stamped and heat embossed a floral stamp, with white embossing powder.  It doesn't show up with these light alcohol ink colors, but it does have the texture and shine in person.  If I were to do this again, I would use back embossing powder for the flower.  I also added multiple drops of alcohol ink in different colors plus air blown from a straw.  The background was left to dry before trimming.  Once dry, I added the sentiment panels on top, to finish.

The look is never the same twice.  It was my first attempt with liquid alcohol inks.  Since this was a class project, I do not have the brand of ink that I used.  There are great ones on the market which produce similar effects.

This project does not include a video tutorial.
However, for my projects with video tutorials, please see my YouTube channel at
Gaylynn NeatThingsBtq
Or, to view my videos here on the blog, click
video.

Here is another look.


Supplies:  Unity Stamp Co. Being There, Blossoming Beauty and Abundant Blessings; white embossing powder, embossing ink pad, double-sided foam and flat clear tape, alcohol ink, vellum, StazOn ink, paper trimmer, cardstock.

Thanks for visiting.  Have a wonderful day.
Gaylynn

6/08/2020

Fun fold cards ~ double gate fold, double easel & double side folds

Today, I am sharing three fun fold cards made during a recent retreat at the Pink & Main store in Athens, GA.  I am have not dabbled in fun folds in a very long time, but this was refreshing to do with pretty papers, stamps and dies.


Sentiment:  Let your faith be bigger than your fear.

First up is a double easel card with pretty papers and a big sentiment, front and center.
This may be called a step card, but I believe it is also a double easel card style.  Both the background and the sentiment tag sit upright once the card front is opened out.  This is A2 size and the teal card base opens like a regular top fold card.  I LOVE this design and will certainly be using this more often.


Next up, a double side fold card.


Sentiment:  Hello friend.  You are loved.

This butterfly card includes two fun fold side folds which interchange and open to the sentiment.  Again, we have lovely floral papers and sweet stamping.


Sentiment:  Life is tough, but darling, so are you.

Next up is a booklet style card made from a double gate fold technique, gorgeous papers and stamps.
This makes a smaller card when flat, but it expands once opened into interesting inside panels.  This is great for notes, art or photos for a mini photo album.  The front ties the card closed with a pretty ribbon.


It is in my plans to incorporate these techniques into separate videos in the future.

These projects do not include a video tutorial for this post.
However, for my projects with video tutorials, please see my YouTube channel at
Gaylynn NeatThingsBtq
Also, to view my videos here on the blog, click
video.

The supplies are patterned paper, cardstock, clear stamps, ink, dies and embellishments by Pink & Main.

I want to give a shout out to Michelle Currie, owner of Pink & Main, and her staff for the fabulous card class, stamps, dies, inks and more.  Also thanks for hosting the 2020 Unstoppable Retreat in Athens, GA.  This lovely store and class space are located inside the local mall.  It was great meeting Michelle and learning how her business expands beyond the store and extends with classes, their online shop, social media and their booth presence at craft events, year-round and more.

Thanks for visiting.  I would love to hear from you.
Gaylynn