6/30/2021

Lotus Flower Watercolor & Embossed Background Stamping Tutorial

 Combining lotus flower watercolor with pretty background embossing works perfectly together.  Today, on the Unity blog, I am sharing a way to pair the two techniques for one lovely card.


Sentiment:  You are remarkably made.

For this card, I wanted to use lotus flower watercolor along with a handmade background panel.  I used two techniques for this one, and I love the way it turned out.


Helpful tips:

Here are helpful tips for making this lotus flower watercolor card.  To begin, stamp the lotus flower twice onto watercolor paper.  Next, stamp and heat emboss the background waves onto color cardstock.  Also, stamp the sentiment on the same color cardstock.  Then, die-cut or trim the background panel.  Next, add watercolor to the flowers using the wet on wet technique.  Then, fussy cut (cut out) the flowers.  Finally, layer it all onto the card base, to finish.

Here is another look.


I made a quick video tutorial showing the process for this project.
{{Please subscribe to my video channel and like this video.  Many thanks.}}
YouTube:  Gaylynn NeatThingsBtq


 Supplies:

Also, Canson watercolor paper, white embossing powder, heat tool, original Misti, Wow embossing pad, Altenew watercolor half pans, watercolor brush, MFT dies & ink; foam and flat double-sided tape, cardstock.

 Be sure to visit the Unity blog for the entire article and tutorial.

Also, you can find my other features at Unity's
Technique Time and
Watercolor Wednesday.

This project is also included in the
Simon Says Stamp Wednesday Challenge ~ Anything Goes


Thank you for visiting.
   Gaylynn
         

6/28/2021

Popping by to say Hi popcorn tall or slimline card

 Hello.  The My Creative Time design team is sharing projects which are made in minutes, on our blogs.  My project today features a popcorn box as part of a tall or slimline card.


Sentiment:  Popping by to say Hi.

This card was easy to make using Emma's MCT dies and fun sentiment stamps.  I just cut from solid and patterned cardstock and paper for most of the pieces.  The sentiment was stamped and then cut into the banner shape.  Everything was shaded with ink blending around the edges.  I cut and scored the card base.  Finally, the card was layered and assembled to finish.
Card base:  cut 7 1/2" x 7 1/2", score 3 3/4"

Also, flat and foam double-sided tape, mini Misti, MFT cardstock & paper, Ranger distress oxide ink in walnut stain, ink blending brush, scoring board, Fiskars paper trimmer, envelope.

Please visit Emma's My Creative Time blog for more inspiration.

Thank you for visiting.

Gaylynn

6/23/2021

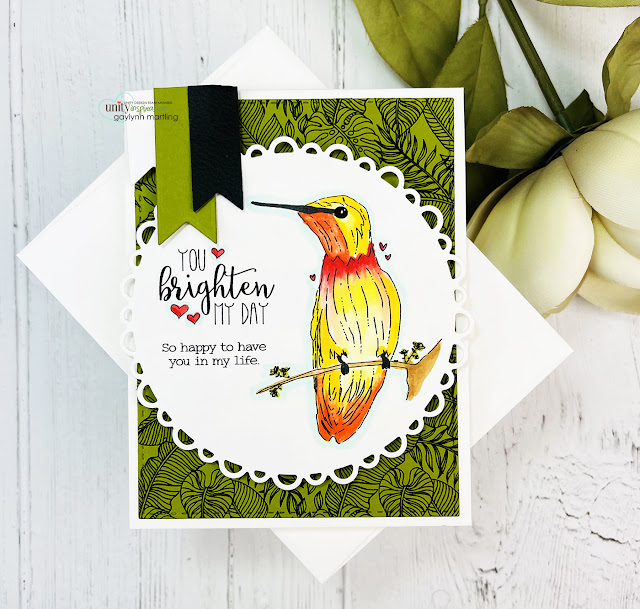
Hummingbird Copic coloring + tropical background ~ card tutorial

 Combining hummingbird Copic coloring with a pretty stamped background makes card making easy.  Today, on the Unity blog, I am sharing a way to add color to the bird while keeping the background stamping simple.


Sentiment:
You brighten my day.
So happy to have you in my life.

For this card, I added hummingbird Copic coloring over a palm background of the month color cardstock panel.  The combination of the sentiment kit with the background worked perfectly together.


Helpful tips:

Here are helpful tips for making this card with hummingbird Copic coloring.  To begin, stamp the palm background onto smooth green color cardstock using black ink.  Also, trim or die-cut the background card panel.  Next, stamp the bird and the two sentiments onto white cardstock, using Copic friendly ink.  Then, trim or die-cut the bird panel to fit over the background piece.  Next, add color to the bird panel in bright shades using Copics or your choice of color medium.  Also, make a flag accent by trimming and adhering three small overlapping flags.  Finally, assemble the card layers, to finish.

Here is another look.


I made a quick video tutorial showing the process for this project.
{{Please subscribe to my video channel and like this video.  Many thanks.}}
YouTube:  Gaylynn NeatThingsBtq


 Supplies:
Unity Stamp Co. Perfect Day Hummingbird {June 2021 sentiment kit} and Tropical Palm {background of the month June 2021}

Also, My Creative Time pretty scallop circle dies, rectangle frame die layers and heart label dies; Copic markers N9, E35, R24, YR09, R27, Y17, R02, Y13, Y11, 0, YG95; foam and flat double-sided tape, cardstock.

 Be sure to visit the Unity blog for the entire article and tutorial.

Also, you can find my other features at Unity's
Technique Time and
Watercolor Wednesday.

    Thank you for visiting.
   Gaylynn
         

6/18/2021

Popcorn ~ MCT 111th Edition Release & Blog Hop + 11th Birthday

 Hi, it's Gaylynn.  The My Creative Time 111th Edition release, sale and blog hop has begun.  We are also celebrating the 11th anniversary of My Creative Time.  Hooray!
For the blog hop, you may have arrived from Emily's blog.


Sentiment:  Smile

For this mini slimline card, I used the cute popcorn die as the focus. (There is also a tall version of this popcorn die available for the tall or longer slimline card styles.) I wanted the colors to be yellow, white and red. By die-cutting most of the layers, the card base and the envelope, everything was ready to assemble. Using extra tacky tape and foam tape, the card was layered and assembled, to finish.

 *** BLOG HOP GIVEAWAY ***
Leave your comments on each blog for a chance to win a $25 Gift Card to the My Creative Time store. One lucky winner will be chosen and noted on the MCT blog! GOOD LUCK my friends! (Please don't forget to leave a way/email for MCT to contact you, if you were to be one of the lucky winners.) 

Here is a peek at the 111th Edition MCT release items:


*** SALE ALERT ***
DON'T FORGET our sale starts RIGHT NOW HERE! Use the code: JUNE2021 to receive a 15% discount off of your entire purchase! This sale applies to "IN-STOCK" items ONLY. This sale will end on Friday, June 25, 2021, at midnight PST.
*** FREEBIE (ended)*** This is the freebie that Emma will be giving away to the first 25 shoppers on release day. And then, the More Sentiment Strip Dies will be available to purchase in the MCT store, but not part of the release bundle.
Here is another look at today's project.


Here are my sneak peek blog projects from this release.


Also, assorted patterned paper, MFT cardstock, flat and foam double-sided tape, score tape, Ranger multi medium matte glue.

Hop along with us.
Your next stop in the hop is Ginger's blog. The entire blog hop lineup is on the My Creative Time blog.

Thanks for visiting and hopping along. Happy 11th Birthday to MCT!

Gaylynn

6/17/2021

Mouse tag card tutorial ~ very light stamping & watercolor shades

 Today, I am sharing a tag card featuring light stamping and watercolor.  The idea was a  vintage or storybook look for this tutorial.


Sentiment:  Sending hugs.

Helpful tips:

To create this look, begin by stamping with very light waterproof ink onto the smooth side of watercolor paper.  I used a stamp positioner to repeat the stamping a few times.  Next, add light watercolor to accent the stamping.  Once dry, die-cut the stamping to fit onto the card base.  To accent, add a sentiment, cording and Nuvo drops.  Finally, assemble the card layers, to finish.

Here is another look.


I made a quick video tutorial showing the process for this project.
{{Please subscribe to my video channel and like this video.  Many thanks.}}
YouTube:  Gaylynn NeatThingsBtq


 Supplies:
Unity Stamp Co. Timerland Mouse and Here's A Hug {die}. 
Also, original Misti, Zig clean color real brush in 071, 045, 028, 036; paint brush, MFT natural hybrid ink pad and stitched traditional tag STAX die-namics; cording, Nuvo crystal drops in bright gold, Altenew palette mat, Ranger plastic craft mat & multi medium matte glue; Canson watercolor paper, stamp scrubbie, gold glitter cardstock, foam double-sided tape. 
 
Thank you for visiting. 
Gaylynn

Popcorn Box ~ Day 4 MCT 111th Edition Sneak Peeks

 Hello, it's Gaylynn.  The My Creative Time 111th Edition release and 11th anniversary celebration is coming up tomorrow.  But for today, the team is sharing Day 4 sneak peeks.


Sentiment:  You're invited to a movie night.  Admit one.

***Sneak Peek Giveaway!***
We will be giving away the sets we are showcasing each day to ONE lucky winner! ALL winners will be announced on Emma’s blog on Friday during the blog hop! ALL you have to do is leave a comment on each of our blogs! You are NOT required to comment on EVERY SINGLE blog, but the more you comment on, the more chances you have for winning! VERY IMPORTANT, PLEASE leave a way for us to contact you with your comment just in case "YOU" are the lucky winner! For EXTRA entries, you can spread the word about this release on Facebook OR even Instagram! #mycreativetime! GOOD LUCK EVERYONE. Let's start spreading the word!

Supplies for today's project: My Creative Time Popcorn Treat Box Die, Another Date Night, Label Dies; score tape, foam double-sided tape, cardstock, DCWV black & white foil paper, MFT ink.

See more inspiration on the My Creative Time blog.

Thanks for visiting. Have a great day.

Gaylynn

6/16/2021

BBQ Masculine Card + Copic markers & ink blending tutorial

 Masculine card making is easy with Unity stamps and color.  Today, on the Unity blog, I am sharing a way to add color to masculine stamping for a BBQ scene.


Sentiments:
King of the grill.  Happy birthday.
Wishing you a perfect day. 

For this card, I added Copics plus distress oxide ink blending to build color.  This complements the masculine card making process.


Helpful tips:

Here are helpful tips for this example of masculine card making.  To begin, stamp the grill items onto cardstock using Copic friendly ink.  Next, trim or die-cut the stamped panel to fit onto the card base.  Then, add ink blending in two colors around the edges of the stamped panel.  Next, add color to the grill stamping.  I used Copic markers for this example.  Optional, add a sentiment panel.  Finally, layer it all onto the card base, to finish.

Here is another card version.


I made a quick video tutorial showing the process for this project.
{{Please subscribe to my video channel and like this video.  Many thanks.}}
YouTube:  Gaylynn NeatThingsBtq


 Supplies:
Unity Stamp Co. Barbecue King and Perfect Day Hummingbird. 
Also, Ranger distress oxide ink peeled paint & broken china & plastic craft mat; ink blending brush, My Creative Time etched edge frame dies & heart label dies; Gelly Roll pen #10, Copic markers C6, N3, R24, E13, E33, E37, E18, Y26, R27, R02, YR23, Y11, C1, BG0000, YG13, G07, 0; heat tool, foam double-sided tape, cardstock.

 Be sure to visit the Unity blog for the entire article and tutorial.

Also, you can find my other features at Unity's
Technique Time and
Watercolor Wednesday.

    Thank you for visiting.
   Gaylynn
         

Popping Birthday ~ Day 3 MCT 111th Edition Sneak Peeks

 Hello, it's Gaylynn.  The My Creative Time 111th Edition release is coming up on Friday.  But for today, the team is sharing Day 3 sneak peeks.


Sentiment:
Hope your birthday is popping!

For this fun card, I die-cut the elements onto polka dot patterned paper.  This provided a colorful and easy assembly.  For depth, I added ink blending around all of the pieces prior to layering it all onto the card front.  Finally, I added twine and a button, to finish.


***Sneak Peek Giveaway!***
We will be giving away the sets we are showcasing each day to ONE lucky winner! ALL winners will be announced on Emma’s blog on Friday during the blog hop! ALL you have to do is leave a comment on each of our blogs! You are NOT required to comment on EVERY SINGLE blog, but the more you comment on, the more chances you have for winning! VERY IMPORTANT, PLEASE leave a way for us to contact you with your comment just in case "YOU" are the lucky winner! For EXTRA entries, you can spread the word about this release on Facebook OR even Instagram! #mycreativetime! GOOD LUCK EVERYONE. Let's start spreading the word!

Here is another look.


Supplies for today's project: My Creative Time Cute Popcorn Die, Another Date Night, Label Dies and Rectangle Frame Die Layers; flat and foam double-sided tape, cardstock, Ranger distress oxide ink in walnut stain, MFT & BasicGrey patterned paper, MFT ink; button, twine.

See more inspiration on the My Creative Time blog.

Thanks for visiting. Have a great day.

Gaylynn

6/15/2021

Date night ~ Day 2 MCT 111th Edition Sneak Peeks

 Hello, it's Gaylynn.  The My Creative Time 111th Edition release is coming up on Friday.  But for today, the team is sharing Day 2 sneak peeks.


Sentiment:
You're booked for a date night.

This is a fun date night movie themed card. It features popcorn, drink and a movie icon along with the sentiment label. I used Copic friendly ink for the stamping along with Copic markers. Also, I added a bit of distress ink masking for the background.
***Sneak Peek Giveaway!***
We will be giving away the sets we are showcasing each day to ONE lucky winner! ALL winners will be announced on Emma’s blog on Friday during the blog hop! ALL you have to do is leave a comment on each of our blogs! You are NOT required to comment on EVERY SINGLE blog, but the more you comment on, the more chances you have for winning! VERY IMPORTANT, PLEASE leave a way for us to contact you with your comment just in case "YOU" are the lucky winner! For EXTRA entries, you can spread the word about this release on Facebook OR even Instagram! #mycreativetime! GOOD LUCK EVERYONE. Let's start spreading the word!

Here is another look.


Supplies for today's project: My Creative Time Another Date Night and Label Dies; foam double-sided tape, cardstock, Ranger distress ink in pumice stone, Post-It tape, MFT cardstock and ink; Copic markers R27, Y21, Y11, C1, C3.

See more inspiration on the My Creative Time blog.

Thanks for visiting. Have a great day.

Gaylynn

6/14/2021

Cheers ~ Day 1 Sneak Peek MCT 111th Edition

Hello, it's Gaylynn.  The My Creative Time 111th Edition release is coming up on Friday.  But for today, the team is sharing Day 1 sneak peeks.


Sentiment:
Cheers.  You are simply the best.


This card was made for celebrations like graduation, good grades, promotion, birthday and so many other occasions. I added circles in the background with one of the new big word dies along with a coordinating sentiment strip and gold dots. This is a clean and simple design.
***Sneak Peek Giveaway!***
We will be giving away the sets we are showcasing each day to ONE lucky winner! ALL winners will be announced on Emma’s blog on Friday during the blog hop! ALL you have to do is leave a comment on each of our blogs! You are NOT required to comment on EVERY SINGLE blog, but the more you comment on, the more chances you have for winning! VERY IMPORTANT, PLEASE leave a way for us to contact you with your comment just in case "YOU" are the lucky winner! For EXTRA entries, you can spread the word about this release on Facebook OR even Instagram! #mycreativetime! GOOD LUCK EVERYONE. Let's start spreading the word!

Here is another look.


Supplies for today's project: My Creative Time More Big Word Dies, More Sentiment Strip Dies, Big Word Sentiments, Linked Circles Die; foam double-sided tape, cardstock, Nuvo crystal drops bright gold, multi medium matte glue, MFT cardstock and ink.

See more inspiration on the My Creative Time blog.

Thanks for visiting. Have a great day.

Gaylynn

6/09/2021

Watercolor pencils, stamping & sketching ~ frog card tutorial

 Stamping and sketching provide fun background scene building details.  Today, on the Unity blog, I am sharing a way to sketch a stage scene for this adorable stamped frog.  Intense watercolor pencils were used for color.


Sentiments:
You are pretty much amazing!
Hi there.  How are you?

For this card idea, I wanted the frog to have a stage.  So, I made two similar cards by stamping and sketching the stage background scene.  The stamped frog and sentiment are showcased right in the center.


Helpful tips:

Here are helpful tips for card stamping and sketching.  To begin, stamp the frog onto watercolor paper using waterproof ink.  Also, stamp and trim the sentiments.  Next, sketch lightly around the frog to create curtain creases and a stage floor.  Then, using watercolor pencils, lightly sketch the pencil colors then blend them out one color at a time for watercolor.  Next, trim or die-cut the dried frog scene panel to fit onto a card front.  Finally, assemble the layers to finish.

Here is another frog card version.


I made a quick video tutorial showing the process for this project.
{{Please subscribe to my video channel and like this video.  Many thanks.}}
YouTube:  Gaylynn NeatThingsBtq


 Supplies:
Unity Stamp Co. Salutation Toad. 
Also, Derwent Inktense watercolor pencils 2400, 1740, 1530, 2100, 0400; paint brushes, heat tool, black embossing powder, Wow embossing pad, Altenew palette mat, Fiskars paper trimmer, mini Misti, MFT extreme black hybrid ink pad, A2 stitched rectangle STAX & stitched modern rectangle die-namics; foam double-sided tape, Ranger plastic craft mat & watercolor paper; cardstock.

 Entered into:
Simon Says Stamp Wednesday Challenge ~ Create A Scene 


Be sure to visit the Unity blog for the entire article and tutorial.
Also, you can find my other features at Unity's
Technique Time and
Watercolor Wednesday.

    Thank you for visiting.
   Gaylynn