1/29/2021

Sakura Koi watercolor tones + stamping card tutorial.

 This is an inspirational slimline card featuring Sakura Koi watercolor tones with stamping.  I used blends of watercolors for this slimline or tall style card.

Sentiment:
Do small things with great love. ~ Mother Teresa

Helpful tips:
Here are helpful tips for creating this inspirational slimline card.  To begin, stamp the hands and the sentiment onto the smooth side of watercolor paper.  Next, mix watercolor to the shades you want for the stamping.  I chose to mix colors to get the tones that I was looking for.  Then, add color and blend the color out with a wet paint brush.  Also, add more color layers if you want to.  Next, trim or die-cut a slimline or tall card base and card layers.  Also, Finally, layer everything to finish.

This card base was cut 7 1/2" x 7 1/2" and scored at 3 3/4" to coordinate with the MCT tall die-cut layers.

I made a video tutorial showing the process for this project.
{{Please subscribe to my video channel and like this video.  Many thanks.}}
 

Here is another look:


Supplies:  Unity Stamp Co. Together We Do More and Small Things, Great Love.
Also, My Creative Time Tall Frame Dies, and Tall Frame Die Layers; adhesive gems, flat double-sided tape, Sakura Koi watercolor, Ranger watercolor paper and plum archival ink; Altenew palette mat, watercolor brush, heat tool.

Thank you for visiting.
Gaylynn

Flip-Up Card ~ MCT 48 Hour Flash Sale & Blog Hop

 Hi, it's Gaylynn here. Welcome to another My Creative Time "48 Hour Flash Sale" and blog hop. This sale is for 48 hours ONLY that is going on right NOW and will end on Sunday, January 31, 2021 at 7am PST. Use the code FLASH at checkout to get 20% off of your entire "in-stock" only purchase! Sale applies to in-stock items only! Start shopping HERE. For the blog hop, you may have arrived from Emily's blog.

Sentiment: Thank you.

Today's card is a thank you card that doubles as a gift card holder. there is a flip-up gift card holder on the card front. This is great for thanking someone and it is great for a man or a woman. It can be an easy masculine card also. For this one, I used kraft and navy blue papers along with amazing die-cuts by MCT.

In addition to our sale, we are ALSO showcasing a brand new die set! It is called “FANCY GIFT CARD HOLDER DIE”. This new set is available for purchase HERE.

GIVEAWAY!
Leave your comments for a chance to win a $25.00 Gift Card to the "My Creative Time" store! Don't forget to leave a way for us to contact you "just in case" YOU are the LUCKY winner! Good Luck!


Don't forget to use the code FLASH at checkout to get 20% off of your entire "in-stock" only purchase!

Supplies:  My Creative Time Fancy Gift Card Holder Die, Rectangle Frame Die Layers and Belly Band Dies; navy blue cardstock, TCWV kraft color cardstock, adhesive gems, cardstock, Ranger multi medium matte glue and flat clear double-sided tape.

Your next stop in the blog hop is Ginger's blog.


The entire hop lineup is on Emma's My Creative Time blog.

Remember to leave comments along the way on the blog hop for MCT prize chances.
Thanks for stopping by.

Gaylynn

1/28/2021

Puppy dog slimline card with Copic marker blending.

 This is a sweet puppy dog slimline card featuring pet-themed stamping.  I used stamping along with blends of Copic coloring, Unity paper and also die-cutting.


 Sentiment:  Sending puppy kisses.

Helpful tips:
Here are helpful tips for creating this puppy dog slimline card.  To begin, stamp the puppy and add the colors of choice.  I chose to use a blend of Copic markers to create a similar color scheme as one of the pups in the family.  Next, fussy cut (cut out) the dog stamping.  Then, trim or die-cut a slimline or tall card base and card layers.  Also, make dog bone-shaped cutouts or die-cuts using patterned paper and layers.  Finally, layer everything to finish.

This card base was cut 7 1/2" x 7 1/2" and scored at 3 3/4" to coordinate with the MCT tall die-cut layers.


I made a video tutorial showing the process for this project.

{{Please subscribe to my video channel and like this video.  Many thanks.}}
YouTube:  Gaylynn NeatThingsBtq


Here is another look:


Supplies:  Unity Stamp Co. Love Puppies and Pretty Polkas {paper pack}.
Also, My Creative Time Tall Frame Dies, Tall Paw Frame Dies and Doggies and Kitties; adhesive pearls, flat and foam double-sided tape, Copic markers C9, C7, C5, C3, E71, E18, E15, E13, E11, R02, R27.

Thank you for visiting.
Gaylynn

1/27/2021

Simple flower jar monochromatic card tutorial

 For Technique Time on the Unity Stamp Company blog, I am sharing a monochromatic card featuring simple flower jar stamping.  This is easy card making with beautiful results.


Sentiment:  Sending smiles across the miles.

Using a similar color family of products gives the most beautiful look for monochromatic card making.

Helpful tips:
Here are helpful tips for creating this monochromatic card.  To begin, stamp the flower jar onto a mint or turquoise color cardstock sheet using ink in the same color family.  Then, once dry, add the sentiment partially over the flowers, using white heat embossing.  Next, die-cut or trim the flower panel for your card base.  Also, add cording around the front of the main card base.  Then add the flower jar panel over the cording.  Finally, add pearl embellishments, to finish.


Here is another look.


Supplies:  Unity Stamp Co. Simply Blessed.
Also, foam double-sided tape, cardstock, heat tool, My Favorite Things Elegant Rectangle STAX die-namics; Mini Misti, Pink & Main skyscraper surface ink, adhesive pearls, cording, Wow embossing pad, white embossing powder.

Be sure to visit the Unity blog for the entire article and tutorial.
Also, you can find my other features at Unity's
Technique Time and
Watercolor Wednesday.


Thank you for visiting.
Gaylynn

Valentine Pillow Box Favor Wrap ~ MCT 3-D Wednesday

 Hello.  The My Creative Time design team is sharing 3-D project ideas.  For today, I am sharing a mini Valentine pillow box favor wrap.

Sentiment:  Be mine.

This little favor box is all decorated for Valentine's Day.  I made a heart window to show the treats peeking through.  It was easy to make with the pillow box die set and sentiment.  It was easily accented with red and white twine, another heart and sentiment tab.  The pillow box measures approximately 3 1/4" x 1 1/4" x 3 1/4" assembled.

Supplies:  My Creative Time Love You Lots and Fancy Pillow Treat Box Die; Ranger archival jet black ink, acetate, twine, cardstock.

Please visit Emma's My Creative Time blog for more inspiration.

Thank you for visiting.

Gaylyn

1/20/2021

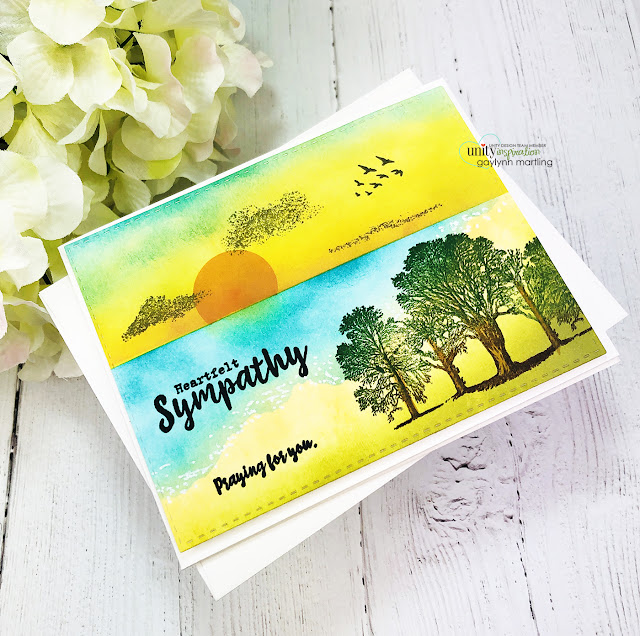
Beach sympathy one layer card ~ masking & ink tutorial

 Hello.  For Technique Time at Unity, I am sharing a one layer card with a beach theme and with sympathy sentiments.  I show techniques for masking and ink blending.


Sentiment:
Heartfelt sympathy.  Praying for you.

The layers of ink combined with creative masking makes this one layer card come to life.  Many different stamps can be used to accent this tropical beach background.

Helpful tips:
Here are helpful tips for creating this one layer card beach scene.  To begin, trim a piece of cardstock a little larger than A2 size.  Mask a horizon using post-it tape.  Begin ink blending the water using torn cardstock for masking.  Next, mask the water area to blend a sunset sky scene.  Then, add more blending for the shoreline and the grassy areas.  Next, using the original Misti, stamp the sun over the partially masked area and also the clouds, the birds, trees and the sentiments.  Also, trim or die-cut the scene to fit.  Finally, layer the scene panel using foam or flat double-sided tape or glue, to finish.


I made a quick video tutorial showing the process for this project.
{{Please subscribe to my video channel and like this video.  Many thanks.}}
YouTube:  Gaylynn NeatThingsBtq


Here is another look.


This project is included in:

Supplies:  Unity Stamp Co. No Better Words.
Also, foam and flat double-sided tape, cardstock, heat tool, My Creative Time rectangle frame die layers; Ranger archival ink in pale ochre, Venetian orange, potting soil, olive, watering can, jet black; Ranger distress ink in peacock feathers; distress oxide ink in spiced marmalade, fossilized amber, peeled paint and broken china; Ranger plastic craft mat, ink blending brush, Sharpie white paint pen, Post-It tape, Original Misti.

Be sure to visit the Unity blog for the entire article and tutorial.
Also, you can find my other features at Unity's
Technique Time and
Watercolor Wednesday.


Thank you for visiting.
Gaylynn

1/16/2021

Watercolor contrast Iris flower card tutorial ~ sympathy

 This is a sympathy card featuring a beautiful Iris flower.  I used stamping along with Sakura Koi watercolor with contrast to create this.  The added sentiment is great for showing care and concern.

 Sentiment:
May you find comfort in loving memories, strength in the support of those who care and hope in each new day.

Helpful tips:

Here are helpful tips for creating this watercolor Iris flower card.  To begin, stamp the Iris flower onto watercolor paper.  Also, stamp the sentiment.  Next, using a paint brush, add watercolor in dark blue in tiny sections where there would be shadows or creases.  Then, with a damp brush, blend out from the dark areas to move the color into the petal areas.  Finally, once dry, trim or die-cut the Iris panel and layer the card, to finish.

I made a quick video tutorial showing the process for this project.
{{Please subscribe to my video channel and like this video.  Many thanks.}}

Here is another look:


Supplies:  Unity Stamp Co. Care And Hope Iris.
Also, Sakura Koi watercolor, Ranger watercolor paper, archival ink, My Favorite things stitched mini scallop rectangle STAX die-namics, heat tool, flat and foam double-sided tape, paint brush, Altenew palette mat.

Thank you for visiting.
Gaylynn

1/15/2021

Butterfly, card background cuts & Copic markers ~ tutorial

 For today's card, I am sharing a butterfly card set against a stamped print offset background layer.  It is a love-themed card, great for Valentine's Day, anniversary or love occasions.

Sentiment:  Love, hugs & kisses.

Helpful tips:
Here are helpful tips for creating this butterfly card.   To begin, stamp a background panel and a butterfly panel with  Copic friendly ink.  Next, trim or die-cut an offset shaped panel for the background.  Then color in the butterfly with Copic markers or your markers.  Next, fussy cut (cut out) the butterfly.  Also, onto a kraft color card base, heat emboss the sentiment in white.  Finally, layer everything onto the card front, to finish.

I made a quick video tutorial showing the process for this project.
{{Please subscribe to my video channel and like this video.  Many thanks.}}
YouTube:  Gaylynn NeatThingsBtq


Here is another look.


Supplies:  Unity Stamp Co. Love Story Background, Falling Into Place and So Very Grateful
Also, My Favorite things stitched scallop basic edges die-namics, Wow embossing pad, white embossing powder, walnut stain distress ink pad, heat tool, EK powder tool, kraft cardstock, flat and foam double-sided tape, Copic markers R27, R02, G99, G21, BG32, BG10, BG49.

Thank you for visiting.
Gaylynn

Gift Card Idea ~ MCT 107th Edition Release, Sale & Blog Hop

 Hello, it's Gaylynn.  The My Creative Time 107th Edition release, sale and blog hop has begun.

For the blog hop, you may have arrived from Emily's blog.


Sentiment:
LOVE
Lots of love

This gift card holder was put together easily using some of the tall dies along with the new love-themed stamps and dies.  I just folded the tall pieces in half to form a mini card.  Then, I added the gift card die-cuts to the inner folded flap only.  To finish, everything was layered on the front side and the gift card sample was placed inside.


 *** BLOG HOP GIVEAWAY ***
Leave your comments on each blog for a chance to win a $25 Gift Card to the My Creative Time store. One lucky winner will be chosen and noted on the MCT blog! GOOD LUCK my friends!
(Please don't forget to leave a way/email for MCT to contact you, if you were to be one of the lucky winners.) 


*** SALE ALERT ***
DON'T FORGET our sale starts RIGHT NOW HERE! Use the code: JAN2021 to receive a 15% discount off your entire purchase! This sale applies to "IN-STOCK" items ONLY. This sale will end on Friday, January 22, 2021, at midnight PST.

***FREEBIE*** Starting this Friday, January 15, 2021, at 8am PST, we will be giving away this new die set “Gift Card Helper Dies”! This new die set will be given to the FIRST 25 shoppers for FREE! If you are one of the first 25 shoppers, this die set will automatically be added to your package/order. Once 25 shoppers come through, this die will be available for purchase! So, if you see this die available in the store, you were not one of the first 25 shoppers. No exceptions will be made. This freebie die is not part of the “bundle” and will be sold separately! (The freebie has ended.)

Here is the inside.

Here are my sneak peek blog projects from this release.

Day 2


Supplies for today's project: My Creative Time Big Love Die, Love You Lots, Gift Card Helper Dies, Tall Frame Dies, Tall Scallop Frame Dies; silver glitter paper, cardstock, cording.

Hop along with us.

Your next stop in the hop is Ginger's blog. The entire blog hop lineup is on the My Creative Time blog.

Thanks for visiting. I look forward to your comments.

Gaylynn


1/14/2021

Pillow Box ~ MCT 107th Edition Sneak Peek Day 4

 Hello, it's Gaylynn.  The My Creative Time 107th Edition release is coming up on Friday.  But for today, the team is sharing Day 4 sneak peeks.


Sentiments:
You are loved.
Happy Valentine's Day

To create this pillow box treat or favor wrap, simply die-cut the box onto solid or patterned paper.  I used part of a double-sided sheet of K & Company 12" x 12" patterned paper.  Also, die-cut the heart twice.  Next, stamp the sentiment and then die-cut with the label layers.  Then, to assemble, simply fold the pillow box together.  I used adhesive on the side folds, but a ribbon or twine tie will keep it closed as well.  Layer the front, to finish.
This mini gift box measures approximately 3 1/4" x 3 1/4" assembled.

***Sneak Peek Giveaway!*** We will be giving away the sets we are showcasing each day to ONE lucky winner! For example, the set we are showcasing on Wednesday, Emma will announce the winner of that on Thursday and the sets we are showcasing on Thursday, Emma will announce that winner on Friday on the MCT blog! ALL you have to do is leave a comment on each of our blogs! You are NOT required to comment on EVERY SINGLE blog, but the more you comment on, the more chances you have for winning! VERY IMPORTANT, PLEASE leave a way for us to contact you with your comment just in case "YOU" are the lucky winner! For EXTRA entries, you can spread the word about this release on Facebook, tweet about it OR even Instagram it! #mycreativetime! GOOD LUCK EVERYONE and let's start spreading the word!

Supplies for today's project: My Creative Time Fancy Pillow Treat Box Die, Heart Label Dies and Love You Lots; K & Company 12" x 12" patterned paper, silver cardstock, cording, flat double-sided adhesive, Ranger archival jet black ink.

See more inspiration on the My Creative Time blog.

Be sure to stop by tomorrow for the full MCT release and blog hop.
Thank you. I look forward to your comments.

Gaylynn

1/13/2021

Cute Winter Animals ~ MFT Stamps Color Challenge 156

Hello.  Today, I am playing with My Favorite Things stamps and dies.  Also, I am participating in their color challenge 156 this week.  This is a sweet winter thank you card using a window pane stencil to build the scene.  I also used inspiration from their recent sketch challenge.


Sentiment:  Thanks for giving me the lift I needed.

For this card, I used many of the cute animals in the stamp set.  I used bears, a seal, a fox, penguins and some fish.  The window was stenciled using a few different inks.  Then, all of the stamping was colored in with Copics, die-cut and placed in the little window scene.

Here is another look.


Supplies:  My Favorite Things Stamps Partners In Adventure stamps, Partners In Adventure Die-namics, A2 Stitched Rectangle STAX die-namics Set 1, Window Panes stencil, Extreme Black ink and Sweet Tooth ink; Copic markers C5, C3, C1, W5, W1, YR0000, B01, B14, B37, B32, 0; white embossing powder, heat tool, Original Misti, cardstock, distress oxide ink faded jeans, Hero Arts ink cornflower, Ranger watering can ink, blending brush.

Thanks for visiting.  Have a terrific day.

Gaylynn  

Tropical beach seashells girl ~ embossing on kraft tutorial

 Hello.  For Technique Time at Unity, I show distress embossing on kraft color cardstock for this tropical beach girl card.  I also use Copic coloring for the girl.


Sentiment:  A day at the beach restores the soul.

The distress embossing on kraft color cardstock process provides rich colors for both the background and for the girl.  Kraft color cardstock helps to achieve the look.

Helpful tips:
Here are helpful tips for creating this card using distress embossing on kraft.  To begin, stamp the background and the sentiment onto a larger sheet of kraft color cardstock using light ink.  Also, keep the stamp in place and mark the paper placement.  Next, stamp the girl using Copic friendly ink.  Then, add two colors of distress ink blending onto the seashell stamping.  Next, place the background panel back into the Misti the same way as before, then stamp the shells again using embossing ink.  Then add white embossing powder and heat set.  Also, trim or die-cut the background to fit your card front.  I used waxed paper over the embossing prior to die-cutting.  For the girl, add Copic coloring and then fussy cut (cut out) the girl.  Finally, assemble the card layers, to finish.


I made a quick video tutorial showing the process for this project.
{{Please subscribe to my video channel and like this video.  Many thanks.}}
YouTube:  Gaylynn NeatThingsBtq


Here is another look.


Supplies:  Unity Stamp Co. She Sells Sea Shells {background} and Beach Girl.
Also, foam and flat double-sided tape, cardstock, heat tool, My Creative Time rectangle frame die layers; Ranger archival ink in pale ochre and coffee plus distress oxide ink in walnut stain and broken china; white embossing powder, Original Misti, Wow embossing pad, MFT extreme black ink, Copic markers E13, E33, E11, E00, B05, BG15, B0000, BG32, B01, 0.

Be sure to visit the Unity blog for the entire article and tutorial.
Also, you can find my other features at Unity's
Technique Time and
Watercolor Wednesday.


Thank you for visiting.
Gaylynn

Gift Card ~ MCT 107th Edition Sneak Peeks Day 3

Hello, it's Gaylynn.  The My Creative Time 107th Edition release is coming up on Friday.  But for today, the team is sharing Day 3 sneak peeks.


Sentiment:  LOVE

Here is a slimline or tall style love card that doubles as a gift card holder.  For this card, I used the new love die-cuts, the tall dies and layers plus the gift card helper dies.  The little notches are cut perfectly to fit a gift card almost anywhere on a card, tag or favor.  The possibilities are limitless.  This card is made for many occasions including Valentine's Day, anniversary, I love you, wedding or any love occasion.  I can also be for a guy or gal.

Card base cut 7 1/2" x 7 1/2"
Score at 3 3/4"

***Sneak Peek Giveaway!*** We will be giving away the sets we are showcasing each day to ONE lucky winner! For example, the set we are showcasing on Wednesday, Emma will announce the winner of that on Thursday and the sets we are showcasing on Thursday, Emma will announce that winner on Friday on the MCT blog! ALL you have to do is leave a comment on each of our blogs! You are NOT required to comment on EVERY SINGLE blog, but the more you comment on, the more chances you have for winning! VERY IMPORTANT, PLEASE leave a way for us to contact you with your comment just in case "YOU" are the lucky winner! For EXTRA entries, you can spread the word about this release on Facebook, tweet about it OR even Instagram it! #mycreativetime! GOOD LUCK EVERYONE and let's start spreading the word!

***FREEBIE*** Starting this Friday, January 15, 2021, at 8am PST, we will be giving away this new die set “Gift Card Helper Dies”! This new die set will be given to the FIRST 25 shoppers for FREE! If you are one of the first 25 shoppers, this die set will automatically be added to your package/order. Once 25 shoppers come through, this die will be available for purchase! So, if you see this die available in the store, you were not one of the first 25 shoppers. No exceptions will be made. This freebie die is not part of the “bundle” and will be sold separately!

Here is another look.


Supplies for today's project: My Creative Time Big Love Die, Gift Card Helper Dies, Tall Frame Dies and Tall Frame Die Layers; silver glitter cardstock, colored cardstock.

See more inspiration on the My Creative Time blog.

Thanks for visiting. I look forward to your comments.

Gaylynn